On Location Shoot: Portrait with Sun on the Shoulder with ND Filter
Lesson 12 from: Strobe Lighting on LocationJoel Grimes
On Location Shoot: Portrait with Sun on the Shoulder with ND Filter
Lesson 12 from: Strobe Lighting on LocationJoel Grimes
Lesson Info
12. On Location Shoot: Portrait with Sun on the Shoulder with ND Filter
Lessons
Class Introduction
06:48 2Develop your Artistic Vision
20:22 3Learn Strobe Basics
19:21 4Which Strobe Is Best For You?
17:36 5Strobe Questions Answered
15:33 6Balance Strobes with Ambient Light
14:27 7The Sunny 16 Rule
16:12 8Choose the Right Modifier for Strobes
28:02On Location Shoot: Overpower Sunlight with Strobes
24:01 10Create Shallow Depth of Field Using Strobes Outdoors
23:49 11On Location Shoot: Portrait in the Shade with ND Filter
21:19 12On Location Shoot: Portrait with Sun on the Shoulder with ND Filter
17:48 13On Location Shoot: Portrait Using Strobes & Wide Angle Lens
14:41 14Shoot: Use Strobes with Props
17:07 15Shoot: Shooting into Sun with Strobes
22:27 16Shoot: Increase Strobe Power while Shooting in Sunlight
10:46 17Understand 32 Bit Depth
20:03 18HDR Bit Depth with Strobes
16:36 19How to Use the CamRanger for HDR Portraits
33:35 20On Location Shoot: Setting Up the Lights in Boxing Gym
13:55 21On Location Shoot: 3 Light Edge Portrait with Strobes
21:45 22On Location Shoot: Portrait Using Top Light with Strobes
18:10 23On Location Shoot: Create a Dramatic Portrait with Strobes
19:26 24Strobes & Textured Background for Character Portraits
09:44 25Shoot: Set-up the Gear for Portrait
16:07 26Shoot: One Strobe Portrait with Gray Backdrop
26:30 27Shoot: One Strobe Portrait with Textured Background
13:32 28Shoot: Using HDR for One Strobe Portrait
08:55 29Setting up Post Production Workflow
16:02 30Photoshop® Workflow: HDR Boxing Gym Portrait Shoot
14:35 31Photoshop® Workflow: HDR Portrait with Stitching
37:51Lesson Info
On Location Shoot: Portrait with Sun on the Shoulder with ND Filter
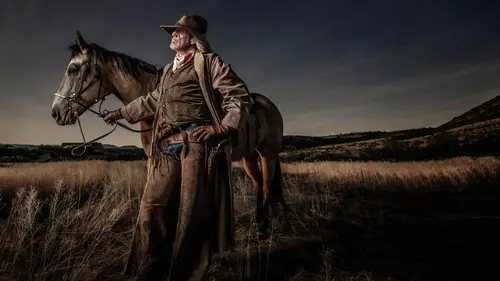
So this next scenario what I really wanted to do, was the sun hitting her shoulder. But by the time we got in position, the sun was gone. However, that soft light still hitting her, can shape a little bit of value on her shoulder, even though it's not direct sunlight, it's just kind of a soft light, so it's a big canopy light coming over the top. So let's go to that and view, let's go enter full screen and hit here we go Alright. So, the goal here is to get the sun, which is kinda going behind a cloud, on her shoulders. So what this does is this gives me a second light source to give a little bit of an edge light. That's my goal, it's to get a little edge light. So let's take a look here. Alright, Cliff, I need about three more inches on that thing Here. There you go. I could take ... I have these big-- You'll see one here, this afternoon, on the roof, a big huge avenger stand. It's actually like a movie stand, almost. This gives the video, film and video. We could se that up and also ...
have Cliff, or an assistant just hold it and keep the wind blowing, whatever, put sandbags on it if you want. I could put it on a light stand, you probably wouldn't want one of those- I have a stacker stand that's a little- Manfrotto stacker stand, that could hold it, but it'd be like kinda, you know. What this hopefully does, is give me the ability to say, Hey Cliff, move it left, move it right, whatever. It's pretty easy to move around. You don't have to have a painter's pole with this system up there. I'm doing it her to make a little bit easier, makes sense? But, if you're by yourself, which I do lot by the way, I would put it on a stand, a big stand with a couple sandbags, and then position her underneath. The only thing is, every time I wanna move her I gotta pick it up and move it. That means I don't have to go to the gym that day. It's my workout. But you don't have to have a painter's pole set up to do this. I just wanna make sure that's clear. That's good Okay Alright, I still have my three stop ND. Yep. Oh no. Thank you John, you are smarter than me. Okay. Alright here we go. Ready? One two three. And I don't really want the tree behind her, so let's take a look here, so I'm gonna move this way. So I have an open patch of foliage. Lets try it again. So I do see a little bit- a glow on her shoulders, not much. So let's go to 13th and a second here. Let me see what that looks like. Probably too much. I'll go back to 20 and let's just move in. I'm gonna move in here. And that's sprinkling. (camera clicking) Did you guys see the highlights? These highlights on her shoulders. If we had a little more sun it would pop. That looks beautiful. I'm gonna down power this light a little bit. So just tip it toward me. The other thing too is I had my radio poppers on there, which give me ability to power up and power down my light from- remotely. However, we ran out of batteries, we got low, and then I couldn't figure out all the times. So I had to quickly pull out my standard Paul C. Buff triggers, which do not allow me to remotely power up and power down. So, like my cannon system now, I have a cannon 600s, I have a commander that I can power up and down on the spot. Actually I can do it from the back of my camera, on the menu of my camera. I've been doing that a lot. This way you gotta go, walk over and physically turn up or turn down. It's kind of a hassle. Once you get used to the remote, this is a pain. Of course, I've been doing this for, How long? 25 years. Powering up, powering down without remote. We're getting a little spoiled, with these new tools. But they don't always work perfectly, cause, I don't know, the battery went dead, then- We're gonna try it on the roof, we're gonna go back to the radio poppers. That' why I have to walk over now and do that. One, two, three. We're gonna get a third stop down. Cause it's just over powering a little too much. Poor Sofia is getting all wet here. Okay, one two three. Gorgeous Gorgeous so the skin on her shoulders look beautiful. Look at that. It's working. It would work more if we had a little more sun, but- you can see it here. Okay, I'm gonna move in a little tighter here. Still 200 millimeter, but let's do horizontal here. Okay, change my focus point. Right about here. Okay, now bring a hand into the picture. Okay, now we can go- I don't think so- I think we're doing good now, because we don't need the fill because- oops, sorry. One, two, three. Because of the- this now- the ambiance bouncing around. That's probably too long. I got to the point where my shutter speed, again, started getting too long. And now you're losing the effect of the strobe. There's that threshold that you gotta be careful. By shortening my shutter speed, I now can go back to where the strobe starts to stand out. Does that make sense? (traffic in the background) Let me do this. I'm gonna swing that direction. Okay? Alright, so now what I'm gonna try is, instead of being at 30 for the second, which is a little bit slow on the shutter speed, could risk a little bit of movement, I'm gonna- because the sun basically went behind a cloud, I can now try to take the three stop ND filter off as one of my variables. To do that now I need three stops more exposure power in my light. So let's go do that. So we're gonna go over here, and go one, two, three, four, five, six, seven, eight, nine, ten. one, two, three, four, five, six, seven, eight, nine, ten. one, two, three, four, five, six, seven, eight, nine, ten. That should be hopefully close. Alright? So now, I'm still at 2.8. Let's see if this works. One two three No. That did not work. Okay, we're two to the second, 2. this is why I needed ND's filter. Let's see here, free stop, let's go back. One, two, three, four- This is good for you guys to see that it is a little complicated, but it' more- you just gotta solve it right there. I went the wrong way. I was making double duty. Three stops, I took the ND off, then I added another three stop power on my strobe. That was the biggest mistake. In my mind I was thinking I was going from three stop to six stop, so I needed three more stops of power. But what I was trying to do was take of the ND completely, and to see if I could it without the ND under that scenario. Five, six seven, eight, nine, ten. One, two, three, four, five. Let's try that. So I'm trying to think what I just did wrong. I tried to go three stops more power. Let's bring it back down. I got way too much power. I didn't like that. Let's try that. I jumped a couple stops by holding it too long. Alright, we're gonna get it figured out here. Okay ready? So if we have to- Just look here. So I'm at my- I'm at my sink speed, which is about right. So I'm now only about a half stop off. By the way we did have the radio poppers on here, which can change from my camera, but something went wrong. So we ended up going to the Paul C. Buff triggers. That's why I've to do it manually. Here we go again. I think that's it. We didn't need to go - because I took the ND filter off, but I moved my shutter speed three stops. That's what I did. I actually counted twice. So that's good to know, that even someone who's been doing it for a long time still gets screwed up. I counted two variables, that's one of the things that I always talk about, usually when I'm in the studio, I always leave my F stop at one fixed aperture, then change my lights. That way you're not changing two variables. Does that make sense? Here you gotta think about the same thing. Just try to end up changing one variable, that makes it so much easier. With that, this looks beautiful, right? My background's a little darker right now, and I'm at 200th of a second shutter speed, the highest I can go. All I gotta do is, let's say to 100. Look at this, right here. One, two, three. Now that sun's gonna pop, well I say sun, but the light on her shoulders is gonna be a little bit softer. That's gorgeous. That's my shot right there. Let's try this. And now I'm working with a 100 shutter speed instead of 30th, which is gonna help, hopefully, keep my little blur, shaking or whatever. That looks gorgeous. Okay, here we go. Think about this, because we had such a dark, cloudy afternoon at that time, I could this scenario without an ND. But as soon as that sun pops out a little bit more, I can't do it. Then I'm stuck. I gotta knock my aperture down to compensate. Cause I can't go any higher than 200th of a second You see where I'm going? That's where an ND comes into play. If you always have an overcast day, and you're under a big canopy of trees, you probably don't need an ND filter. But its when you start to battle a little bit of the sun, and you wanna keep that should at the field, you're gonna have to pull out that ND filter. I'll show you side by side her in a minute. Does that make sense? I did it without an ND, but I was pushing close to my limit of what I work with. What did we learn? We learned that there's a lot of things you gotta think about at one time. That's photography, right? It's kinda fun, but there's a lot of things - you're juggling a couple balls at the time. Minimize how much you have to fiddle with and you're gonna be much better off. That was that video. I think they were suggesting that I take that out, that mistake out, but I said put it in. The reason why I do that is because I have nothing to hide In fact when I teach, if I was to try to convey to you, or pull something over on you, that I was the most brilliant person on the planet, it wouldn't take long before I- you'd figure out the truth, right? I always say, 'hang out with me long enough, and I'll prove to you I'm not the most brilliant person on the planet.' However, at some point I'll figure it out. I'll get there. It may take a little bit of fiddling, I'll get there. That's why I wanted to have you guys see that little kind of mistake I did. We're having - there's a little debate going on online, and I'm wondering if you can clarify this, as for Tami louis who's trying to understand, she understands that it uses more power, but if you are using strobe that doesn't support high speed sync, if you're doing it just for a few portraits, why not just use high speed sync on those strobes-- Very good question Do these strobes have high speed sync capabilities? No so the question is this. Remember I gave you three variables that you could do. One is the old standard way of strobe, like I'm doing right now, there's the high speed sync which is pulsating a light across your sensor as you get a higher shutter speed, and then there's that- what'd they call it- hot sync or whatever. The problem with the high speed sync is this, if I was doing multiple lights, which I do a lot, I've done it like a Harley rider sitting on his motorcycle with two edge lights and the whole thing, I got all my studio strobes out there, to do that with speed light would be a- I mean you'd have to have tons of speed lights, right? All set up so that- and the speed light has to be about four or five feet from your subject at the furthest, which is not bad here, but you're limited on your high speed sync. Plus, when it comes to- and I've tried it- when it comes to high speed syncing, it's not as easy to change your background value like that. It's not as easy, I've tried it, to me it's even more fumbling around, right? So one day maybe I can finish that. And a lot of high speed syncing, the strobes wanna do it in ETTL, you out it to manual and you have to kinda go into another zone to overpower the high speed syncing, so it's a little more work to figure out your speed lights, this is my experience. So to me, this gives me the ability to fine tune it a lot faster, even though I kinda screwed up there, it gives me more control. So high speed sync would be better in some respects, because one light, you do high speed sync you get your aperture all the way up, and you get your shutter speed way- really fast shutter speed. But it's not as easy to control the exposure on your face, and on your background control at the same time. So that change in the darken, lighting darken, is a little bit more of a challenge. You have to be hitting more buttons, and whatever to get it to do it. That's why I just say this is a really simple, pretty simple, way of doing it. If you dial it in right, it's not that complicated. But that's a good question. Here's what I would say, there are some people that work in high speed sync all the time. They're gonna be better at explaining, and working in high speed sync than I am. By this time next year, maybe I'll have practiced the high speed sync enough to where I could say, 'Oh, yeah. You just hit this button, overpower this and do that.' Right now I can't quite get- I've tried it and it's just not as smooth as what I can do here. Here's an example of the F8, which is not F22, by the way. If we had it at 22, it would've been a lot more depth of field. But F8 versus the 2.8. See the background change and softness. To me, I love that soft look. Love it. It's a good look to have in your arsenal.
Class Materials
Free Download
Bonus Materials with Purchase
Ratings and Reviews
Christopher Langford
I love Joel, even though I'm not a big fan of his style. He's a great teacher, really down to earth, and best of all, humble. He's a true professional and knows the business. Even if you're a seasoned photographer, I believe you will pick up some great tips throughout this course. What I enjoyed most from this course was learning Joel's thought processes and how he takes on challenges.
Gilbert Wu
I did enjoy the class despite not being used to the American product placement culture. The British say “the proof is in the pudding”, Joel’s pictures are fantastic and create drama. He has the eye. I like his very down to earth approach which is far better than many youtube photographic charlatans. Apart from the techniques he shared, one very important thing I learned from this class is “Be an artist and not a technician”. If you want to learn from people who can take better pictures and more confident and experienced in his/her work than you, Joel is one of those people.
Dana Niemeier
After seeing Joel at Shutterfest 2016, I am a fan. He is intense, but that is inspiring. I especially like the segment using ND filters as I live in Florida where bright sun can be an issue! His teaching method sets the student at ease. You see him make mistakes and then figure them out! Makes us believe there is HOPE for us in the learning process! I also bought his commercial photography class as an add on. Great to see him work and think on his feet. Thanks CreativeLive for giving artists this platform that reaches out to artists around the globe.