Lessons
Class Introduction
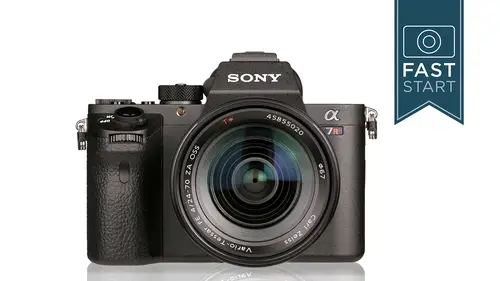
05:40 2Sony A7 Mark II: Overview
15:53 3Photography Basics
07:36 4Basic Controls
08:12 5Panorama Controls
04:44 6Mode Dial and Exposure Compensation
10:47 7Custom Key Settings
06:27 8Focus Area
08:45Multi Interface Shoe
02:31 10Back Side: Navigation
11:02 11Function Button: Modes
22:40 12Display Options
10:18 13Left and Right Side: Navigation
15:26 14Bottom and Front: Navigation
03:45 15Sony Lens Options
15:37 16Camera Menu: 1
09:29 17Camera Menu: 2
06:01 18Camera Menu: 3
02:42 19Camera Menu: 4
05:02 20Camera Menu: 5
08:31 21Camera Menu: 6
08:46 22Camera Menu: 7
11:32 23Camera Menu: 8
05:39 24Camera Menu: 9
07:16 25Custom Set-Up: 1
04:42 26Custom Set-Up: 2
05:33 27Custom Set-Up: 3
09:19 28Custom Set-Up: 4
04:24 29Custom Set-Up: 5
09:35 30Custom Set-Up: 6
03:53 31Custom Set-Up: 7
07:12 32Custom Set-Up: 8
02:41 33Wireless Options
03:44 34Application and Play Menus
17:42 35Set-Up Menu: 1-6
16:01 36Camera Operation
09:21Lesson Info
Mode Dial and Exposure Compensation
Okay, next mode on the camera is the movie mode. On the camera. There is a movie record button, which is a little bit awkwardly placed button. I do have to admit I think a lot of reviewers have keyed in on that and is a little bit harder to get to, but that is how we record our movies. And when you put the camera into the movie mode, the viewfinder changes to accommodate the slightly different aspect ratio of shooting movies and kind of gets the camera all set for shooting movies. Now there is a lot of movie controls that were going to be talking about, and some of the main ones can be found in page eight on the camera settings for adjusting how the movie's air shot, for instance, we can shoot in the manual mode, choosing shutter speeds and apertures, or we can let the camera choose it ourselves. It kind of depends on how serious we are about what type of video we're shooting, so we will talk more about the movie capabilities as we go through the class, all right, getting into the more...
manual sections of still photography. The p mode stands for programme mode, and this is where the camera is going to select shutter speeds and apertures for you. Now it will show you these shutter speeds and temperatures down at the bottom of the frame is going to tell you you're in the p mode and then down at the bottom generally the way that pretty much all cameras work is the first number on the left is your shutter speeds, and then the next number is your apertures and then there's other information about the exposure in there, so one of the things that we can do is called program shift, and this is where we can adjust the shutter speeds and apertures ah, little bit to our preference. Let me show you with my camera here in front of me, so let's, go ahead and turn this on put it in the programme mode and what we want to pay attention to where these numbers down here at the bottom, sir, at any sixty eighth of a second and f four, and I'm going to just cheat a little bit here and I'm going to go in and I'm going to bump the s o up just cause I want to have a wider variety of numbers to choose. So right now we're at one, three, twentieth and f ate and if I turn the front dial it's changing both shutter speeds and aperture, so if I wanted more depth of field here I am at f sixteen I am going to get more depth of field now as I move the camera around a little bit you'll see that it is generally holding that f sixteen and it's adjusting the shutter speeds I could go to the other end of the spectrum and say I would prefer shallower depth of field and faster shutter speeds and as I adjust its constantly reading the different light and it's changing the shutter speeds there's still fast but they are very and so this is a relatively quick way of working with the camera but it's not quite as precise is going for emanuel and so if you know exactly what you're trying to get out of the camera I would recommend manual but the programme mode is where I think a lot of people wanted have the cameras because it's quick and it's easy and you can actually make a fair amount of adjustments very, very quickly either with the front dial or the back dial of the camera you can see those changes happening on the back screen or up in the viewfinder okay, so that's the programme mode myself I will use the programme mode about one or two percent of the time it's those times when I just need to take a quick photo and I'm not too particular about the shutter speeds or apertures you know mom says quick take a picture of the birthday cake that's when I'll throw the camera in the road next on the list is the aperture priority mountain this is where you get to choose the aperture, the camera will figure out the shutter speed so I really like the aperture priority mode, especially doing travel photography where I'm not exactly sure what the next photo is going to be but I want to be able to make quick adjustments and I want them to kind of stay where they are and so in the aperture priority mode we can change the aperture either through the front dial or the back dial of cameras we can see on the my camera here we haven't an aperture priority were changed the front dial and the back tile and it does the same thing now this is kind of interesting because you know I compare cameras on all different brands so I have no problem talking about canada or an icon. They usually either have a dedicated a button or dial for doing this here we have we can do it with either one. Now this is going to come into play later on in the camera because we could tell the camera we only want to use one dial for changing the aperture and the other dial will be used for something else so just kind of keep that in mind as we go forward all right, an aperture priority is very closely related to shutter priority, and so this is where you get to choose the shutter speed and the camera will figure out the aperture. Now let me go ahead, change my camera to shoot a priority and want to show you something on this camera, and I'm going to just, uh, change my eyes so back down just a little bit just I have an example here, and so if I changed my shutter speed let's say to a sixty eighth of a second it's coming out pretty good, let me zoom in a little bit on our camera stand over here, and so we're getting a pretty nice exposure here, and if we're not thinking about things and we just said, oh, I want a faster shutter speed and we go upto a faster shutter speed like a thousandth of a second. I think you can clearly see that our screen is very, very dark here. It is very easy to sit to set shutter speeds for which you have no aperture to work with. This lands is an f four lens. I don't know what it would need to be, but it would probably need to be in f one point four lens in order for me to take a photo here. The camera will allow me to take a photo, and that is the photo that I'm getting is a nearly black photo without any information there, and so you do have to be careful about looking at the screen to see am I getting a proper exposure on this? Now, if I go down on a really long shutter speed, I'm going to get into the same effect. Well, I really don't have a proper aperture to work with its overexposed because I've chosen too much time and so there's just a lot of mistakes that can happen with shutters priority. So I do warn you about being cautious about how you you shutter priority, I think a good option for somebody who wants to use shutter priority is using auto sl. We're going to talk about s o on auto eso, especially some of the controls that you have over a little bit later on, for instance, if you were doing, say, bird photography and you got birds in the sun and birds in the shade and you knew you needed a thousandth of a second to stop their movement, the auto iso setting kind of accommodate for the shadows versus the sun a portion of that type of shooting, and so I tend to avoid shutter priority in many, many cases, all right, next up. Full on manual this is my favorite mode on any camera because I get to make the exact choice where things are and they don't move around and change on me. And so we have our shutter controlled in the back, we have our aperture controlled in the front, and then we have our exposure controls. You'll see that in the er screen down at the bottom it's the mm setting, which stands for metered manual. So let's, go ahead and do that with the camera here in front of me, so I'm gonna put it in manual mode and I am going to set an aperture. Let's, I want to try to get an aperture at five point six, so I am going to change the aperture in the front two, five point six and I can tell by looking at the screen, it seems pretty bright, but also down hunted down here under metered manual it's, showing me plus two, which means I'm overexposed, and so now I'm going to start changing it until it adjust, and it looks like it's getting closer on the screen, but I'm still blinking at plus two and where are we at now? We're plus two, okay, now we're getting closer plus one and normal exposure is going to be at zero setting plus minus zero now, in some cases, depending on the brightness of your subject, you should have this a little brighter or a little darker. We got a big white wall over here, so I think I should probably be on the plus side maybe as much as plus one is a normal photo for where the camera is currently pointed at pointed over at another area it's going to be something slightly different over there and so that's how you're going to do manual exposure and the beauty there is is that no matter how much the light changes your shutter speeds and temperatures stay exactly where you set them to be and so you will see that same information when you put your eye up to the view fighter to see in the viewfinder so that's the manual mode finally we have out whoops we do have control set up that we can change if you don't like where the aperture and the shutters are set because you're coming from a camera manufacturer that reverses um or you just want to change him, you can change them in the customs setup mode under the dial's set up you can reverse the operations of those buttons. All right, now we get up to one and to this camera has to memory positions on the dial they actually have more in the camera and this is where you can memorize settings of the camera so if you have a particular set up to your camera with a variety of settings for, say, portrait photography and action photography you khun change them just by flipping the dial on the camera now there is actually six memory settings for them are electronically chosen in the camera itself you can choose to on the memory dial itself and there are two different controls that you want to get into under the camera settings on page nine. Memory is where you're going to register your setting so you're going to save them you're going to set your camera up the way you want it to go to that memory settings and lock that in as one two or m one m two m three and four if you just want to look at what settings you have, you could do that under memory recall just for viewing your settings and so for anyone who is constantly changing back and forth between two very different types of environments, this is a great way to do it all right, so that takes care of our mode dial so moving on big, old traditional dial you know hardcore photographer geeks like myself really love actual dials on a camera rather than pushing buttons to electronically to change something actually turning the dial on this, so this is a one way of making our pictures either brighter or dark so minus is going to be darker, so we could dial in a minus exposure one, two or three stops of exposure, and we could do the same thing on the plus side. And so this is a really easy way in many different modes, like aperture, priority shutter priority in program, where we can just say, you know what? This picture needs to be a little bit lighter, a little bit darker. You're not going to use it in the manual mode because you would be changing shutter speeds and temperatures on your own to do that. And so I really like these traditional dials on the camera. Now we can also do it electronically, and we'll talk about that later on as well. So that's the exposure, compensation dial.
Class Materials
Bonus Materials with Purchase
Ratings and Reviews
Diane Schulman
INCREDIBLE Class! I couldn't find anything on the internet that truly explained this camera, explained what it can and can't do and what accessories would work with it. I have had my Sony A7II for awhile now, but was so overwhelmed by it, I rarely even took it out of its case. It was just easier to use my Canon 5D III. After this class, I am so excited to finally practice with and use my Sony. John is an incredible teacher. He is thorough, professional, fun and knowledgeable! Buying this class was the best investment!!! I feel like I just got the gift of a new camera because I can finally use my Sony!!! Thanks John and Thanks Creative Live!!!
Enrique Vega es
I stored my Sony A7II for more than a year since I've been Canon's user for 7 years and I felt unsure of taking this new camera which implied a different menu system, different functions, a little bit intimidating. Finally, I took a bit of valor, put my camera next to the computer monitor for then start watching this guide and I spent a great time actually. I'm amazed at how helpful and clear is the sequence of the chapters. It was enough to get to chapter ten to know all the basic controls and start taking pictures with an equivalent confidence of my good old Canon, or even better since in the chapter 8th I learned how accurate and easy to use is the focusing system, either, manual or auto (For stills I've always used manual focusing). Very informative, enjoyable and now I became a new fan of the mirrorless cameras, at the point that I'm considering to buy another two :D
VeraInAlbania
John is an excellent teacher! In fact his Fundamentals of Digital Photography 2014 was the first ever class I watched on CreativeLive, and since then I'm in love with his teaching style as well as with CreativeLive! I bought my Sony A7II in March 2015 and when I found out that John is giving a class on it I was very excited! As I expected I learnt many secrets about my camera which I had been using for 9 months already. For example about the option of focusing on the eyes, setting the buttons, making panoramas etc. The camera is still smarter than me I must admit. I am enjoying my Sony even more now since after the class I feel much more confident. Thank you John and CreativeLive for such an opportunity! I would recommend to everyone who has a Sony a7II camera and the other cameras in this line to watch this class. It's a concentrate of useful information, very detailed and to the point. I spent two days just watching the class and practicing new knowledge with my camera straight away. I had to postpone all the other life chores. And I would be ready to watch the class again after some time as it's a professional camera which needs a lot of practice!
Student Work
Related Classes
Camera Guides