Lessons
Lesson Info
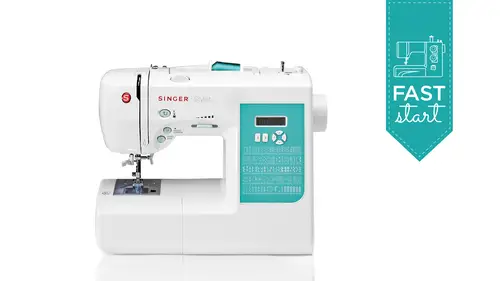
Machine Overview
Before we really dive into really a lot of stitching and getting the machine going, I would like to just spend a little time on a few sewing machine basics whether you already have this machine or you're considering the machine or you just have another sewing machine completely different machine there's some sewing basics that everybody should know to keep their machine running its best and so we're just going to take a little time to go over that s o that as we start sewing as I make reference to some of those things, it'll make sense to you why I'm doing what I'm doing and why I'm using the items that I'm using so just before I do that I'd like to just show you what the box looks like and the reason I want to do that is to remind you give you a good visual when you take the machine out of the box when you get it home um try to hang on to this box if you can because if you ever need to store the machine transport the machine I know some folks have the luxury of a full sewing room othe...
rs use the machine and have to put it away it's a great place to store it if you have to ever send it for anyway warranty work or ship it anywhere for like service the best place to do that isn't something that fits perfectly so we really encourage you to hang on to the box if you can so I wanted to just call that to your attention ok? And so what comes with your machine once you do take it out of the box you have a few items that are in a plastic sleeve in inside the packaging and one of those of course is your instruction manual and I would encourage you even if you already own the machine and you haven't yet done this I would encourage you to really read your manual from cover to cover there's a lot of very good information in here, much of which I'm going to cover today and show you but find very often that folks don't really make that good use of their manuals and there's a lot of good information in here, so do yourself a favor and read that and then you also get a machine dust cover and if you do are one of those folks that leaves your machine out and you sofa rather frequently this is a nice little dust cover that just fits perfectly over the top it's got a little slot in the top two for if you just want to transport it, remove it from the table temporarily but it fits it beautifully so that keeps the, um dust and lint out of thie open areas that the machines so that those don't get full of um, dust, and you just have to clean the machine out more frequently, and then the other thing you get is some information about the warranty centers and where those are, and some just information about getting into contact with singer and then the last thing, this is what we call our quick start guide, and I think you'll find this quite helpful. It really is information very, very clearly spelled out for you how to not only wind and insert a bobbin, but also how to thread the top of the machine. And this is something you might even just keep handy and maybe the top drawer of your sewing table or just keep handy for a quick reference. So I wanted to call those items to your attention. Those are in your box, so we'll go ahead and get started. I'm going to just give you a little tour of the machine. So up here at the top, as I mentioned there's that carry handle used for transporting your machine, and up here you have the bob and winding spindle and bob and winding stopper, and you'll see those in action very shortly. Over here on the side is my hand wheel, we always turn the hand well toward us, not away from us hand wheel over here, this is what moves the needle up and down um it moves up and down when you're so into that if you want to manually move the needle up and down you use the hand well to do that this is your tension control these are thread guides for threading and I'll show you the wining a bobbin and threading the machine shortly so and there's died there are diagrams at the top of your machine that show you exactly where to put the threat for doing both the bobbin and the upper thread you have a take up lever right here going to talk about that this machine has a speed control at the front so you can adjust the speed of your machine from slow to fast or anywhere in between and I'll use that in just a bit this is your reverse button the reverse button is always a also a tie off button for your decorative stitching so that they don't unravel at the beginning and end of a sequence when u s o them we have a programmable needle up in needle down great for quilters great for a fashion sewing for pivoting corners and things ah keeps the needle down in the fabric while you pivot and you can raise it or lower it by the touch of a button and then we have a start stop button that you can operate manually here at the front because you can also so without your foot controller plugged in so we can unplugged the foot controller and run the machine manually if we want to here's our presser foot lifter, we can raise that up or lower it down. This is our removable extension table, our automatic needle threat er er buttonhole sewing lever. I'm going to use all of these as we go through the session today. And what I wanted to show you also is that on this removable extension table, this gives you access to a free harm when I take this off. What this is nice for is if you have small areas like a very small trouser leg, like for children's clothing or a sleeve or something that you want to him, that will fit right on the end here and you can sew those tubular areas without any problem. When you try to sew on a flat area and have a tubular surface like a project like pants leg, you kind of fiddling with all that fabric on the top side here, so you just slip simply slide this off and you can sell those tubular areas very easily. And now that we have the extension table off the machine, I want to show you that this is where your machine accessories are, and so I'm going to just take all of this and put it on people get really a lot of stuff with this machine so what is all this stuff because we have folks tell us they didn't get their accessories but they haven't looked in this little box here that's where they're hiding but it's nice there right at your fingertips whenever you want to read you reach for them so here we have an extra package of needles we have our buttonhole foot this is your state stitch quarter inch foot you have some extra bobbins this machine comes with a satin foot it comes with an over edge foot it comes with a free motion durning embroidery foot it comes with a gathering foot a zipper foot a blind him foot this's the foot for rolled ham's this is our feed dawg cover plate for when we want to do free motion sewing or sew on buttons you get three different sizes of school cap for the different sizes of threads that you work with you get to school pin felt's and these are when you want to sow with either twin needle sewing or you have threads that maybe work a little better for you when they're standing upright and that fits up here on the top of your machine and then there's also a seam ripper and it's a kind of combination cleaning brush and seam ripper so you it looks like this when it comes out of the tray so just open that up and turn it around and there's your seam ripper so um I've already won't one of the bombings but you have one in the machine and you have three extras in york south three cover what I'd like to do I'm going to try to show you is much of this stuff is I can in the short time that we have today, but what I'd like to show you now is how to wind a bob and and I'm going to remove this bobbin and the way that you do that to me to show you that real quick on the top of the machine. This is a bob and cover release lever and when you're bob and cover and your bobbin are both transparent, which is wonderful because it allows you to monitor your threads supply as your sewing you don't have to take the bobbin out and look at it to see if it's getting low you can actually monitor that right while you're sewing and you press this little button over to the right and this cover will release and you can remove your bobbin now I know I just told you that we have four all together with the machine, but you may fill them up with certain colors and you may want more to put more thought thread on more bobbins for future use so what do you look for when you're shopping for bobbins for seeing your singer machine? You're seventy to fifty eight I'm going to show you some examples of some bobbins that are available where pretty much anywhere, where you by sewing notions, you'll have some sort of selection of these on the shelf, and you'll notice right away that I have to hear that our mettle and those we obviously don't want for a machine because they're not at all similar to what we have in in your machine. You want to use exactly the same style of bob and that comes with your machine. Bobbins are not interchangeable from machine to machine because the machines are actually designed and calibrated for the type of bob in that it has. So you want to make sure that you look for bobbins that are exactly what are in your machine. So clearly these two go away, and then here we have three more style of bob in that are also transparent, but you're bob in is called a class fifteen j in this machine it's a class fifteen j bobbin so right here, these all say singer at the top, but this one says class sixty six so that's not the one I want and then both of these say, class fifteen and once this once this fifteen and one says fifteen j and you might be at the store and go oh well it says fifteen so I'll get that one but actually believe it or not these are slightly different and they are just slightly different enough shaped that they're not interchangeable so when you go shopping for bobbins you want to make sure that the top of the package says class fifteen j and you'll have the right ones ok, so let's go ahead and wind a bobbing for this machine and I'm going to start out by putting my thread on my school pin appear at the top of the machine this is nice it's has like a little hinge on it and a tilt so I can kind of lift this up a little bit to help me get that on there easier and you have those three spool caps that come with your machines you want to find one that fits your thread the best and then we're going to start out by first snapping arthur hold your thread kind of like when you're flossing your teeth and you will feel this and hear this click into this top guide right here and then we're going to bring it into this guide like so and then there's a diagram here see right here where it shows me what to do for the bob and thread we're gonna wind this around this bob and winding tension disc and it shows me it look on the diagram it's like a little like a cursive letters e the way you wrap it around this this bob and winding tension disk here so let's do that again we're going to snap that in bring it in like so and then we're going to wrap that around there, make sure it goes into the slot there's like you can see it there we'll move it with my fingernail, get it, make sure it goes in there like just go wrap around it like a little cursive letters e and then when we come over here to the bob and winding spindle and bob and winding stopper um let's just trim the throw this is getting a little long. What you want to do here is put your thread in through the center of the bob in and out the hole, so let me just find that there we go like that what you don't want to do is put this on, wrap it around and around and around and then push it over and wine because it might not wind properly and it might wind really sloppy when you do that and if it winds not nice and smooth, you won't have good stitch quality, so you want to make sure you wind your bob and properly so we're going to put the thread from the center out I find that there it is that little hole, and go out through the center up, set that on your bob and winding spindle and make sure it goes all the way down. This should be, by the way, this should be over to the left when you do this. If it's over to the right, you're bob and won't go down all the way. And if you turn this, your threat might start winding under your bob and so make sure this is to the left before you put it, put your bob and down onto the spindle, push that all the way down and then push it to the right and we're going to hold this loose tail and step on your foot controller see, here's owe me to show you what happened here. My thread got caught on my school, so I'm just going toe release that just got caught on this little spot on my thread spools so let me just free that up that's. Why it wasn't advancing. Okay? Sure. That's should be okay now way. Go! And so after that does a few revolutions you want to stop and through trim that thread tale. And then continue winding now there's a bob in wind er winding stopper here that will when my wants my bob and gets a bullet will stop winding, but you can stop winding yourself any time by just taking your foot off the foot controller on this will wind faster right now at the front of my machine. My speed control is set at a slow speed. I can move this all the way over to the right and speed that up if I want to. You could set this however you want. So let's say that's enough thread for what we're going to do right now. So now to remove it, I'm going to push it to the left and then lift my bob and up off the stopper and then trim the thread and we're ready to insert the bobbin into the machine. So we're down here at the bobbin area on the front, and we're going to drop this in and before we start putting it in any of the guys, I want to just pull this thread toward me and make sure that it's going counterclockwise or against the direction of the hands of a clock. I want to make sure that bob and his turning counterclockwise, if it's, if you drop it in here and it's turning clockwise. You're probably not going to have good stitch quality, the machine will, so but the stitches are going to look a little funny and it won't so properly s o you want to make sure that you drop it in here and you don't just drop it in and put the cover on, you actually need to thread it into these guides on the, um, uh, bob and holder here, and I might just point out that on the front of your machine there's a diagram right here to the left of your needle plate that actually shows you the way that this should be turning. And then these two guides that it gets threaded into so that's a little quick reference for you as well. So now that our bob and is in here it's turning counterclockwise, we're going to bring it first into this groove. You slip it in there like so and then it comes around and it comes out the second groove and you just set it back here like so so I'll do that one more time to make sure that you got that so you drop it in so that when you pull it, it goes against the clock, and then you threat it first into this first groove. And then out that second one and just said it behind like that and you're bobbing is threaded, and at this point you can also put your cover back on there's a little lip or ah, a little tongue that sticks out right here on the side of this cover. So you just took that in first onto the side of this opening in the needle plate and then just pushed down just snap it in place, you'll release it like this and snap it in place by just pushing down on it. So now we're ready to thread the top, fred, and to do that we're going to snap our threat back in here, and what you want to do before you proceed is what we do with every sewing machine, and that is, is to make sure our presser foot lifter is raised. You must raise your presser foot lifter as step number one of proceeding to thread your thread path, because what this does is it actually makes your attention assembly open so that it can accept the thread as you place it into the thread path. If you have this down when you're threading your machine and even if you put it in all the right places and you threat it exactly right. Your machine is not going to be threaded properly, there won't be any tension on your upper thread and believe it or not, what that will probably result in is when you're sowing along, you'll either hear it making a really loud sound, and or you will have a big bird nest of threat on the underside of your fabric. So you want to make sure that before you even start threading that you lift the presser foot lifter, so that the thread can go correctly into the tension assembly, the other thing before you begin is it appear at the front there's a little silver mechanism that's just kind of peeking his little head up over the top of the case of the machine here, and that is the take up lever and it's, very important that that is threaded as well, and the way to make sure you do that is make turn your hand, we also your needles in its highest position and that you see that take up lever at its highest position. The threat has to go through that take up lever and it's very easy to miss it. If you don't put your needle and highest position, even if you're following all these guides just like it shows you on here, it won't go in the take up lever, and when you start sewing it's going to sound trump chunk chunk shot really loud because you just didn't thread the machine properly there's the thread can't so and so by raise the presser foot lifter, make sure your take up levers in its highest position and that you can see it there and then you're ready to begin threating and all of this is in your manual too. So now we're going to bring our threat into these guides appear like so and then number two, the thread path is marked with numbers, and number two is to bring it down through this channel, and we're going to go around this u turn at the bottom like so, and then bring it up to the right hand side of that take up lever over to the left and then bring it down again, and you want to just look and make sure that that threat actually did go into that little hole on the take up lever. Everything looks great, then we're going to bring it down again, and then we can put it around our thread guide just above the needle, and then we can thread the needle with our automatic needle threat. Er now I'm going to do that one more time for you, so you can follow along again. Because I think it's really important if you can't get the machine threat and properly too so it doesn't matter what else it can do because you won't be able to run it so let's make sure you've got that so we're going to snap it in up here and we're going toe slip are thread in here take up lever is up I can see it press the foot lifter is up so now I'm going to bring it down into this right hand channel around the u turn at the bottom up to the right hand side of this slot over to the left to bring it down again check to make sure that it went in the eye of that take up lever and then bring it down around this thread guide right here and now we're ready to use our automatic needle threat er the automatic needle threat er is a wonderful little thing you don't have to strain to see the eye of a needle to thread the machine and how that works is you'll bring it down, bring it around put your threat over here on the side it helps you just hold the threads sideways as you um tuck it into the underneath the hook that comes through the eye of the needle you release it and a little loop comes through and then you just grab that with your fingers and pull the loop through to have your needle threaded. So let me do that again for you. So just in case you missed that and I'll just show you with my hands kind of what's happening there, but if you imagine this is the eye of your needle and this is your automatic needle thread a there's, a little tiny hook like this on the end of the device, and when you bring that needle thread or around it comes into the either needle like so in that little hook is there waiting for youto bring that threat in like that? And then when you release over here, it pulls the little loop through, so you've got this loop, and then you just grab it and pull it to so so that's how it works. I know it's kind of hard to see, um, close up here, but I'll do that one more time, and then you just tuck that up under the that hook, release it and there's that loop, and then you just grab that, lou, pull it through, and we're ready to now draw up the bob and thread. I think I got caught on something here I'm just going to eat through, I think I got caught on something, so I'm going to re thread. I got stuck on something, so I'll just re thread real quick. You want, I'll show you, I'll show you because we're going to do a little test to make sure you're threaded properly in just two minutes. I'll show you, I'll show you what to look for there so let's me gives me an opportunity to show you that one more time I could feel like my thread wasn't moving freely, so I must have had it's stuck on something that's much better there. Okay, so now we're going to draw up the bobbin thread holding this with our left hand and just putting a little pressure on it or attention on it. Turn the hand well toward you as you lightly pull this to the left and you'll see that loop come up from the bottom side and that you're bob and thread, and now both of your threats go underneath the presser foot the slit for the on the on the foot is not in the center of this general purpose foot it's over here on the side, so we'll talk those underneath, and we're ready to begin stitching now. My threat tales have gotten kind along with all this demonstrating I'm doing here, and you want to trim them down a little bit when you cut your threads there's ah, thread cutter here, on the side of the machine that you can use to trim those together, the other thing you could do is cut your threads manually. The only thing I would caution you against it's cutting them to short next to the foot. I see folks do that quite a bit, and the only thing that's going to do is it's going toe when you start sewing the take up lever will actually pull your needle thread out of the eye of the needle and you'll just have to keep re threating the machine. So if that's happening to, you know, constantly re threating, you're probably trimming your threads to short at the end of a scene. Just leave, leave a little bit of length on those tales and battle probably stop happening for you. Okay, so we're ready to start sewing and when it when you turn the machine on, it goes automatically to straight stitch and all the stitches on the front of the machine are indicated here on the front panel with a number and straight stitch is number zero zero and this goes all the way up to, um, like one hundred stitches in total, and just to give you a little visual on the front of my table. I have all of the stitches already sewn out. So you can see all the wonderful stitches, including the button holes that are included in your machine. And we won't be using all of them today because time doesn't permit. But I'll show you some fun things you can do. Try to give you a little inspiration and show you some of the most popular selling techniques that folks like to know how to do. So that will be our goal today.
Ratings and Reviews
Judith jensant2
This is an outstanding course taught by a fantastic teacher, Becky Hanson. I just bought this machine and can now use it thanks to her. I would love more sewing classes taught by her. Very Excellent.
a Creativelive Student
I am a beginner, and this was an awesome course! I learned so much about my machine and some great sewing basics. I will definitely be referring to these videos as I continue to learn how to sew. She was very thorough and demonstrated everything nicely without going off course too much. Absolutely wonderful, I highly recommend!
a Creativelive Student
I am a newbie at sewing. This is my very first machine and I needed to learn everything from how to use the machine, threading etc this course taught me all I needed to know specifically for THIS machine and that was really what I needed. It's nice to see all what the machine can do...... even though I can't do them right now.....but hopefully in the near future :)