Button Holes and General Sewing
Lesson 4 from: Singer Stylist™ Sewing Machine Model 7258 - Fast StartBecky Hanson
Button Holes and General Sewing
Lesson 4 from: Singer Stylist™ Sewing Machine Model 7258 - Fast StartBecky Hanson
Lessons
Lesson Info
Button Holes and General Sewing
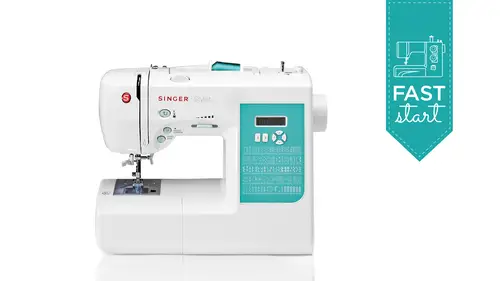
So your machine comes with for for button sewing I've got a bob in here for bob for selling the button, and I've got a thread for that. So let's, marry these two where did it go? You know, use this one here, ok, so here is what would be like a plaque it on a dress or a blocks, or even a pillow that has a syriza buttonholes on it, and you would never just make your buttonhole on just fabric. You always stabilize this somehow, and so you'll see on the inside of my placket here where I've applied in this case, it's, an interfacing that was fuse herbal and it's, a woven interfacing that I've applied with heat it's f usable so it's part of my plaque it now, and what that's going to do is it's going to give my fabric of really nice firm foundation machine buttonholes are dense, the stitching is very dense, and if you don't use an interfacing and or a stabilizer, that stitching will kind of tend to want to pucker up your fabric. And why did my buttonholes look like this it's? Because you real...
ly haven't prepared your fabric properly, you might also let me just reach over here and grab a piece of stabilizer I've got some pre cut little squares you might even add a, um piece of stabilizer to the back side of this, this is a tearaway stabilizer, and the reason I say tear away is literally when you're finished with it, it just tears away and you put that on the back side of your fabric, and that will give you a little additional stability while you're making your buttonhole, then when you're finished, it just tears away. So I'm going to change my bob into something that it was a little more appropriate for our for our fabric, which is this color here we're going to drop that in like so, and I'm going to change my thread here to something more appropriate as well to go with that slide that on presser, foot lifters up, take up lever, I can see it, and we'll put our spoke cap on snap that thread in there, and then we're going to make sure that take up livers threaded again. I just like to make sure you're very aware of how to properly thread so because if you can't threaded it doesn't matter what else the machine can do, so let's, just draw that bob and threat up, and we're ready to go. So one of the things you've got in your, uh, box of accessories, here was your automatic one step buttonhole foot. And what you would do here, this is your this is your button. You would actually set your button in this slider at the back of this foot, close the slider on that button, and now the machine is going to know how big to make those buttonholes for that button so you don't have tio worry about when to turn around and go back a few of a four step button holder. You'll need to mark everyone and watch when to turn around. The beauty of a one step buttonhole is they're all completely automatic, so all of them are identical, and we're going to drop this presser foot off the machine by pressing there's a lever at the back of the machine that I press this in and it drops the foot off the machine. And this is how you put them back on again to just let me just show you this real quick there's a little pin right here on the foot, all of your feet, even like here's, for example, the use your satin foot and will be working with this in just a little bit. They all have this little pin across here and on the ankle or the presser foot shank this bit right here is shaped like a little claw, and that comes down and snaps on over that pin. All you really need to do to apply these is put them underneath that pin and just snap it on like, so if you don't have it quite in the right place, just wiggle it around a little bit till it until it grabs it. The point is you don't have to try toe I've seen people try to push these up onto the pin, and you don't need to do that it's so much easier than that they just clip on like so. And this is how you drop them off. And so I say that to say, see here my thread got well, tangled around that foot that's how you put your buttonhole foot onto it has that same little pin right there. So you're going to clip that on, and then the only other thing you need to watch on this is that when you put your fabric, you always testes on a little scrap to before you put it on your projects, because because you might want to play with your stitch length a little bit, you can adjust that even for your one step buttonholes. But when you put this your fabric, uh, underneath the foot there's, a buttonhole lever that has to come down, and you want to make sure this is between these two guides on the side of the foot if you have it over here it's not going to so if you've got it in front of this one it's not going to sew it has to be in between them you just have to pull it down, you don't need to push on it or anything just pull it straight down and make sure it's all the way down or you'll get a little error message on your screen and your manual tells you what the little air message will say it's just a reminder that hey, you're going to go what happened and it's just going to tell you you don't have your bob and or excuse me, your buttonhole ever all the way down or you didn't do it at all it's like reminding you hey, you're not ready yet so it's a it's it's neat the machine will tell you what it wants okay so just pulled out all the way down and then you put sorry put your press their foot down and way have to choose our buttonhole though, and if you look down here at the bottom of the front panel of the machine, there is a whole siri's or selection of buttonholes. There are two bar tax styles there's a larger and a smaller bartek style, the larger one you would use for more of a maybe a mid two heavyweight fabric the because the zigzags wider and the hole is a little bigger the smaller bar attack is a thinner zigzag on the sides of it and the hole in the center is a little smaller so that may be more appropriate for a mid weight to a lightweight fabric and even a smaller button. But again, you might want to test on in fact because you might find you like one of the other better for whatever project you're doing you also have to keyhole style buttonholes there a larger and a smaller like we just described and keyhole buttonholes are often used on menswear or outerwear so you've got those selections and then you also have round end buttonholes there are two again a larger in a smaller and one end is the flat bar attack and the other end is a rounded style and again that's just a style preference so you can use whichever you prefer but to start out with I'll just use the basic bar tax style which is stitch number ninety four so I'm going to go on my tens call him here and dialed in a ninety and then a four in my single digit column and that lets me know I'm ready to sew a button hole so let's go ahead and do that buttonhole ever down and we'll get started I'm going to stop and just trim this thread so it doesn't drag it around and let me just describe what's happening here when it's sewing it actually does a foundation stitch first and then it zigzags over itself and then it comes over the other side and does the same foundation stitch bartek and then the others execs so instead of just zigzagging on each side you get a foundation straight stitch and then its eggs eggs over it in both legs run the same directions so that you don't get any twisting or puckering of fabric it's a really nice feature and if you can see all also another one but I don't know if you noticed but at the end of making that buttonhole it did like three attack tie off stitches so that I don't have to try to tie it off or manually pulled the threads to the back side and tie them off it actually tied it off for me and here's my perfectly beautiful but beautifully stitched buttonhole with a satin looking stitch on the top side I would go in the back side and remove my stabilizer and then all we have left to do is cut the buttonhole open and there's a little tip it shows you in your manual but I'll show you a cz well when he was just a little straight pin and right in front of the top bartek just slide this little pin it's like a little bumper guard so when I use my seam ripper to open up the buttonhole I don't have to worry about pushing too far and cutting through my bartek at the other end it's like a little bumper to stop my cutter maybe I pushed too hard or that won't happen to you if you put that little safety in there and you could just pull that but a pin out and you've got a perfectly perfectly you just see my stabilizer coming out here but there's your perfectly stitched buttonhole and then to do another one you would just simply place your foot over your fabric your liver is already down you don't need to do anything differently with it and then just, uh start sewing again and it's gonna what you can watch this time that help both one side it's done straight stitch up going upto did the bartek now it's zigzagging on the left side with eggs a all in one direction? Then it goes up the other side with straight stitch and then it's gonna zigzag down the other side so both of those eggs eggs are coming the same direction. I don't have any chance for to ship if they're slip and there's that tie off and we have a perfectly sized buttonhole it's exactly the same size as the first one that we did so they will be perfectly identical in anything that you make with that will look absolutely professional ok, and then you just go on the back side and trim away your stabilizer just tear it away just tear it away when you're done, you don't need that anymore just picked trim that away and and you're finished ok, so that is buttonhole selling now let's move on to some just kind of utility sewing I'm going to show you maybe with some I'm gonna put your standard all purpose foot back on the machine general purpose I should say and let's say that we have a tear that we want to repair and some of these utility stitches right up here at the top I'm going to use a multiple stitches exam, which is stitch number six, so I'm gonna go to zero six my optimum stitch with for that was wide at six and I can make it shorter or longer if I want. So in this case, what I'm going to do is cut a hole here to kind of simulate if you had a whole and some trousers or some children's clothing and you wanted to repair that hole, you probably want to put some kind of stabilizer or what I more recommend is a similar fabric if you don't have more of the same but a similar weight and color of fabric as the fabric being repaired to go on the back side to be like a stabilizer for that and you're going to use a multiple stitch, the eggs egg with a really short stitch length uh, not really short, but fairly short and when you're sewing this instead of going zig zag zig it's egg like this back and forth it's going to do ah little stitches like this one, two, three, one, two, three, one, two, three, one, two, three like that so it's kind of darning it and to do the mending that's a little open solving my stitch length down so they're closer together. Do you see? You can control that for whatever you're doing and however you want that too, I would probably have my thread perfectly match my fabric. This is like a brownish color on the blue indigo denim here, you'd probably use a color like a denim navy so that it blends in really well, but I want you to be able to see it even just pivot this around one hundred eighty degrees and stitch right over where you sold the first time just to really secure that in place and you, you're dunn, you're ready, prepared, tio, get a little more use out of that garment, ok, so that is multi stitch his exact you can use your utility stitches as well for doing elastic insertion, so here I have a um just a cotton and a three quarter three I think this is a three eighths inch wide elastic and you can actually use your press her foot as a little helper for guiding your elastic as you apply it you see how this three especially this three eighths inch it just fits perfectly in the whole of the your regular press her foot if you want to feed that in their released a little more easily, you can snip the tip of this so he's a little bit more of a point to feed that in easier fighting with a little bit and that will slide right in and where you might do this is children's clothing doll clothes any place where you want to add a little elastic you could turn this over and press it so you're actually adding your elastic here as you stitch and that'll all be on the on the inside of your garment than one sets gathered in I'll just do it for now because I haven't prestes I forgot to press that before we started, so I'll just do it on the raw edge, but I think you'll get the idea and what? The reason you put that in the whole of this foot is if it's wider than this you need to sew it under the foot because you don't want to force something into a hole that's too small but for these quarter inch and three eighths inch sizes this works really beautifully it actually kind of acts like that extra hand that you wish you had when you're trying to feed the elastic through and all you really need to do then when you so all use a feather stitch I liked he's the feather stitch for this one on an electronic machine that stitch number twelve on your machine and you can just use the priest set lengthen with we're ready to go and just stretch the elastic as you so you know I'm not pushing or pulling it I'm just kind of holding it firm and todd another really nice stitch for this on your electronic machine is the honeycombs stitch and that would be number nine if you really had a a pattern or a project that had elastic that gets inserted they usually tell you for your your pattern pieces the sole big and you need a piece of elastic so big and you would stretch it from and kind of pin it in sections and stretch from pinned up in because we're just demonstrating I just have a piece cut here but you're pat project will tell you how being to cut it men you'll know how much to stretch so let's just say we're finished there for the sake of I want to get on to some other things to show you we'll finish this out I think you got the idea okay lift that and we move our work use those the thread carter to keep our tails nice and long and here we have a beautifully inserted elastic stretches even though this is a woman fabric this is nice it stretches now and it looks pretty even on the topside and so there's your last a concession yes can I dio want to give some shout out people who are in the chat rooms this one's for you cynthia who says I just realized that I've been sewing elastic all wrong watching you we're going to have to go back and rip it out of those leggings I made and do it right now and with the right foot thank you were all about enlightenment here good I'm glad that helped now I've been showing this to I think speaking of leggings I mean the casual kind of yoga where I mean I wear t shirts and yoga pants around the house all the time I love spent you know, stretchy knit fabrics s oh let's talk about how you would do that and here I have like some sweatshirt fleece here's, another type of sweatshirt, fleece and here's some ribbing and just for our demonstration purposes I'm going to take a piece of this sweatshirt fleece and I'm going to cut a neck band into it so we're going to pretend that we're putting a ribbing in here like we're going to make a little it looks like a little bit or something right now but this is how you would insert a ribbing if it was ribbing for a sleeve or the bottom of a sweatshirt or something like that when you buy ribbing to I just want to give you a little tip they all have they have different fiber content or fabric composition here's one that has a lot of really nice spandex or stretch to it it's got I guess what I should say is it has a lot of memory when I stretch it it really pops back into shape some of them can be a little more like just one hundred percent cotton and even though they're stretchy they tend to like stay a little stretched out after you stretch him and they won't have that memory that you like to keep it fitting nice against your skin so you want to kind of watch those uh the end of the bolt and look at the fabric content of those cause it's kind of sometimes they cost a little bit more but it's worth it because your result is what you're after so we're going to fold our ribbing in half lengthwise and I'm gonna lay it on top of my garment pieces would be like my front of my little shirt and I just keep it small because of our time just to do something small but you get the idea and I'm going to use and over edge stitch and that is stitch number ten so my, really I'm a single my tens column is already on once I'm just going to go to stitch number ten and this is like an over lock type of stitcher and over edge stitch so press a foot down and I'll just get this started and I'm going to stretch the rib as I saw the bottom fabric, I'm going to try to just keep it because it's curved, I'm going to try to keep guiding it in straight, but I'm not stretching it. I'm just kind of guiding the bottom one as I stretch the upper one, and again, your pattern peace would tell you how big both of these need to be. I'm just demonstrating for you, the stitch to use and how to put it in, and I like to use these higher contrast threat so you can really see what I'm doing. Obviously, if I was making this for myself, I use a white thread. This was really my garment, but if I used white thread, you wouldn't see what I was doing so let's say we're finished there, lift that up, remove your work beautiful, beautiful stitch, nice and consistent looking, and then when you turn that over, you've got a perfectly inserted rib stretches with the fabric, and you could even use that for like even repairing a sweatshirt maybe the readings come loose just fix the area that maybe came undone and fix it with that stitch same technique just kind of um run it under there it does the seam and the finish at the same time so it's one pass and you're finished ok, so that is your ribbing insertion so here is um I mean your machine comes with a blind him foot and this foot is I'm going to see I think that you know that threat will probably show up it's a light enough color um yeah, you use a blind hem stitch in conjunction with your blind him foot and this is all in your manual to so you you do have this information just picking up some of this linda off here. This is a piece of some wool cashmere that I had left over from a skirt that I made ahead a like a pencil skirt I did. I love this fabric it's so soft and beautiful and but where people get a little confused with blind hemming is how to prepare the fabric and fold the fabric to go into the machine for the him um it seems a little counterintuitive, but once you wrap your head around it you're like, oh my gosh that's so easy, eh? So I'll try to make sure to make this really clear for you but if this is the wrong side of your fabric and this is your him and you turn that up however deep your you want you're him and you press that in place what you do next yes and as you just flip this over like so so that you turn your him under and this is still the wrong side of your fabric but you've got this fold here and what you do with your blind him foot is there's this extension that is at the front of the foot that you would use to guide along the edge of this fold as your stitching and the screw here on this is adjustable so you can move the peace more closer or further away from the fabric the reason why that might be necessary is this is a nice like cashmere wool and it's a little thicker than if I had say a quilting cotton that I made a little summer skirt out of and I wanted to blind him it that would be a very thin fold and I might adjust this more or less depending on the fabric thickness so that's why it's adjustable but you can also adjust your stitch um with on your blind him I'm going to use stitch number seven which is sorry I just don't have my glasses on its stitch number seven I believe yes stitch number seven I don't my glasses I should probably go get those so vain okay, so there's our blind hem stitch and by the way your machine has stretched blind him stitches and woven fabric blind him stitches the difference would be a regular blind hem stitch goes stitch stitch stitch like straight stitches stitch, stitch, stitch and then it juts over to grab the fold of the fabric and then it goes stitch stitch, stitch straight stitches and then it juts over to grab the bite of the fold of the fabric that's what we're after here when we try our little sample the stretch blind hem stitch goes little zigzag little zigzag little zigzag and then bite into the fold and then it does little zigzag little zigzag little's exam and then it bites into the fold so what happens is when you do a blind him on a stretch fabric that little zigzag gave this a little give so that your hem will stretch if it needs to like maybe you did a kind of a fitted knit top and you need that to stretch with you so the straight such as the one we're going to use now because this is a woven so I'm gonna drop my press her foot off the machine just like I did before and we're going to snap this one on and put our threads under the foot and you might want to try on a scrap I'll just go ahead and start at the beginning of this we'll adjust just cause of time but you would probably you would take a scrap fabric and try this out first so what we're going to do here is place this underneath the foot so that the folded back this is this is our him we just talked to him under like that so we have this temporary fold and our stitches going to so we want to so and let it just catch the edge of the full now I can see it's not catching the fold it's coming a little short of it I can either move this adjusting screws so that I'm, um a little closer to the the fabric that fold is a little closer to my stitch or I could make my stitch a little wider either way you can adjust it either way it looks like now I'm catching that full what's nice about being able to do machine blind hemming is the time it saves you especially if you like to do things like home decorating projects draperies, bed skirts do they covers? I mean if you have really beautiful elegant fabrics that your sewing you don't want to do top stitched gems because it has more of a casual look you don't want the hymns to show it all and just think about doing that by hand it would just take hours and here you get a completely blind him in just a fraction of the time so we're all finished here. You remove your work from your machine, and I can see. I caught I stitch caught the fold. And when I flip this over, it's completely invisible from the topside, there's my stitch on the back side, but see here's, what we had done. This is the fold, and we had just turned it back temporarily to do that stitch. And then, when we're finished, you just unfolded again. And there is your blind. Him looks beautiful and just in a fraction of the time of handwork.
Ratings and Reviews
Judith jensant2
This is an outstanding course taught by a fantastic teacher, Becky Hanson. I just bought this machine and can now use it thanks to her. I would love more sewing classes taught by her. Very Excellent.
a Creativelive Student
I am a beginner, and this was an awesome course! I learned so much about my machine and some great sewing basics. I will definitely be referring to these videos as I continue to learn how to sew. She was very thorough and demonstrated everything nicely without going off course too much. Absolutely wonderful, I highly recommend!
a Creativelive Student
I am a newbie at sewing. This is my very first machine and I needed to learn everything from how to use the machine, threading etc this course taught me all I needed to know specifically for THIS machine and that was really what I needed. It's nice to see all what the machine can do...... even though I can't do them right now.....but hopefully in the near future :)