Bobbin Types and Thread Tension
Lesson 2 from: Singer Quantum Stylist™ Sewing Machine Model 9960 - Fast StartBecky Hanson
Bobbin Types and Thread Tension
Lesson 2 from: Singer Quantum Stylist™ Sewing Machine Model 9960 - Fast StartBecky Hanson
Lessons
Machine Overview
13:06 2Bobbin Types and Thread Tension
23:11 3Basic Needle Styles and Threads
16:50 4Button Holes and Decorative Stitching
29:22 5Twin Needle and Blind Hem
21:48 6Ribbing Insertion and Free Motion
28:38 7Thread Painting and Flower Stitcher
15:11 8Additional Foot Attachments
15:34Lesson Info
Bobbin Types and Thread Tension
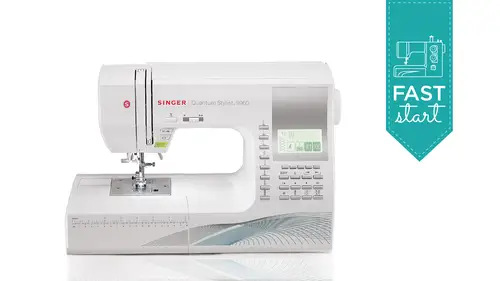
I want to just go ahead and briefly talk about I'm smooth this just a little bit um about bobbins and so you make sure that you are when you buy extra bobbins that you're buying the right type of thing uh here I have some packages of various singer bobbins that are available wherever sewing notions air sold and some I find very often that folks don't understand that there really is a difference between bobbins and it makes a huge difference in the performance of your sewing machine. You always want to use the exact same style of bob and that comes with your machine you don't want to be substituting bobbins your machine and this says so in your manual but your machine uses a class fifteen bob in this is a class fifteen bobbin now here when I look at all of these packages that I would see hanging on the shelf and I'm like, oh my goodness it says singer which one do I buy? Well since I said you want to use exactly what comes in your machine at a glance right now I can tell I don't want th...
is medal bob and and here look at this one this one says class fifteen too so you say, well, why can't I use a metal bomb and aren't metal bobbins better not in this case because machines if your machine came with a metal bob that would be the one you want to use, but machines are designed, they're calibrated. You're bob in area and your upper thread part upper part of your thread, the intention of your machine, the whole assembly is calibrated for the style of bob and that it comes with and these air waited differently. So if you were to put the wrong bob and in your machine, you may find that you're having stitching problems to you, even though that says fifteen, you don't want that one. And then when you look at the's, they all looked quite similar because they're transparent. But this says, class sixty six, so we definitely don't want that one that's a smaller, flatter, a little bit more curved bob and for some older models of machine and then here you have class fifteen j and fifteen, so you might say, well, they both say fifteen does it really matter? Yes, it does. The's actually are shaped just a little bit differently. So you want to not consider that fifteen j and all you want to look for where it says class fifteen, transparent bobbins, and then, you know you've got the right one for your machine, okay, so let's, go ahead and wind a bob, and so I'm going to place a spool of thread here at the top of the machine, and I have a school cap. We had to school caps that came with our machine a minute. Is this larger one, and we're going to set the thread on the spool pin and then place the spool cap on top so that that spooled stays firmly in place. And then what we're going to do is, we're going for bob and winding. We're going to snap it in here, bring it around this guide, and we're going to go, like, kind of, like, kind like a backwards s around this guide into the bob and winding tension disk before we put the thread into the bobbin on the top of the machine. So, I mean, I've got my bob. And, by the way, the way it comes in your machine, here it is, it's. It's down here inside your machine and to take it out it's great everything is transparent so even while you're sewing you can monitor your threads supply as your sewing you don't have to reach in and take your baba note and look to see if you're low or wait for it to run out and wonder why you don't haven't you just sold and you don't have any stitches you can actually monitor that while you're sewing so this is a release lever over here press that to the right and that cover just pops off and then you can take your class fifteen bob and out of the bob in case so we're going to place our thread here at the top of the machine we're going to snap that and you want to kind of hold that kind of like you're flossing your teeth and just bring that in and you should feel it and hear it kind of click in there kate just floss it in there bring it around this guide around the back side and then we're going to go around the back side of that finger that pointing over to the right and then bring it around the bob and winding tension disk you want to make sure it's in there feeling you should feel just a little resistance and you know it's in there if it feels really loose and sloppy you didn't get it in there just just try it again till you feel that slip in there and cause my threads gotten a little long I'm just going to trim it and when you thread, you're bob and you want to, uh, bring the thread from the center of the bob and out through the hole on the bob and to the top do not put the threads the bob in here and then start winding it around like so and then push it over because you can actually cause you're bob in tow wine very unevenly and when you put it in the machine, it could not so possibly correctly for you. So you want to make sure you threat according to the way it shows you in your manual, which is what I'm showing you here and that is to bring it from the center through the hole in the top side of the bob and sorry, I think I might need my glasses. There we go and then we're going to set the bob and on top of the bob and winding spindle and make sure you get that all the way down on the spindle. Ah, if it's sticking up a little bit like that, you might have threads start winding underneath the bobbin and you'll just have a mess you'll have to cut out of there so you don't want that to happen just push that all the way down and then to wind it, we're going to push it over to the right to engage it, and what you'll see on the front of the machine on your lcd screen is a little picture of a bobbin, and it lets you know that you have engaged the bobbin wind er and urine bob and winding mode. So now we're ready to wind, and I'm going to hold this thread straight up step on my controller, let that wind a few revolutions, and then I'm going to come and snip this little threat away and I can continue winding and the bob and will stop automatically when it's full. But you can thread as much or as little on there as you want for what, whatever you're doing, you don't have to fill it, but again, the fact they're transparent, I can just see really easily how how, how it's feeling and that bob and wind ir signal will stay engaged the whole time I have that bob and wander over to the right when I feel like I have enough threat on there, I'm going to bring this over to the left and that bob and winding a message on my screen goes away, I lift the bob and up, and I'm gonna cut my thread and now I'm ready to thread my bob in now what you'll do here is lay this to thread the bobbing in the machine to insert it properly you're going to lay the bob and in your bob in case and before you start putting it through the thread guides pull the thread and make sure that it's turning counterclockwise when you put your bobbing in here if you put a drop this in and it's in here clockwise that's incorrect and you're probably going tohave poorly forming stitches or very sloppy stitches it won't so right at all if you have that in backwards so make sure that before you begin putting it through the guides give it a little poll and make sure it's going against the clock and then you have a little slot right here and a groove here where this thread is placed so you bring it into this slot first right here I'd like to just keep a little finger on my bob and as I'm doing this and then bring this around place your thread in that groove like so so do that free one more time so you drop it in like so make sure it's turning counterclockwise bring it first into this slot at the front of the bob in case and then bring it around and lay it in that groove like so and you have got your bobbin inserted properly we'll put that cover back on and we're ready to thread the top of the machine so now we don't need that bob and winding tension disc anymore, and we're going to bring our thread again. Hold it, sort of like you're flossing your teeth, snap it into this guide right here. Bring it around the top of this there's, a marked thread path it's sort of a raised path on the top of your machine if you look really closely, you'll see it guides you through the threating one thing you also want to do is you want before you before you proceed through the thread path. You want to make sure that your presser foot is in its highest position by reyes, or that your press, if it is raised by lifting your presser foot lifter and that your needle is in its highest position. The reason you can't really see your take up lever on this machine because it's covered by this piece on the front of the machine. But when your needle is in its highest position, your take up lever is also in its highest position, and that will mean that you'll get it threaded properly. If you're if your needle is down, you may not get your thread in the threaten your thread in the take up lever properly and your machine won't so in fact when you try to run it it might sound really loud like jump jump jump junk because you didn't get it in the take up levers so if you just bring your needle to the highest position and raise your press afoot lifter before you begin to bring your threat into the thread path here you should be just fine so we're going to bring our threat down and this is all marked with arrows up over the top and then come on down again and then there's a thread guide just above the needle and then you have an automatic built a needle thread her and so when you bring this down you wanna push this all the way down your threat actually hooks first around this finger on the on the mechanism and that there's a pin that comes into the eye of the needle that actually grabs that thread loop so you can pull the thread through you and you don't have to strain any more to see the eye of a needle to thread it I know somebody is watching right now probably saying how did she do that again I want to see that again so let me let me go ahead and do that because the first time you see that you're kind of like what it's happening there it's it's so neat how it works but if you kind of imagine my hand is the eye of a needle and my finger over here as well part of that mechanism that's coming around when I pull this needle threat or down this mechanism comes around and there's this little hook that comes into the eye of the needle so that when you set your threat in here like this it pulls that loop through and then all you have to do is grab the loop and pull it through so let's do that again you're going to bring the threat around that finger to it just helps you hold that straight across as you tuck that thread up into that little pin I would say sorry I let go of it kate chuck that thread into that little pin well thread it manually for now it could be that I I myself tried using it with the needle not in highest position when I was trying very quickly too reset for the class and I may have accidentally bent it and if that happens I just need to have that little piece replaced still need to know how to do that because actually there are there are needles like twin needles and we needles where you still need to thread it manually because of the shape and style of those needles so we were all threaded and we're ready to go and so let's just grab some fabric and get started stitching so actually a couple of bobbing questions before we move along yes one was from bill payer how do you tell the difference involved um bobbins once they're out of the packaging do they have a little notation on well e I mean if you know the one that you have like that fifteen j in the fifteen they look really similar but when you put them side by side you can tell they're just shaped the slightest bit differently and the fifteens are much flatter on the top and bottom and the fifteen jay's air just slightly just a slightly different shape and that's why if you interchange them they don't fit the bobbin cases properly you can tell when you have two side by side you'll know anita who it was asking for which one again yes this's class fit teen not a fifteen j f fifteen and that is in your book too in your instruction manual it tells you which one that you read okay so we need to raise our we're going toe hold our left hand thread with our left hand and pull that bob and threat up to the top side to put our threats under the presser foot to begin sewing and I'm putting my fabric underneath the presser foot and on the needle plate there are guide markings on your needle plate in the case of this machine in the front side these lines are in metric measurement and middle millimeters and on the back side, you have the imperial or the inches measurements, so you'll have your you're half endure five base your three quarter seven eighths and so on marked here with these lines, but in the front they'll tell you the metric measurements, depending on which system you like to. Oh, use on dh when you so you put in, place your fabric underneath the presser foot, guiding your edged raw edges of your fabric against the guideline that you want to use. Bring the presser foot lift her down, and then we'll start to so and we're set for straight stitch right now and could tell how nice and quiet this machine is and here's a reverse button that would let us if we wanted to sew in reversed attack off stitches. If we were at the end of the scene, steve souls in reverse for as long as I wanted to, and then I can so forward again until you come to the end of your scene, and then you can touch your reverse to back, stitch a few stitches, and then just step on your control. It is so forward again, and then here you compress that thread trimmer button to raise your needle and cut your threads and just remove your work from the machine it's a great little convenience. Now I know probably someone who souls with machine like this is more of a proficient store, and so you're probably already aware of what we mean by seem allowance this is your seem, and this is your seem allowance and as we talked about their different lines here, depending on different projects that you do give you information about if you need to be sewing with a half inch or quarter inch or five eighths inch if following those lines is if they're either hard for you to see or you're a new sewer and you're not really sure how to guide your fabric properly, you could try something like a masking tape or a little piece of painter tape, and if you need a little bit stronger visual for yourself, you could just a neat little tip. I did this a lot in beginner classes because they were having a hard time knowing where to guide the edge of the fabric. You can do something like that to a place see so as your sewing, you guide the edge of the fabric along the edge of that tape and that's really helpful if you have a little trouble seeing, we have just wanted to give you a little sneak peek at something we have coming near the end of this year and it's a foot that were we created that will be an optional accessory for folks but we call it we're going to be calling it the so easy foot and what that does is it will snap on to your machine just like all your other feet do but it will give you a new adjustable guide here at the side where you can put it anywhere you want so that when you're sewing you'll actually have a physical guide for guiding the edge of your fabric and you might find that really helpful s o you could be watching for that year near the end of this year and those will be out will be called the so easy s e w so easy foot ok, so let's proceed here with a little discussion about um tension now at at um at the your tension is controlled on your screen on mechanical machines on some of the other computerized machines that we've worked with tension is controlled with a physical dial's somewhere on the machine and on this machine the this button right here there's a function button directly under these it looks like two exes but that tells you tension and so right now it presets for me the automatic precept tension for this center needle position that I'm sewing in right now is set right here where the arrow is pointing and I can use my plus or minus keys it's to increase or decrease my attention I'll always know what automatic is because the auto or default setting for the tension for any given stitch that I choose is marked with that you'll notice how when I go off auto that that black box around the number goes away. When I come back to auto, it highlights it again for me so I can increase or decrease as I wish, and I'm just going to talk a little bit about why you would change tension and what what that's for and when that's important. So I'm going to go to the monitor right now and show you a picture of thread, tension and what a balance stitch looks like. We get a lot of questions on this type of thing, so I want to just ten to demystify this a little bit for you, but I'm gonna walk over to the monitor and show you what to look at here. And when you do this at home, you may want to change the threads on your machines so that on the top, but the top thread, maybe you have one color and on the bottom thread you have another color so that you can see more clearly how they interact with one another. But this if this is the top of your fabric and this is the bottom of your fabric, you wanna have nice looking stitches on the topside. Nice looking stitches on the bottom side they actually interlock here in the center between the two fabrics so it just looks perfectly even on both sides that's a nice balance stitch if you're stitch looks like this where the top side of your fabric this needle looks like a straight line and you're on the bottom side it might actually appear to be normal but on the topside this needle thread is so tight it's actually pulling the bob and threat up to the top side you may even see puckers and your fabric and if you actually ran your finger over those stitches you'll feel it's almost like little tiny like little beads. You can feel it even with your finger and this thread would be so tight you could just about pull that up or thread and pull it right out that's an indication that your needle thread is too tight here is the opposite effect where the needle thread is too loose and on the top side it might appear normal but when you look to the back side you have that same kind of effect happening. But the bobbin threat is a straight line now and that needle threat is creating the loops on the back side, in which case you would need to increase so to increase your tension you goto a higher number and to decrease it you go to a lower number the next slide that I have, a few guys could flip me to the next slide that one is thank you that is attention for decorative stitching and here's, a case where we do want the upper thread tension to be reduced slightly so that here's my needle, thread and here's the back side of my fabric and I actually do want to see a little bit of my needle thread on the back side of the fabric with that bob and thread showing like so, because I don't want to see any hint of that bob and threat. I want to see all that beautiful decorative stitching on the topside with no, no little tiny bits of the bob and thread it also there's a case where I would actually deliberately go in and decrease my upper thread tension slightly. Now, if you go, please, to the next slide this's probably where what some of you have experienced before, where this is the top side of your fabric and this is the bottom side of your fabric and doesn't always look exactly like that. But the indication here is that it's, a boy big mess of threat on the underside. At some point in time, we've all had that happen to us and that's an indication that your machine is actually not threaded correctly. The funny thing about this it's a little counterintuitive because this is the top this is your needle thread and down here this is the underside of your fabric and when you see all this on the underside most folks automatically make the assumption that something's wrong with the lower thread tension and that's actually this actually means that you didn't thread the upper thread correctly so what I want to do is show in fact when you run the machine it might even sound a little funny like chun chun chun chun chung and it's looking normal and you're like you turn it over and you look at it and go what happened here but that is not anything to do with your bobbing through attention in fact, with this top drop in bob and machine the tension for the bobbin is precept at the factory so you don't need to adjust it but I'm going to show you how you know if you have your machine threaded correctly so what you would do here is right now we are machine is threaded correctly we just sold and everything was great now I'm going to just bring my thread my needle is threaded and I just I'm going to bring it out from under the presser foot because that's the best way to tell if you have this under the presser foot it's it's hard to feel what I'm goingto t tell you howto watch for this but with the needle threaded but not underneath the presser foot and the presser foot lift her up make sure it's up and your machine is all threaded pull this thread and you see how I can just freely pull this thread it's not it's not obstructed at all I'm just pulling pulling, pulling it's moving really freely that's great when I put the presser foot lifter down and I still give it that same amount of pulling you see how now and I pull it it's not moving at all in fact it's making my needle tug a little bit see that really close that means that my machine is threaded correctly because when I put tension on now it now I've raised the presser foot lifter it moves freely when I put it down it tugs that's how you know that your machine is correctly threaded if my present foot lifter is down like this and I am able to pull that thread like I like I did when it was up you did not thread your upper part of your machine correctly and the best thing to do is snip the thread pull it out raise the presser foot lifter because that's probably why you've got that to happen in the first place is you had that down when you threaded so raise the presser foot lifter and then thread your machine again and then give it that little test and you'll noah's, long as you can feel that it's tugging when you put the presser foot down and it's not pulling freely, you know that you've threaded the upper part of your threat, your machine, correctly. And you won't see that bird nesting of thread on the underside of your fabric. Also, you want to make sure that your bob and is incorrectly, that it's not turning clockwise and that you are actually in the thread. Grooves. You don't just drop the bobbing in and pull the thread up. You have to make sure it's threaded into the groups. You make sure of those things, and you should be avoiding thie bird nesting of thread on the underside of your fabric.
Ratings and Reviews
user-a49565
I was surprised and impressed with the quality of the instruction I received from this course. I recommend it to anyone who owns this machine (which I am very happy with) and decided to buy it for future reference. I'm happy to know about Creative Live. I hope to find other great resources there.
a Creativelive Student
Awesome class! Although I've been using my 9960 for at least a year, I learned a ton! Becky is an excellent instructor. She explains things thoroughly, and it's so fun to see all the inspiring projects that can be created with the 9960! Thank you!
a Creativelive Student
The best. I accidentally found the "free" video and then bought the class. I started sewing as a child (I am now over 60) and am amazed at what I did not know. I love the 9960 machine. Becky has taken a sewing machine to a whole new level. Her knowledge, tips on uses of thread and attachments, showing items she made and what you can do was wonderful. Now I just need to get my "creativity" working. Thank you!