Lessons
Class Introduction
00:49 2Settings
02:36 3Scouting Locations
07:36 4Shooting Reflections
06:26 5Shooting Leading Lines
03:05 6Shooting Skylines
09:26 7Organizing
03:32 8Removing Billboards
10:05Lesson Info
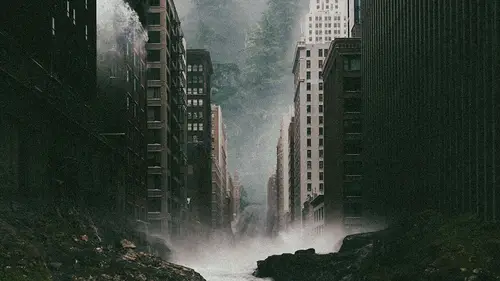
Removing Billboards
when it comes to street photography, you're always dealing with tons of variables, whether it be ads, billboards, whatever the case may be. With this perfect situation, we do have an ad in there. So it's nice that we have that because I'll be able to show you how to edit it out. So for right now, I'll show you what we can do is we'll do the selection and just for safety I'm gonna do at all. And then I'm gonna go ahead and puts the XO got my image open. And the nice thing about art studios we consume in as much as possible to get as much into that pixel as we want. So what I like to do is start right. They're right on the edge and then bring ah, the way over here and I'll tap right there and then bring back all way of the other corner and then bring it here. In here. Now we've got that whole advertisement selected, and maybe you want to do your own thing to it. Maybe you want to put your own advertisement in there, so go ahead and add an additional layer. Fill it with whatever color. Yo...
u feel like it. Maybe you want to fill it with a color that's nearby, but make sure instead of sampling the active layer, so the sample all layers select, maybe agreed, or something. Or maybe this color that's there. Go ahead and just fill it and the ad is gone. But you can also easily add your own stuff there. Maybe you want to add some text or something. Um, and you can always spend more time on this, but move that change the color of that black. Now you got your own billboard. Get rid of that ad. That's your image. And of course, this is a very basic way to do this. But we've got the idea across, and then another way to get rid of that, I'll show you. Let's delete that. Another way is the clone tool clone stamp. So the clone stamp tool is very common within all types of editing programs. Photoshopped, our studio, whatever it may be. So it's got a bunch of different options. The options go down pretty far. Don't get too ahead of yourself with those Take your time, but keep it simple. So you've got all these different options for clones settings. But what I like to do for this specific one, because the building is definitely structured, I'll probably just not keep it a soft. Is that so? I just use probably the least soft edge. Keep the opacity high, maybe bring up the size a little bit. And then what I'll do is hold down. So the clone tool you'll see first you have to tap and hold in the area. Want a copy? So it'll give you directions on how to use it and then zoom out. And then this will allow me to keep that clone to continuous. It takes a while to line it up, trying to make sure it looks good. Okay, looks pretty decent. Okay, we'll move over here. Got that? Now we're getting rid of it. My look a little funky right now, but nice part is is that we've made it into a new layer so that we can kind of play with around with it afterwards. And now you'll see from far away that half of the sign is gone. Half of the sign is absolutely, completely gone, which is super super cool. So if you continue that took some really good time. With that, you'd see that you had some really wonderful results. Keep this edit going here. Get the clone tool again on it. There. Come back up here. Tap there again. Get another clone. Zoom in on this part that we get a get rid of. So let's start, Becca, that corner again. Draw it out a little off, but deal with it. Seems a little off, but fix it. We can't really tell that much, actually, for far away. So what I'll do is actually race a little bit from far away. Kind of looks like totally fine, but the windows actually look like it's I mean, it could be a hotel. Maybe it's a hotel, maybe all the windows in Same. You don't know people aren't. Really. If you tell people that there was a sign there, they'll look for the problem. If you never told him there was it, they will never even see it. So don't tell anybody. Do you think, um, so go ahead and keep doing that. It doesn't need to be perfect. It really doesn't. When it comes to the mobile editing and creating really realize that Yes, people consume in. But that quality and all that kind of stuff really won't. Details of the editing and taking things out really won't necessarily matter at the end of the day. So keep it clean. But don't worry too much about all those tiny little mistakes because no one really ever catches them. Keep repeating this. Got that part down and I got one more. Section two dio this part. Let's just deal with this right here, because that is not on the other side. But we want a clone, the windows on the other side. But this part will not be there. So let's just clone this for now. That part actually, start a little down here. So start that there. Okay, that works. So it's just about just figuring out what works and what doesn't work. Like honestly, it's really just you got to really feel it out. It doesn't look right right now on that side, but we'll fix it, so that will also get these windows here. It's night. Start fixing those windows back up. Close to that edge is you can don't lose that edge that we worked hard on. Oh, well, looks like a gun, Not there anymore. Might see a little bit of that actual pull there. So why don't we just remove, pull, but, you know, same kind of concept. Get clone tool here. Obviously from far away. People won't really be able to even tell what this is. So don't worry about the specifics. Straw right over it in that line, right there might be a little funky, actually. So let's make sure that we keep that in line. Bring that back that way. Good. Not bad. Well, some over here, though. But we can actually get rid of that too. So it's like this. Actually, she is a pencil. Paintbrush has, like, opacity to it, so it's kind of see through. So you should always use the pencil tool in our studio. If you're trying to draw over something, it's like it never happened. You could do the same thing with the red. Here, use that eyedropper tool and pencil it up. Great of those ads. Same here. We're officially ad free. Just took a little bit of work, Took a little bit of dedication, but it absolutely worked out. And I'm really glad that it did
Class Materials
Bonus Materials with Purchase
Ratings and Reviews
Kate Crossley
Found it very interesting how Elise translated Photshop style art composition onto her mobile and how she scouted for images. It would have been good to have had a list of the apps she uses in the class information page. I had to go to her website to find them. I appreciate she mentioned them in her tutorial but a list would have been helpful too. Having been doing composite work on my iphone recently it was great to see another artist at work and their approach. All in all, very enjoyable class.
Jennifer Pinter
I think the class could have been longer with more detail about the editing. I am glad I purchased the class and can go back to watch again because she goes through the editing process very fast. Overall some good tips about shooting with your phone and worth $25 to me.
Ken Hattie
I cannot attest to the course content as I tuned out after and left after the 10the use of the irritatingly over-used word, by videomakers, "super". By god, get a thesaurus, people.