Card Making Workshop
Lesson 17 from: Scrapbooking, Paper Crafts, Stamping and More!Close To My Heart, Monica Wihongi, Jill Broadbent, Karen Pedersen, Michelle Snyder, Kristina Livingstone
Card Making Workshop
Lesson 17 from: Scrapbooking, Paper Crafts, Stamping and More!Close To My Heart, Monica Wihongi, Jill Broadbent, Karen Pedersen, Michelle Snyder, Kristina Livingstone
Lessons
Class Introduction and Explaining Profiles
07:23 2Stamping Profile
40:59 3Card Maker Profile
11:22 4Stacy Julian: Why Stories Are Important
25:44 5Decorative Scrapbooker Profile
58:24 6Studio J Scrapbooker Profile
25:16 7Paper Crafter Profile
44:17 8Pocket Scrapbooker Profile
21:34Fundamental Scrapbooker Profile
25:46 10Close To My Heart Catalog Walkthrough
09:44 11Create Using Cricut Cartridges
04:17 12Close to My Heart Cartridges
19:48 13Using Cricut to Create a Page
43:17 14The New Consultant Kit
26:14 15Consultant Party Planning Basics
14:24 16Consultant Event Basics
38:34 17Card Making Workshop
18:46 18Home Gathering Demo
1:07:06 19Consultant Highlight with CTMH Consultants Karen, Michelle, and Kristina
14:40 20Jill Interviews the in-studio Audience
06:07 21Connecting with Community through Social Media
04:51 22Consultant Opportunities
13:58 23Close To My Heart Events
11:17 24Skype with CTMH COO Brian Holman
17:23Lesson Info
Card Making Workshop
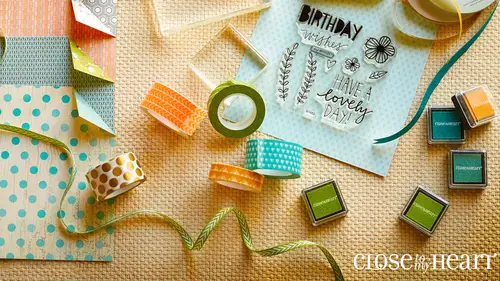
We are actually going to make a card together just like you were attending my workshop, right? So we are going tio this is the card that we're going to do together right now and everybody should have an envelope there in our guest audience today that has all your parts and pieces, so if you kind of take those out carefully carefully being the key word there uh let's see if I have one of those so this is what you should have there there's a card base the card base in the envelope is coming from the close to my heart value packs that come in white and cloning a white so we're working with the white daisy today so you should have a card base you've got a little bit of shimmer trim inside your envelope there should be some two little stars these air black enamel stars love them because they have the teeth of on the back it's peel and stick so it's fast and easy to accessorize and we're using lagoon and honey and pair and pacifica colors from this paper we are going to do a little bit of st...
amping and you all have they're this stamp set that's called brush strokes, but I don't know if you can I wanted to show you my stamps that way talked a little bit earlier about how when you get a stance that mitt it's all just clear and pretty and knew and then remember you seasoned it so it's stamped beautiful well sometimes a well loved stamps that gets a little colored like this right so you can tell this is one of my go to stamps sets okay so brush strokes is something every craft room needs because it's so incredibly versatile so we are using brushstrokes and you're going to be using this kind of circle I love that these designs are just kind of whimsical very uh versatile and just kind of loose designs there is this circle in the middle so if you want to take that and put it on a block and then we're also using a celebrate stamp so these little stamps that come m size stamps I call it m for many came their single small individual stamp designs and they come in a huge variety there's all kinds of different sentiments and messages different kinds of individual designs were using the celebrate today but you'll notice on my card workshop pieces that you see on the table here each of the cards has a different message so what I've done is used different m size stamps I I'm using different messages so that the guests my customers that air at this workshop could create the types of messages that they're going to need that would be most helpful to them right which essentially means we could make a whole bunch of bases and have a stash here don't you love when you have a secret stash even just grab and go there's always those moments like oh right that was supposed to go in the mail today, right? So you can have your bases all put together and just change out your messages and so we have to celebrate and we have all of those put together at there you're all set, okay? So we're using black and lagoon inc and the first thing we'll do here is take your lagoon inc and inc your stamp and we're just gonna make it a stamped image there in the center of that little two inch square piece of paper okay on your white daisy card stock just make a print in the middle when you have that stamped, then we're going to add the message on top so I'm using the black stamp pad and I'm just going to add the celebrate in the center ok and that's it for stamping so you can set those pieces aside. I like tio ad cem well and my workshops we call them wiggle squiggly lines we call them wiggle squiggly lines because if I say we're going to draw a line right here, then there's all of a sudden this pressure that the line needs to be straight and all that and it doesn't, so they're pretty loosely drawn and I'm just taking a black journaling pen and I just make this little wiggle square the line down the side and what that's doing is framing that stamped image so it's not just floating anymore okay and we'll put some adhesive on the back and that is going to layer on pacifica card stock now you get to choose at this point this paper the fundamentals has printed texture on one side and the glass on boss finished on the other side so you can choose which side you want to show and the same is true for your other pieces for my project I chose to have some of the patterns with e printed side up and some with the glossy side up so this composition is from one of the how to books and I just start by glue in one of those lagoon pieces down the side so it kind of got three even sides on that outside border and we'll add the second blue lagoon piece on the other side I always work from the outside in ok that way it's a little bit easier for centering and spacing if I start in the middle then if I'm a little to the left or to the rights that I'm going to run out of some room on the end okay so I start from the outside work in now I can just come back with the honey peace center that in the middle nice and easy you can see already we're getting great color they're very festive that pair piece of card stock is going to go across about three quarters of an answer so up from the bottom so it just got all those pieces glued down and then christine actually shared a little tip with me to make this easier for your shimmer trim so it's already pre cut and ready to go teeth on the back so you're just going to lift that off of your little storage sheet there center that on the pair piece and it's a little bit longer than what you need so just to make it easy to work with a little bit easier to work with so I don't have to line up the end so just take your nonstick microchips scissors best scissors ever right especially when you're working with sticky stuff one of those craft room essentials again trim off the ends and you could choose at this point tio glue this celebrate message just flat to the front if you wanted tio however my favorite is to add a little three d film tape okay, so I'm using three d film tape on the back and I just put in I put a couple of pieces in the corners and that adds some depth and dimension to the project helps it pop off the page a little bit and one in the center just to help support it peel the backing off and add that to the front of the card okay got our two little black stars that already have adhesive on the back so I could just peel those off, add them to the front and all of a sudden you have this quick, simple festive card you're ready to celebrate somebody that day whether it's a non birthday or birthday or whatever special occasion you've got going on you will also notice is one difference with one difference you see between the two cards, the one I just made and the one that I I made the earlier the additional lines okay, so right here you'll see I did that around the message so that the message wasn't just floating, but if you want to, you can also add some of those borders tio any of the pieces so you could do with or without however you like and that black journaling pen is makes it really easy to add a little more detail into the project and it all ties in together, so we've got bright, bold fun colors and some really crisp black accents on the white base and it's just beautiful and fun so anybody remember how many cards we could make from this workshop? Yes, alicia over fifty fifty carts yep, fifty cards were just perfect because that's how many cards come in a valu pack of cards and envelopes okay, so they would all be different color combinations and be bright and beautiful and you can change them out to make them whatever you want them to be but I want to show you one more thing with that stamp set, okay, this is actually so this is a workshop I'm going to be sharing with my customers the one that we're talking about with the cards, but I wanted to show you a workshop that I've done previously just so that you can see your stamps that can go so many different places and now you'll know why mine looks so well loved. Okay, so here are some cards that we did with the exact same stamp set at a, um previous workshop. Oh, I'm sorry. Thank you so much. Okay, so here's the circle that you used to just now in the same kind of wave just as a center behind your message, but here's the circle in the middle of a flower shape that flower shape is actually this piece. So holding the piece this way with the narrow side in I make pedals for the flower narrow side out, I make leaves to go around okay, and over here we're using this this kind of quick brush stroke in layers for birthday cake. This was something that was a point of inspiration from a close my heart idea book so you will want to get close to my heart every idea book because flipping through there will help you with color combinations and all kinds of great ideas now this stamp design right here it just looks like this swash of color what can you do with that? What does his purpose? I tell you I do everything with that stamp, okay? So here it is this image is the same as this image. The difference is that I let the whole whole image show here and just kind of staggered it here it's making a very even finished border and then we put it all together so when my customers came thank you when my customers came and this might have a little glare because the page protectors air on there they made the cards and this graphic way out so we're talking about all of our party planning pieces right start to finish memory making and memory keeping in those shared experiences together so you've got the borders and those little swash is all those parts and pieces and flip flaps so I can tell even more story underneath okay, so workshops are a great way for you to learn a little more have some more hands on time with close my heart products I'd encourage you to go check out the close my heart website find a consultant near you that has some workshops going you can attend and also watch for crops, other types of the events that are bigger, longer full day sorts of things. Kenan a couple of quick questions for you. Write that one is from symonette boy who says, is it better to use liquid glue on a card rather than tomboy? That is such a great question. And you can actually it's really a personal preference. Both all of our a t's of all those types of adhesives work the same for card making and scrapbooking. I just have a personal preference for bonding memories and it does come in the two sizes. So that blue that blue, blue that is that is the one I enjoy using and I eat it on everything, even would everything somebody wrote in the commons. Michelle loves her blue glue. You know you're right, ee o michelle, I still want you to be my wedding planner. Please say I do that's from cindy. I know that's exactly. I totally don't wear quick question. Do you know? Do the themes change with each catalog for the themes paper packs? Yes, there are different themes in each idea book and and a great variety, which means, as we have different seasonal expressions that that come up throughout the year there's even more themes in there, so where we have an annual book you have a set of themes that are going to last for the whole year and then in a seasonal expressions you have some things that will kind of rotate through so there's always fun new things thank you thank you but we have one question yeah quickly yes go so well one first to comment on that garland banner that you did for the happy birthday when you were holding that up I was thinking how great would that be to make a bunch of those and hang them down as a backdrop for photo exactly what I did for a little photo booth and we had I use thes can I just pulled that out of there now excuse me while I take this apart oh, by the way can I tell you this real quick if you made a cupcake box if you've ever used the cupcake boxes this is a cupcake box just rapid in paper and it can be your table centerpiece ok, so I used these skewers yeah skewers or sometimes the balloon pieces for signs and I'm different party pieces that you can easily mix and match and move around and then the question was at the beginning you mentioned that you have your monthly trainings that air based on an overall theme so how does that work the theme within a theme? Great question so I'll give you a quick example this year that creative parts teams theme the overall theme for the year is color your world with close to my heart and so each month we've had a different color as the theme so out of that color then our projects or training or we even get to talk about what two colors mean because every color kind of has different things that it it means our feelings are kind of its own will personalities that we talked about all these things and we've also had a close to my heart your passport to success and so we had a passport book and each month we went to a different country just like we get to travel all around the world that close to my heart literally one that by the way twelve times well love's travel with close to my heart it's the best but we could do each month was a different countries so our projects or training we went to italy and it's like what are all the pieces of the pie for using the social media were you know so just different kinds of things yeah we'll have you learned so much from michelle is she not like party love her creativity? I love her inspiration that I also love how willing she is to share all of her ideas she wants everyone to be as successful and have the great experience is that she's had with close my heart and with just her overall planning parties. And so, I think it's, so wonderful, that she's willing to come with us to share. We really appreciate you and love you.
Ratings and Reviews
user-50b2e2
I have been stamping, making cards, for 10+ years but only found out about ctmh last year. I love, love, love your clear stamps. They are great to use and easy to store. These classes inspire me and get me all excited again about making cards. I just recently got a circuit, so much to learn. I've got to get me a ctmh cartridge!!!
DebbieTuggleFL
This video series will provide all viewers with a fantastic overview of not just the wonderful products Close To My Heart has to offer but the creative environment they foster. Whether you want to craft personally or would like to see if this could grow as a business, watch this series and receive tons of information. Thanks CTMH and Creative Live!
Aya
I'm in love really with art ,craft ,colours, everything related to papers stamping writing party preparation, celebration wedding everything over and over things that course will be definitely increase my ability to innovate more and more ... thanks a lot for that free course with massive information love my heart to close to my heart
Student Work
Related Classes
Paper Craft Ideas