Lessons
Class Introduction
04:33 2Demystifying How to Best Treat Hair for Compositing
02:46 3How to Create the Best Mask
10:55 4Methods for Removing Halo
15:56 5Add Hair by Painting
07:53 6Use Brushes to Create Hair
08:53 7Cleaning Up Cross Hairs
06:39 8Screen Mode to Paint Hair
05:17Lesson Info
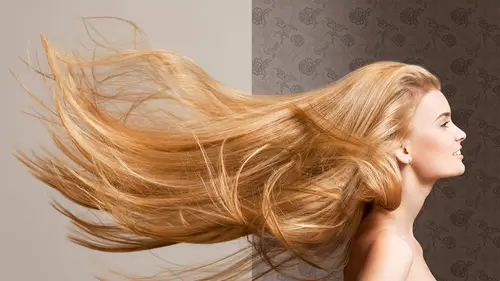
Screen Mode to Paint Hair
All right, I wanna go back to the hair painting for a bit 'cause I wanna show you some more final details on the hair paint. So, do you remember the last time we looked at this, I was talking to you about doing the paint the blurry, the mid and the top, right? All right, now I wanna show you bling and some finishing touches you can do on top of that. The first one's gonna be screen mode. So, what do I mean by that? I mean once you painted a base amount of hair, see that? This base hair. You can go in and paint a new layer, hot detail on screen. Now, you could do this a couple different ways. You can literally make your brush white and paint on screen mode. I'm gonna make it a little bigger. So you guys can see it. Bigger than you want it to be for this demo. And make your brush in opacity of 50. It's gonna be too much. Just showing you the idea but I'd rather not do that and I'd rather leave my tools on normal. Did I mention that earlier that I tend to leave my tools on normal? Tend to...
leave my tools on normal and I tend to leave my opacity, except for painting on hair, on normal. So on the mask, I paint with a 100% brush. All right, I'm gonna paint on screen mode, so the layer is gonna be on screen mode. And let me check my pen pressure here. All right. Always on pen pressure. Do you see how it gives you that nice, fine edge on the end. No scattering on this and little teeny little brush. It's at six right now but you guys are gonna wanna go smaller. Now, this is a detail bit, and oh, I don't think I've mentioned this, you guys. When you're painting your hair edges, go on the inside. This is, maybe it's a misnomer that I'm calling it hair edges. You wanna paint on the inside, why? Because you don't wanna have a bunch of hand-drawn hair on the outside and not have the same quality on the inside, they look fake as heck. And then the other part is when you can paint on the inside, you can direct the eye and what does that mean? That means you can fill in areas. Like, let's say, I'm not gonna do it here 'cause we don't time. Let's say you patch that forehead right here. And then, you patch this section here. This big loopy view. Then what you're gonna wanna do is paint over it. Do you see all that? Look, it's messy, messy. You don't need to be precise. It'll work out in the end, I promise. Now, here's another trick to do with hot detail, like hot wax, hot detail. You can, pretend this is my hot hair right here. You can make your hair a smart object. What? You can make your hair a smart object. I'm gonna just rasterize this real quick. So, pretend, let me throw this away. Gonna start from scratch. Get rid of all that. All right, pretend that I just painted all that hair. All right, I painted all that white, nice highlighty hair. Layer, Convert to Smart Object, Blur, Gaussian Blur. What? This is a smart filter. So, what I can do is paint in blur. So, let's say put it on 3.2 pixels for giggles. When you have a smart object, that allows you to put a filter that is editable, you could turn it off or on. You can come back later and change it, all right. Very, very, very flexible. We like flexible. I'm not the final say in my client's jobs, they are. So, I give them my best go but they're gonna come back and say, hey, we prefer something else. And then I have to be flexible. So, it's like queen point of living is be flexible. I'm gonna now make that mask on the smart filter, black. Command + I, and I now I can selectively paint in blur. Ooh. So, you remember like the hair edges, let me put her back on. I'm gonna actually leave it off for a while, so you can just see how it works. That's gonna look way more realistic because you know how it is. You get a photo taken and the hair's in focus here and then it goes out of focus. But it's, chances are you can't draw a hair and then pick it up later and draw it out of focus. You need to draw one continuous hair. And then have it go out of focus. Cool. So I think this is a pretty great tip and you can paint it in and out. And then if they decide they didn't want blurry hair, you turn it off. It ain't no thing.
Class Materials
Bonus Materials with Purchase
Bonus Materials
Ratings and Reviews
LindaK
This is a fantastic course. But is clearly intended for very experienced PS users and retouchers. This backup materials, especially the workbook, are first class. She does speak too quickly and is a little difficult to follow. I felt like the right amount of material was covered. I would have loved more. But it needed more time to do it justice. She just seemed so rushed. I would have payed more for a longer class. Overall, I would highly recommend to anyone interested in this type of work. I found it fascinating.
user-01901f
If you love Photoshop and are serious about retouching, this is one of the best classes from one of the BEST instructors I've ever seen. It is fast pasted, but well organized and completely to the point. I don't know about you, but I prefer an engaging instructor that is passionate about her field and wants to give you as much information in her course as possible. The bonus materials alone are worth their weight in gold and should help anyone having trouble following along with her advanced techniques. I hope CreativeLive brings her back soon!
Jennifer Funk
Absolutely love this class! I've owned it for a couple of years now and find myself coming back to it time and time again. Lisa is really easy to listen to with her clear and confident direction. I Own a few of her other classes too and truly enjoy watching her teach. Thank you for the amazing content!