Lessons
Class Introduction
04:33 2Demystifying How to Best Treat Hair for Compositing
02:46 3How to Create the Best Mask
10:55 4Methods for Removing Halo
15:56 5Add Hair by Painting
07:53 6Use Brushes to Create Hair
08:53 7Cleaning Up Cross Hairs
06:39 8Screen Mode to Paint Hair
05:17Lesson Info
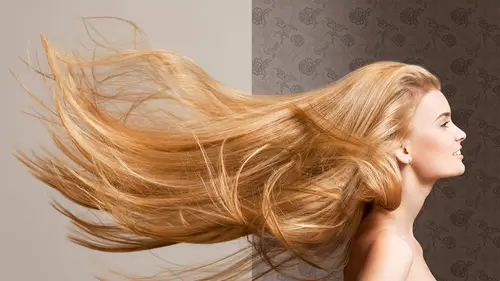
Methods for Removing Halo
I would like to talk to you a little bit about contamination. And I'm sure this is a bit of a consternation for a lot of folks here, that you get those halos, you pulled a pretty cool channel and then you've got that halo and you're like ahhhh, nutso, how am I gonna get that out? So, here's how you're gonna do it. Couple different ways. We're gonna talk about contracting a selection, we're gonna talk about using a filter minimum filter, love that filter, we're gonna talk about painting with color, we're gonna talk about adjustment layers, we're gonna talk about matting and decontaminating color. So those are the things we're gonna talk about here. Now, this is the area I was telling you about that not every technique is right for every image. So I'm gonna show you some techniques in this particular image that you wouldn't wanna use. But you might wanna use it for another image that I'd rather go over so you have it. Cool? Alright. So the first one I wanna talk about is contracting a se...
lection. So there's a selection of her, again, we don't care about her face, you can always load a selection, which is a mask, a mask is a selection, right? Command click on it. Command click on that icon of the mask, and I've loaded the mask and I'm on the mask and I'm sitting here going thinking what would I like to do? Well, I could modify, contract. So I'm just gonna choke the mask a little bit. One pixel. Alright, here's where I really want you to pay attention. What's selected? The girl or the background. The girl, exactly right. So if I want to make the mask a little tighter, I need to invert. Or inverse the selection. Command shift I. I'll do it on the menu here so you can see it. It's command shift I. I've now flipped my selection, now the background is selected. And now I'm gonna hide these marching ants just so you can see what I'm gonna do. I'm gonna option delete because black is my foreground color. Or I can hit shift delete and pick black and I'm gonna basically choke the mask. I'm gonna do that for a second. That is choking the mask. Okay, so just select and inverse. Why would you choke it? Well, if you have a halo, that's why you choke it. Oh, but I lost all that good bit in the inside. Doesn't matter, we're gonna paint it out. Do you remember how I said earlier, you wanna do a tighter mask like a cut into your hair and then paint over. Okay? Cool, so that's one technique for compressing your mask a little bit. I'm gonna go to my history and make sure I go back to the beginning here. Again, I'm gonna show you a few ways to get to the same spot. Another filter I really really dig, which hardly anybody uses, is filter other minimum. Love this. Alright, what minimum's gonna do, it's gonna choke the mask, it's gonna come in, I generally do it a pixel. The size of your file will determine how much you do this. If you have a 150 MB file, you're gonna do this more than a 20 MB file. Okay, because it's a pixel width. So when you do minimum, it's gonna choke the mask again, let me zoom in close so you can see that. Do you see that? It is subtle as hell and it's fantastic cuz oftentimes in our business, you have just that half pixel of white, just teeny teeny pixel white and you need it, this minimum filter is rocking awesome. Alright, another filter you might wanna use will not necessarily choke but I think I should talk about it real quick is, do I wanna talk about this here? Yeah I think I do. Is the diffuse filter. So sometimes, when you um sometimes when you paint a mask or cut a mask or cut it it's a little hard edge and it looks a little awkward and you know when you have a photo and it's gonna sound odd but I'm just gonna, when you have two things that are melding against each other you want just a little dither, a little noise if you will, on the edge. The diffuse filter is fantastic on the mask and I generally do darken only. I think her hair is so wispy, you're not gonna be able to see this, and you might need trust me on this. But you can hit darken only and it will give you a really fine dither. This can make the difference between something looking stripped or not. Okay, so again, that was filter diffused on darking. Okay? Let's turn this back again. Alright, so we're talking about halo right now. Tools of the trade. Please dear God, have a pressure tablet, please. Do not try to do this with a mouse. Please. I have to tell you, my 25 years of experience, there's one guy I know who's a retoucher, who's good who uses a mouse. One. Hi Roman, I know you're out there. (laughter) He's really good, the only guy I know who does it, he works for CW, he's fantastic. So, please use the proper tools of the trade. Alright, we talked about- (Audience member) Lisa, sorry- Yes ma'am. Just to interrupt, people will definitely be asking what is your preferred tablet of choice. (Lisa) Am I allowed to say the name? Sure. Wacom wacom moo. Love it love it love, I'm a size queen. It's true, I would have one this big, I had one for 15 years that was juicy big, this is the biggest you can get now. Don't need that, you don't absolutely need that at all. I know folks who make quite a handsome living working on a tablet that's this big, and I kid you not. So by hook or crook, you need to have one. You must have one if you're gonna be a professional retoucher. Period, paragraph, I don't care who you are. But you don't have to have a big one. And what are those, about a hundred bucks, them little ones? And you can get them refurbished. They're, it's a little like this for me, but if that's what you need to get started, rock on. Um, they have Cintiqs, which I don't particularly care for Cintiq because you're drawing over the actual image. And I'm too used to doing this. Doesn't mean they're not fantastic, just not what I'm used to. And they're like really expensive, they're like two grand. So, um, yeah, hundred dollar Bamboo, you'll be fine. Another method for de-frnging or getting rid of a halo is painting with color. So what do I mean by that? Ignore that hue saturation, that's there for just a second. What look at that. So a way of getting rid of a halo is painting with color. So what you all wanna do is making a new layer, command shift N. I'm a quick key girl, I like em. Command shift N. And you're gonna clip it to the previous file, that means it'll clip to the file that's underneath. And what you wanna do is simply paint, so I'm gonna take my paint brush. I'm gonna select a color. I'm gonna select the color very slowly. There you go. And just for this demo, I'm gonna do this a little heavy handed so you can see it. You want to be gentle. Did I mention earlier that fast is not always the way to go? Fast is not always the way to go. Sometimes the key to success is going slow. Now this is obviously too much. But I want you to get the idea. Oh, another thing I wanna remind you of, when you're doing demos and what not. Reset your tools. That should have been our normal. I was looking at it thinking that's a little little neon, let's redo that. Option click, selecting a color and painting. Now keep in mind, we're gonna be painting over the hair so I don't mind, if this is filled in because I'm gonna be painting hair on top and in fact, this might be where you wannna start saving some time. And what I mean by that is getting rid of the big glaring bits quickly because you're gonna paint hair over it afterwards, alright? But this should take some time, this is not a two minute exercise. This should take a minute or two. Take your time, alright. I'm gonna get rid of that layer. Now, an alternate way but a very similar way is to use an adjustment layer to do the same thing. So in this instance, what I did, I'm gonna just fill this with black for a minute. In fact, let me check my setting is a 30, 55, 34. Here's what I like to do. I often like to make a selection around the hair. Hold the option key. And I'm gonna use hue saturation for this one. You can use levels, you can use curves, you can use selective color. I'm gonna use hue saturation. Why did I hold the option key? I held the option key because you guys being good working professionals always label your layers. Alright? Always, please, I beg of you. And what I probably should have done at that same time is group it or clip it. The quick key for that is option click on the line in between, coolio? Alright, so here's her hair and what I can do is click on the icon for that adjustment layer and go over here to the hair file and click on the hair somewhere and look what Photoshop does. Photoshop says oh, you wanna adjust the reds? Cool. And you can adjust the reds, you can change the saturation, but more importantly, in this situation, we wanna change the darkness, alright. And I can't remember what I had it set at so I'm gonna cheat real quick and look. 30, 55, 34. 30, tab, 55, tab minus, 34, I'm totally cheating right now. Oh that totally wasn't it. Oh, hello, did I say I was in the reds? Yeah you wanna be in the reds. Pardon me there. Let's go right back to the reds. I should tell you, that's a little trick also. Info or not trick, it's a watch out. When you're on this icon for the adjust layer and you click on the hair to select the color and it takes you to a color like yellows or reds, if you go away from that and you click back on? It takes you back to the master. Oh. Sommona gimmona. That's me not swearing. So, please watch out for that. Anyway, when you adjust the color to whatever it is you want. Dark, light, extra color, red, yellow, whatever it is you're looking for. What you then do, you don't wanna colorize the whole piece, no. You want to paint in just on the edges. Make sure your hairbrushes are set. And again, do you remember I said earlier, not every technique works for this hair? And her saturation is way too high now so I'm gonna bring this down. So that's another technique. Again, I wanna stress, you can do this with levels, adjustment, uh excuse me, levels, curves, selective color. Alright. I'm gonna stop on the adjustment layer. And I'm gonna talk about decontaminating. Decontaminating. So, what do I wanna say about this. I wanna be kind to Photoshop. So let's be kind. This has gotten a lot better over the years, it hasn't always been fantastic but it has gotten better. For decontamination, what you're gonna need to do is you're gonna make a copy. A copy of your, I'm gonna throw this one away. Of your masked out image. And you're gonna leave the mask on. I like to leave it mask on. I'm gonna turn off the bottom one just so I can see what's happening. Okay, so what have I done? I've made a copy of the layer and I've left the mask on. And I'm gonna go to color decontamination. Alright. Oooh, you see that before. After. And what that's gonna do is take out the edges. I really like it on this one. On this particular hair I like the decontamination. Now, I'm gonna turn that mask off for a second, shift click, sweet Jesus, what has it done? What it's basically done is it's splattered the or expanded the hair, outer color hair over the image. But it's exactly what we need, we're not gonna panic, we're gonna leave the mask on. And because we have good professional practices, you always leave the original. That does not have that in case you come back or your client says oh we need to change it. Or you could do this. You could clip that to that hair. Please don't over apply your mask. What do I mean by that? I mean, I can't tell you how many files I've picked up from other people where they've applied every mask they've had and I need to go back and fix this one thing and I can't because it's gone. They've thrown it away. So please don't throw your mask away. Save em, put em in folders, name em. Cool, so decontaminate, easy to use. The key to remember is leave the mask, leave it on there, leave the entire layer. Do not, basically, don't crop her out. I actually say, cutting a mask. I don't know if I've said that, I tend to say it. In the old, in the old days, we used to do mask with rubylith. So that's why they're red. Like if you turn em on, they're red. It's cuz the product we used to use, there's gotta be someone inside here, thank you honey, um, was rubylith so that's why they're red. And we've literally cut them out. So that's why we sometimes say cutting a mask out. Choking is a condensing. Constricting. And it's generally, I'm gonna say, a half a pixel. You can do it more but if someone says choke it they're talking about half a pixel or a pixel. And I'm telling you, when you have something up on sunset wall, on a Hollywood, that half pixel matters because you can see if you have a mistake so it's an important little half pixel. Don't discount it. Contamination, like a toxic spill, I don't know. It's, well, the background color is along the edge. Or if a, let's say, you've photographed me and the blue light over there was really hot and I had blue on me? We'd call that blue contamination. Unless you like it, then you call it some pretty half light, I don't know. (laugher) but that's, does that answer your question you think? (Audience member) Thank you. Yeah, awesome, rock on. Defringing. Defringing you must apply your mask first. So what do you do? You just do a command J. Make a copy, command J, control J, I think it's UPC folks out there in TV land. And um, let me go back to layer, it's all under layer. Defringe. One, two pixels, three, let's just do two for giggles. And it's the same idea. It's actually, spreading out, don't worry about the section in here, cuz we're gonna fill that in. It's spreading out the color. Again, some of these are gonna work. Here's um, quick tip for work. When I have a job and like this I consider this a job and I have this image. I go through every single one of these fast. I don't know which one's gonna work. I've no idea. So, okay, quick, let me try the painting. Alright, that's okay. Alright, let me try defringe. Alright, that's alright. Let me try color decontaminate and let me try matting. I will tell you, I think it takes me less than five minutes to try each one of these. And then I pick and then I go to town with it. Okay? So defringe and then remove matting. So on remove matting, it's the same thing. You need to apply the mask. This one absolutely does not work on this hair but I still wanted to show it to you. So you make a copy, command J, you apply your mask. I'm gonna turn the bottom one off again just so you can see it. Layer, everything's under layer. And then, is the color behind her lighter than her or darker than her? It's lighter, so you do remove white mask. Absolutely does not work on this. But on some ones, this is a treat. So please don't be frightened off by how it looks here. Try it on another image and I think you might be pleased with some of your results. Cool?
Class Materials
Bonus Materials with Purchase
Bonus Materials
Ratings and Reviews
LindaK
This is a fantastic course. But is clearly intended for very experienced PS users and retouchers. This backup materials, especially the workbook, are first class. She does speak too quickly and is a little difficult to follow. I felt like the right amount of material was covered. I would have loved more. But it needed more time to do it justice. She just seemed so rushed. I would have payed more for a longer class. Overall, I would highly recommend to anyone interested in this type of work. I found it fascinating.
user-01901f
If you love Photoshop and are serious about retouching, this is one of the best classes from one of the BEST instructors I've ever seen. It is fast pasted, but well organized and completely to the point. I don't know about you, but I prefer an engaging instructor that is passionate about her field and wants to give you as much information in her course as possible. The bonus materials alone are worth their weight in gold and should help anyone having trouble following along with her advanced techniques. I hope CreativeLive brings her back soon!
Jennifer Funk
Absolutely love this class! I've owned it for a couple of years now and find myself coming back to it time and time again. Lisa is really easy to listen to with her clear and confident direction. I Own a few of her other classes too and truly enjoy watching her teach. Thank you for the amazing content!