Lessons
Class Introduction
07:26 2Getting Started on the Image
05:12 3Mark Up Process
21:14 4Spotting & Cloning
28:53 5Gaussian Blur Smoothing Skin
21:34 6Surface Blur for Smoothing Skin
12:08 7Frequency Separation for Skin
24:30 8Create Skin Textures
10:24Color Correction for Skin
21:29 10Add Details to The Face
10:25 11Add Natural Looking Eyelashes
11:05 12Enhance the Eyebrows
03:20 13Brighten Whites of the Eyes
05:54 14Sharpen the Eye Details
05:08 15Replace Face Details with Masks
05:30 16Subtract Details: Freckles
15:27 17Add, Subtract & Paint Hair
08:46 18Create Hair Highlights
04:42 19Change the Hair Color
08:27 20Body Shaping: Overview
07:36 21Basic Body Shaping
08:48 22Body Shaping Through Masking
06:35 23Body Shaping: Liquify Tool
06:09 24Body Shaping: Puppet Warp Tool
08:14 25Retouch Wrinkled Skin
20:28Lesson Info
Gaussian Blur Smoothing Skin
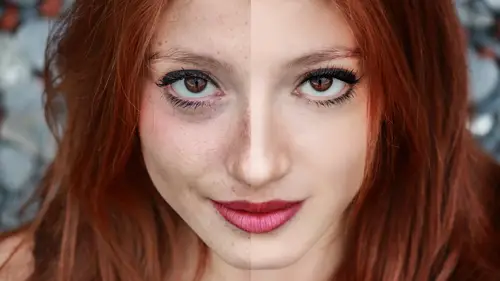
This is the core of beauty work, the absolute core. Here is the deal: good, fast, or cheap. You only get two, you only ever get two. So you can have it good and fast, but it's going to be expensive. You can have it good and cheap, wait, no, you can't do good and cheap, can you? Yeah, you can do good and cheap. Isn't going to be fast. You can do cheap but it's going to be no good. You understand? So you only get two. This is really, really, really, really important. Can I say really one more time? (audience member laughs) This is really important because this is the crux of pricing and getting the job done. One thing I think I'm a little known for saying around here is, get good, then get fast. And everyone wants everything fast, they just, hurry up, fast, fast, fast. Yes. For these types of jobs, how fast is fast? How many hours would you estimate a good job-- This is a very challenging question. What's the job for? How big is it going to be? I'm expensive, I'm really expensive. Th...
ere are a lot of folks who don't want to pay four hours. I think, fair enough, for this job, it's probably about a four hour job. My rate, folks don't necessarily want to pay that or they can't afford it. Is it a catalog, and is it smaller? The job is four hours period, paragraph. I can give them a lesser version but they might not like that version because it's done with smoother blur techniques, which I'm going to show you. I'm definitely going to show you methods to do it fast but it's not going to be as good, okay? They can go to another retoucher and have them do it for less price, but it will probably take them longer. I find the interesting thing about hourly rates, and I know someone had mentioned about a business course, it might not be a bad idea, I believe, philosophically, the job wants what the job wants. She needs whatever she needs, and to get it to a certain level, that's what it's going to cost. If I charge more per hour but I get it done faster it's the same as if someone who charges less per hour but they take twice the time. The job wants what the job wants. However, you are definitely dealing with clients who have budgets, correct? That's where managing expectations come in. I'm going to show you throughout this very next sample. I think what we're going to do is we're going to start the process of this. You can show them, or perhaps have samples and say, I can give it to you like this for your budget and your time. But if you want it to look like this then it's going to cost, or take, this long. Does that make sense? I think that's a really clear distinction for you guys to have on your own level of retouching because I think there are unreasonable levels of expectation that clients have and they don't realize how long it takes to do this properly. Cool? This next section is perfect for that kind of conversation. Alright, so I'm going to begin the conversation of generic skin blurring and skin smoothing. I call it skin blurring, but let's call a spade a spade, it's smoothing, is what you're doing. It's just the method that you're going to use to get there. Now, there are many, many ways to do this, I believe. Let me count out so I can give you an exact number. I think I'm going to show you four. They're all of a feather, they are different ways of getting there. Yes, I am going to show you, in fact, I'm going to put this graphic up so I can show it to you. Alright, this is what I want to talk about. Let me scroll down just a hair so you can see it. We're going to talk about these different techniques for skin blurring, or skin smoothing, whatever you want to call it. The first thing that you'll see is the original. The second one is going to be called a Paint Blur. Third one is going to be a Surface Blur. The Dust and Scratch Blur, or Frequency Separation. The Paint Blur, the Surface Blur, and the Dust Scratch Blur, they are all the same process, they are just done with a different tool and they have a different result, but they're the same process. The last one is Frequency Separation, which is the better one, takes a little longer and it's a little more complicated. We're going to go through that right now. Alright, first one, the Paint Blur. It's quite literally what it says, it's blurring with paint. What I'm going to do is I'm going to start to paint, and I think folks in Photoshop get a little afraid to do this. It's literally paint, it's just selecting the airbrush and painting. Now, you don't do it with a ham hoc hand, so I'm putting it at 30% opacity, and what I'm doing is I am selecting areas of the skin and I'm just lightly painting at a light opacity. What this begins is that process of stepping on an image. I know this is a little hard to see, I'm going to do it a little heavier-handed than I would normally do, just so you can get a handle on the process. Slow and gentle. Big, fat brush. Please do not worry about the edges at all. This is where people's illustrations can look really clunky. Go big, you'll mask it in, don't worry about it, just go big, get a large, broad area. Alright, now, some folks will actually, believe it or not, leave it exactly as it is and add no texture to it. That's fine if that's the look they're going for. If they want to be a little heavier, a little more pancake makeupy, you start increasing the density, or, the opacity, of the file. You might still be able to get away with this, this is just basic simple paint. In fact, just for giggles let's put a mask on it. If and when, I do hope it is when, that you do try this process I'm going to ask you to do this: do the paint and then always put a black mask on it. Always, always, always put a black mask on it. Option + Delete, put a black mask on it. Why you're going to do that is now I'm going to paint it back in for real, I'm going to mask it in. Always put a black mask on this. I'm going to paint with the color white on the mask, and I'm going to mask that in. Why am I masking this in? This way, rather than adding a black mask, I mean, pardon me, a white mask and masking it out, I know most people will do it this way, the reason I do not ever do it this way is I have areas of paint showing that I may forget to mask. (gasps) Does that sound like something that sounds from personal experience? That is because I have absolutely done that and the job has gone out and I go, oh god, I missed an area. My new rule of thumb that's been in place for a gazillion years now is I always put a black mask. What that means is that when I am masking my brush, my hand, my eyes are exactly going over that scene. Nothing gets put down on this face that I haven't looked at. Do you understand? This is kind of an important point. (scraping) and then I can go through and mask it. All this is is paint selected from the face, I might want to paint that out, masked in. It's on an opacity of 50%. Now, I may be dealing with someone who's got some rather interesting taste on what women's skin should look like and I might be dealing with someone who wants pancake makeup, something very heavy. Happens all the time. Not that I agree with it, but they want something crazy heavy. Not that heavy, but heavy. In that case, what I need to do is add some texture. Right now I'm going to add some skin texture to this paint. That's step number two, it's for all of these steps, these three steps, you're going to add some texture. How we're going to add texture is I'm going to do Command + Shift + N and I'm going to make a new file. Why do that rather than clicking on the little icon for a file is I want to name it, label it, fill it all in this one window. Command + Shift + N, or... You PC folks, Control? Control + Shift + N? Anyway, someone's going to know what a PC uses. I apologize, I'm a Mac girl. I believe it's Control + Shift + N, or it's Command + Shift + N, and it's create new layer. You want to call it what it is, texture for skin. If you can pay attention here real quickly what I'd like you to do is make sure you clip it to the paint layer, put it on the mode called Overlay, and fill it with the color neutral 50% gray. You're not filling it with 50% of gray, you are filling it 100% with the color 50% gray. That's a very important distinction. It's so important they put it in there for you. Why Photoshop has that as an automation, that's automated, you just click a button, is because on the layer mode called Overlay 50% disappears. It's completely neutral, you will not see it. I'm going to hit OK. I now have made a gray layer on the mode called Overlay and it is clipped to my paint layer. If I unclip that, I can do that by holding the Option key and clicking, and turn it off, Overlay, you will see I have a layer of 50% gray. I'm going to clip it one more time, I'm holding the Option key, it's now grouped. Oh my god, she's got a mask on, she's exfoliating. No, she is not. You're just going to put it on Overlay. Now I'm going to put this on, pardon me, I'm going to fill this with a texture. The texture of choice de jour right now is going to be under the Filter Gallery, so Filter, Filter Gallery, Texturizer, it's down here under your Texture menu, Texturizer, Sandstone. It makes a lovely skin texture, Sandstone. You're generally almost always going to want that at the lowest scaling that's possible, which is 50%. In fact, that might not even be small enough and you may have to reduce this even further, but let's see. Alright, that's not too bad, 50% scaling. Alright, now, well, Jesus, that's a little pebbly, isn't it? Don't panic, what you're going to want to do is go to the Gaussian Blur, please note where you are, you are on the texture layer, Gaussian Blur, and you're going to just give it a little hit of a blur, 0.5 perhaps, let's take a look at that. Before, after. Before, after. That is absolutely more reasonable, I'd buy that. Now, I want to be perfectly clear, this is as ham-fisted as you get. This is crackers, but if someone's got $ and they've got catalog shoots, and they got legs where folks have fallen down and their knees are all skinned up and they need them cleaned up fast this is (makes kissing sound) fantastic, for $5. Now, obviously, on this particular shot we're not going to leave it at 100% opacity. We're going to pull it down, maybe 38%, but it's already starting to, gentle, the wee, sweet Sarah's skin. Now, do you see how I've really lost the shape of her face here on the side? Don't panic. Use that airbrush tool. Select that tone on that side, maybe change your opacity to, I don't know, 12, 15, go back to the paint layer. At this moment, please take your hands off the computer, take a breath, and go, where am I? I am on the paint section of that layer. I'm not on the mask. I'm not on the texture. I am on the paint section. Then click and drag with the gradient tool. I love me some gradient tool. Or go back to your paintbrush, make a big, fat, beautiful brush (scraping) and paint some tone back in. Turn it off and on. Yeah, it's getting closer. Alright, maybe I need to up my opacity a little bit. Maybe I need to up the tone a little bit, make it a little darker. You all following along? Yeah? Again, let us be 100% clear. This is heavy, but this is for those cheap jobs, those inexpensive jobs, those web jobs. I'd like to take a moment here to talk about at what level are you retouching? How close are you? How far away? There's some folks out in the planet Earth, some folks here at Creative Live who disagree with me. This is not good or bad, this is just a different philosophy. I have heard said that if you're working on web stuff and it's only going to be small you don't need to be really close when you're retouching. I would disagree 1000% with that. I would suggest the better practice is always be up here. Always. However, don't just stay here because if I would've retouched just to this zoom of, where am I, I'm at 200%, I can't see that I lost the form. I need to go back and then come forward and then go back because you need to see what level you're at. It is my goal to teach you the mechanics of Photoshop not, oh, it's this filter, or, oh, it's this new plugin, or, it's this. I am trying like crazy to get into your guys' brains, wait, how does this program work? Wait, how does it do this? Because my goal is when you're home and you've got a problem and you've got someone, in their arm they've got bingo wings down here and you want to shade it because you did this face and you had to wrap that tone around the face, that you will be able to extrapolate, hey, wait a minute, I know how to fix this. I'm going to get a paint layer out. Because I'm not going to show you how to retouch an arm with paint, I'm not going to do it, I don't have to. I already showed you how to use paint. I want you to be able to retouch in your mind and extrapolate, how would I do this, okay? On the same note as that paint, which I love doing, painting on a layer is fun, I'm a little lazy and I've got cheap clients. My next process, it's the same process, just getting there in a different manner, is I'm going to copy my spotting layer, Command + J, I'm going to call it Glorious Blur, or I'm going to call it whatever blur I choose to use. Communicate with yourself in whatever way you want to. Now, that painting was awesome but that took a little time and decision-making. I'm going to go ahead and say, hey, Photoshop, I know you know how to paint, or blur, and I'm going to blur the holy heck out of this. I'm going to make a copy and I'm trying to obliterate whatever looks not so lovely. Any imperfections, Sarah, you're lovely, all of you look just lovely, but you get the point here. I've just done this blur. I'm going to say, let's call it 20, I like round numbers, blur 20. Please talk to yourself, Gaussian Blur 20. Talk to the next person who's coming on your job. Talk to yourself. Now, at this point I'm going to do this a little different than we did the last time, just a little different. I'm going to take the Marquee tool and I'm going to draw a box around the forehead and I'm going to add a black layer mask. I now am going to zoom in up close and personal and I'm going to say, okay, I think this blur is going to work for me. I need some texture. Do that whole texture thing like I've already done. Texture, and maybe call is Sandstone. We're going to just look at other textures later, but for right now let's look at Sandstone. Once again, it's that same process. Clip, Overlay, 50% gray. Ba-da bing! Filter, Filter Gallery, Texturizer, Sandstone. Ba-da bing! Yikes, that's too sharp. Gaussian Blur, 0.3, 0.5, somewhere around there. I can live with that. Well, that looks a little big now, doesn't it? Do you see that texture looks a little big? It's amazing when you put that square how you can identify what you're looking at a little easier. I'm going to scale this. Command + T. What am I scaling? I am scaling the texture. And Siri wants to talk to me. Command + T. I wish that Photoshop would come up to a program where you could scale and grab it from the inside and not have to zoom out. They haven't. I keep asking, it's not here yet, one day. Alright, I scaled that. I'm sorry, I didn't look at the percentage, and I probably should've. That might be a little better. Might be a little small but that's alright, for this exercise we're going to go ahead and go with it. Now, what was the rule of thumb? The rule of thumb is always put a black mask, remember? I've got my black mask started, got that little square. I do not want that square. Fill it back with black. To fill with the background color, Shift + Delete. Wait a minute. Hands off the computer. Where am I? Am I on the paint layer, am I on the mask, or am I on the texture. I promise you, someone will be on the paint layer and they're going to go like this and they're going to fill it with black. What the heck? I do it, I do it, that's why I know you're going to do it, I do it. Don't panic, Command + Z is your friend. Where are you? Make sure you know where the car is pointed. The car is pointed forward. Black. (scraping) I'm painting it in. You all with me? Isn't this fun? Alright. No question. This is ham-fisted, there is no question. That's okay, it's a cheap process. You don't need to leave it at 100% opacity. Put the layer opacity at 50%. Ah, I can live with that. Ah, maybe a little more, maybe 80%? I don't know, it depends on who you are. I think 80 is awful. I do 80 all the time. I have clients who just want Barbie doll. Okay, I'm going to give them 50 first and make a mask for 80, okay? The good thing is, look how quick that is. You can send a file, you're going to be ham-fisted, we've already discussed this, it's nothing personal. You're going to go back later and you're going to go, oh my god, what was I thinking? And you're going to come over, and you're going to tap the 50 key, and you're going to go (sighs with relief), I'm done. In addition, if you send the file to the client and they say, oh, that just needs to be a little more, just a little more. You know what you do? You go like this, you hit nine, for 90, you go get a coffee, and you bill them an hour. (audience members laugh) Alright, so, yes, ma'am. Quick question from Naha Mirsky, who said, why can't we take texture from the original portrait rather than using that Sandstone texture? Awesome question, we're going to cover that in Frequency Separation, however, I will tell you, the texture on that original portrait is exactly what you don't want. With a caveat, I am going to show you a way you can get it, but that's another process. Excellent question. That leads me to the point of the fact that this is very basic, this is a very basic process and, as I said, it's ham-fisted. As we continue I'm going to show you other processes that you might be able to use this and include with it, and that's the extrapolation I was talking about. But hopefully you all will be able to figure this out later. I do need to point out a few errors. Not errors, but problems to watch out for. When you use Gaussian Blur there's this problem that happens is the whites and blacks blur into each other, so you will get a shadow on the flesh that is not so pretty. What you want to do, and I want you to pay close attention to this because this is not written down, when you do Gaussian Blur what you often need to do is take the smudge tool, smudge tool, be on paint layer, and just smudge the shadow back. I'm going to turn the mask off for a second so I can show you what I'm doing. I'm on the paint layer and I'm just pushing the shadow of the hair out. Oh, it's good, right? Shadow. Look how fast. Seriously, this is an excellent tool for doing fast retouching. A little ham-fisted, but okay. The most important point about any of this process is, remember I was talking earlier about the stacking order and how important it is? This is why you spot underneath. This is why you take out the unquestionables on the spotted layer underneath because if you spotted on the blur layer, and you were ham-fisted and they come back and they say, oh, take it back 50%, you've got to respot that whole thing. (exclaims with frustration) Does that sound like personal experience? That is personal experience. This is why you do the spotting underneath and then you do the retouching on top, the blurring.
Class Materials
Bonus Materials with Purchase
Bonus Materials
Ratings and Reviews
Tab
If you were like me and had no idea on where to start and feared that the editing process would be too destructive and would have to start all over again if the client didn't like your completed work - then this is the class for you. I watch this class often for review and to make sure that I maintain these good habits Lisa suggests to do. If you follow all of her helpful commentary on her how's and why's you will end up in a far better place when that time comes that you have to re-edit your edit. I cannot say enough great things about her work flow and how it not only enhanced my images to the result I was looking for but also decreased my editing time(bonus!!!!). I also on a whim sent her a email through her personal site and she replied with a massive helpful technique for enhancing freckles on a job I was working on. She is amazing! She is a true teacher who is there to show you how to use photoshop for you to find and gain your own editing style. Far too often i find myself in retouching classes that only demonstrate how to make your images look like who is teaching the class... Workflow and Style are very different, you can have the same workflow but your style is determined by your taste. Her workflow is solid and delivers time and time again. This class should be in everyone's dashboard hands down.
Kristine Pye
Thank you for taking the time to answer my question and take us through your "delivery" process, I found that extremely helpful. I have purchased two of Lisa's classes immediately after the live stream during Photoshop Week 2017 and was very excited to stream another set of lectures from Seattle. I will be purchasing the last two courses of Lisa's within the next 24 hours as I did just over a month ago. I find her classes to be absolutely brimming over with useful information--everything from the technique, her process, what other professionals in her work are doing, and **why** she chooses the methods she does in retouching. She is relatable and genuine, and her knowledge of the program and how to maximize efficiency while "skipping the actions" really reinforces the educational part of her courses. There are "easy way outs", but she emphasizes that you should understand the ways in which any adjustment effect the entire photo. These courses have helped me to move forward in my education, helping me to realize that with enough practice and good habit formation--such as naming every single layer every time-- that it is not irrational for me to make an effort in building a portfolio and a Master's degree with little-to-no- previous experience with the software. I am very appreciate. I hope to see more from Lisa in the future, but I have plenty to practice with for now! Thanks again, Kristine Pye kristinepye@gmail.com
Jeff Robinson
Lisa Carney is amazing! She has a depth of knowledge of Photoshop, retouching techniques, and compositing that she shares in a fast, but straightforward, easy to follow, step by step manner. No matter what your level of expertise, you'll find gems, shortcuts, and methods in her teaching that you can practice and put to use to make your work stronger, faster, and cleaner. And with the bonus materials she graciously provides, including workbooks with her detailed steps, practice files of the images she uses in class, and before and after comparisons, you'll be on your way to improving your skills immediately. She's an accomplished retoucher and gifted teacher. If you have the opportunity to take one of her classes, take advantage of it!