Lessons
Class Introduction
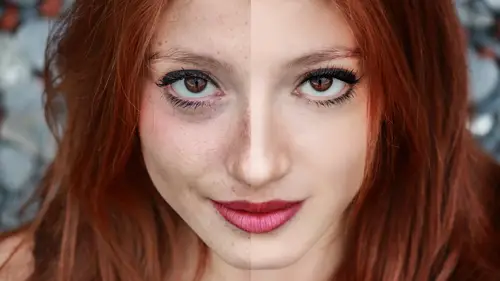
07:26 2Getting Started on the Image
05:12 3Mark Up Process
21:14 4Spotting & Cloning
28:53 5Gaussian Blur Smoothing Skin
21:34 6Surface Blur for Smoothing Skin
12:08 7Frequency Separation for Skin
24:30 8Create Skin Textures
10:24Color Correction for Skin
21:29 10Add Details to The Face
10:25 11Add Natural Looking Eyelashes
11:05 12Enhance the Eyebrows
03:20 13Brighten Whites of the Eyes
05:54 14Sharpen the Eye Details
05:08 15Replace Face Details with Masks
05:30 16Subtract Details: Freckles
15:27 17Add, Subtract & Paint Hair
08:46 18Create Hair Highlights
04:42 19Change the Hair Color
08:27 20Body Shaping: Overview
07:36 21Basic Body Shaping
08:48 22Body Shaping Through Masking
06:35 23Body Shaping: Liquify Tool
06:09 24Body Shaping: Puppet Warp Tool
08:14 25Retouch Wrinkled Skin
20:28Lesson Info
Class Introduction
I wanna talk a little bit about what we're gonna cover here. So, portrait retouching is really, really, really, really subjective and there is no right answer, there's no one way, there's no right, there's no wrong, there's taste, so I'm gonna continually refer to that here. During this class, I'm gonna say, look, here's a roadmap, here's some ways to go. Do you want A, do you want B, do you want C, or do you want D? With no judgment, so I just wanna start the course out letting you know that. Who's this for? Retouching, well, gosh, everyone can do retouching if you need to do retouching. My mom does retouching if she's needs to do retouching. Photographers, designers, art directors and creative directors, even if you're not the ones who have your hands actually in the pie, but you're directing the maker of the pie, I think this is a really good course to see how the process is done. For photographers, whether you're doing the retouching or directing the retouching, again, this is a re...
ally good course because it gives you some idea of what the process is, what the limitations are. It might even help you decide how you shoot, which I think is a really important point, so please pay attention in that eye view, if you will, to think about that. Let's see, what else? Bonus materials. We have bonus materials for this course and most of the courses I teach here at CreativeLive because I'd like you to be able to follow along and there's a lot of information, and I would certainly not expect any of y'all to get it in one round. And I will tell you, I know this from personal experience, doing this for well over 25 years, I will sit with another retoucher and they'll be doing a process that I've been doing, they'll do it ever so slightly different and I'm like oh, my God, I never thought of that one little tweak and it can change your complete workflow. So, I'm saying this is not a one-pass course, this is a course you're gonna wanna watch, come back to it another time, wanna watch it again. And in fact, what I think you'll find is, let's say you're in step one or step two and then a few of the steps go over your head, let it go over your head, that's fine. You can come back to it another time, your brain will be ready to absorb it or to do it or your hands, your skills will be better adept at passing that test, if you will. Cool? Excellent. What else would I like to tell you? Practice, practice, practice on all the stuff that I'm gonna show you. This course is not designed that you sit down and in your first pass, you're gonna have this handled in any way, shape, or form. And what I mean by that, this is definitely what I like to call a hand skill class. That means you're gonna take the practice steps and do them, and then you're gonna have to do it again and again and figure out, because it's often a subtly move, do you see? Tablet, let's talk about tablet. You're gonna be a retoucher, you need some kind of pressure-sensitive tablet. I cannot imagine anybody doing this process with a mouse or a touchpad, period paragraph. I think I could say this still, in my industry, I know one retoucher who retouches with a mouse. One and he's abnormal, and he's very good, but he's a freak of nature. Cheers, Roman, love you. And seriously, he's very good, but one out of everybody I know, so a tablet's kind of a necessity. And I gotta tell you, they're making them smaller and smaller, they're really inexpensive. I think right now you can get a refurbished small one for 65 bucks, so it's well worth, well, well, well worth the investment. So, tablet, practice, practice, practice. A lot of what I'm gonna show you, it's a feel or a pressure or a vibe process and visual decision-making process, so you've got two things. You've got your hands that need to start working for you, but then you've got your eyes, what am I seeing? And let me illustrate that. When I started retouching, this is just a quick little sample cover, I worked for a man who, just a brilliant, brilliant illustrator, painter, and he kept saying, "Oh, you gotta handle those nuggets "on the side of the nose." And I couldn't see what he was talking about, so I was using the Clone tool and I was just cloning, cloning. I couldn't see, I couldn't see anything and in about, I would say about a week and a half on the job there came a day where I started retouching on the next image and I was like, "Oh, my God, I can see them." It was the craziest thing, they were there the whole time, I just didn't understand and I couldn't visually see them, so you might find that in this process. And on that note, I'm gonna tell you, we're including three images with this class with the bonus materials for you to practice on and they're the actual images I use for the demo, so I would encourage you guys to give it a go. I understand that your workflow may have different kinds of imagery, but it might be a good practice to work on the same stuff you're looking at for this class, so I invite you to participate that way. Cool, and I'm gonna run over a little bit about what we're gonna cover. Alright, so this is kind of the master setup we're gonna do for the class. We're gonna first talk about marking up imagery, and I think this is very, very important process and I'll talk about that. We're gonna start with spotting and cloning, and it's kind of the base or foundation setup. And one of the things that you're gonna see in the setup, and I don't talk about it a lot so I wanna set it up now, I actually teach this course in the way that I retouch a job. So when I start a job, what I do is, if it's a new client, I mark it up, I look at it, I do the spotting, the cloning, I do the skin blurring, and I'm gonna show you multiple ways of doing that. The next step I'll do is I'll do enhancing detail and enhancing detail means adding eye detail or eyebrows or adding volume or contour to the face, shaping. Pulling out what's already there, really, and then maybe adding a little extra painting. Subtracting detail, that is when you get those really interesting skin conditions that you might have to deal with. Freckles, you might have to deal with freckles, so that would be a subtracting details element. Okay, then we're gonna talk about hair. Now, this is a time I'd like to tell you that on some of the processes I'm gonna talk about, you actually do it in a different order and what I mean by that is, removing cross hairs, that's done in the spotting. It's not done in the hair section. So, we've now hit the little moment in Photoshop where I like to explain that learning Photoshop, for me, is not a linear process. You start in Photoshop, then it gets you into this area and you're like, uh-oh, I gotta go back over here. It's more circular, this is one of those circular areas. So, while I have it set up in the third window for hair 'cause I'm in the hair section, we're actually gonna talk about it in spotting. Cleaning up exterior fly-aways, painting hair, setting up brushes, importing brushes, changing hair color, just for you, and adding detail, highlight detail. And then we're gonna, at the end, talk about body shaping. Now, I know body shaping isn't, folks don't necessarily think about it with portrait retouching, but inevitably, even in your standard portrait, there might be some kind of shaping that needs doing, bingo wings that I happened to have need to be brought in. And we're gonna talk a little bit about doing that and then, how do you do that in a workflow that you have to be able to go backwards? And what I mean by going backwards is, in my industry, I am not the final decider. My client is the final decider and because of that, I have to be able to go all the way back to the start, so how do you do that if you're doing body shaping and your cutting and manipulating? We have a way for that, we have a plan.
Class Materials
Bonus Materials with Purchase
Bonus Materials
Ratings and Reviews
Tab
If you were like me and had no idea on where to start and feared that the editing process would be too destructive and would have to start all over again if the client didn't like your completed work - then this is the class for you. I watch this class often for review and to make sure that I maintain these good habits Lisa suggests to do. If you follow all of her helpful commentary on her how's and why's you will end up in a far better place when that time comes that you have to re-edit your edit. I cannot say enough great things about her work flow and how it not only enhanced my images to the result I was looking for but also decreased my editing time(bonus!!!!). I also on a whim sent her a email through her personal site and she replied with a massive helpful technique for enhancing freckles on a job I was working on. She is amazing! She is a true teacher who is there to show you how to use photoshop for you to find and gain your own editing style. Far too often i find myself in retouching classes that only demonstrate how to make your images look like who is teaching the class... Workflow and Style are very different, you can have the same workflow but your style is determined by your taste. Her workflow is solid and delivers time and time again. This class should be in everyone's dashboard hands down.
Kristine Pye
Thank you for taking the time to answer my question and take us through your "delivery" process, I found that extremely helpful. I have purchased two of Lisa's classes immediately after the live stream during Photoshop Week 2017 and was very excited to stream another set of lectures from Seattle. I will be purchasing the last two courses of Lisa's within the next 24 hours as I did just over a month ago. I find her classes to be absolutely brimming over with useful information--everything from the technique, her process, what other professionals in her work are doing, and **why** she chooses the methods she does in retouching. She is relatable and genuine, and her knowledge of the program and how to maximize efficiency while "skipping the actions" really reinforces the educational part of her courses. There are "easy way outs", but she emphasizes that you should understand the ways in which any adjustment effect the entire photo. These courses have helped me to move forward in my education, helping me to realize that with enough practice and good habit formation--such as naming every single layer every time-- that it is not irrational for me to make an effort in building a portfolio and a Master's degree with little-to-no- previous experience with the software. I am very appreciate. I hope to see more from Lisa in the future, but I have plenty to practice with for now! Thanks again, Kristine Pye kristinepye@gmail.com
Jeff Robinson
Lisa Carney is amazing! She has a depth of knowledge of Photoshop, retouching techniques, and compositing that she shares in a fast, but straightforward, easy to follow, step by step manner. No matter what your level of expertise, you'll find gems, shortcuts, and methods in her teaching that you can practice and put to use to make your work stronger, faster, and cleaner. And with the bonus materials she graciously provides, including workbooks with her detailed steps, practice files of the images she uses in class, and before and after comparisons, you'll be on your way to improving your skills immediately. She's an accomplished retoucher and gifted teacher. If you have the opportunity to take one of her classes, take advantage of it!