Quick Reference: Photographing Women and Full Figure
Lesson 18 from: Portrait Photography BootcampLindsay Adler
Quick Reference: Photographing Women and Full Figure
Lesson 18 from: Portrait Photography BootcampLindsay Adler
Lesson Info
18. Quick Reference: Photographing Women and Full Figure
Summary (Generated from Transcript)
The lesson is about photographing women and full-figure women, with a focus on understanding their strengths and weaknesses and using posing and lighting techniques to flatter them.
Q&A:
What are some considerations when photographing women of different body types?
- Identifying their strengths and weaknesses and drawing attention to their strengths while minimizing attention to their weaknesses.
- Using posing to create flattering angles and shapes.
- Choosing clothing that flatters their body type.
Why is it important to dress female subjects for success?
Many people do not know how to dress themselves in a way that flatters their body type, so it is important to guide them in choosing clothing that will enhance their best features.
How can photographers achieve flattering curve and shape in their photographs of women?
- By adding curve through posing, such as arching the lower back or raising a leg.
- Using perspective to their advantage, such as shooting from a slightly higher angle.
What should photographers be mindful of when including hands in their shots of women?
- Photographing hands in an elegant and relaxed way, with the pinky side of the hand visible.
- Avoiding tense or gripped hand positions.
How can photographers add movement and create dynamic poses in their photographs of women?
- By adding wind in the hair or capturing a moment of movement, such as a step or a dress in motion.
- Varying the levels of the body to create interesting curves and shapes in the composition.
What are some additional considerations when photographing fuller-figure subjects?
- Pushing the hips further back and the chest further forward to define the waist and draw attention to the face.
- Being mindful of perspective to avoid low and close angles that can make certain body parts look larger.
- Paying extra attention to posture and chin placement to minimize the appearance of a double chin or softer jawline.
What are some recommended lens choices for photographing women?
- A 45mm fixed lens for close-up shots that emphasize the eyes and face.
- A zoom lens, such as a 24-70mm or 70-200mm, for mid to full-length shots that provide more flexibility.
What are some lighting setups recommended for photographing women?
- One light setup with a large umbrella and diffusion for a soft, flattering light.
- Two light setup with a background light to separate the subject from the background.
- Three light setup with a beauty dish for more dramatic lighting and a rim light and background light for added separation.
What are some tips for photographing women on location?
- Look for backlit areas with leaves or other objects that can create a dreamy background.
- Consider the hair color and choose a location and lighting setup that will not cause hair to become overexposed or blend into the background.
- Use reflectors to add light and sculpt the subject's face, and position them to catch the light at an equal or higher height than the subject's face. The lesson focuses on portrait photography techniques, specifically in regards to lighting, posing, and composition. The instructor discusses the importance of finding and manipulating light to create desired effects in the photographs. They also provide tips on posing the subject to enhance their features and create a pleasing composition. The lesson concludes with a discussion on capturing the right expression and using specific camera settings for different types of shots.
- What is the instructor's advice for finding the right light in a portrait?
The instructor suggests finding a circle of light and moving around to capture the light from different angles. - How does the instructor suggest posing the subject to create a slenderizing effect?
The instructor recommends having the subject kick their hips and waist back, lean their shoulders towards the camera, and turn their shoulders slightly towards the camera. - What does the instructor do to improve a headshot where the subject appears too short?
The instructor uses an apple box or step stool to elevate themselves and shoot from a higher angle. - How does the instructor modify the lighting setup for shooting headshots on a bright sunny day?
The instructor switches to a white reflector to soften the harsh contrast of the light. - What does the instructor suggest when shooting wide open at a low aperture?
The instructor recommends using back button focus and focusing on the eye closest to the camera. - How does the instructor create a captivating portrait with a simplified background?
The instructor shoots at a wide aperture to blur the background, while also capturing direct sunlight to add interest to the photo. - What does the instructor advise for shooting portraits on an overcast day?
The instructor suggests bouncing a little bit of light in the subject's eyes or using a reflector, as the lighting conditions are softer on overcast days. - What are some tips the instructor provides for achieving a pleasing composition in full-length shots?
The instructor recommends having the subject lean towards the camera or using an apple box to elevate themselves if they are shorter.
Lessons
Gear & Getting Started
1Introduction and Overview
1:53:24 2Cameras
55:41 3Lens & Focus
1:01:58 4Cropping & Composition
35:28 5Group / Accessories
45:29Lighting Essentials
6Intro to Studio Lighting
1:13:03Modifiers
41:08 8Natural Light Essentials
21:01 9Speedlights
37:28 10Training Your Eye - Light
28:08Posing & Directing
11Directing and Posing Headshots
46:50 12Posing Couples
21:18 13Posing Individuals Full Length
25:35 14Posing Groups
22:10 15Posing: Training Your Eye
15:34Subject Matter Essentials - Bringing It All Together
16Headshots: 3 Go To Set Ups for Men and Women
37:11 17Quick Reference: Photographing Men
29:39 18Quick Reference: Photographing Women and Full Figure
48:15 19Quick Reference: Photographing Couples
36:55 20Quick Reference: Photographing Families and Groups
30:43Lesson Info
Quick Reference: Photographing Women and Full Figure
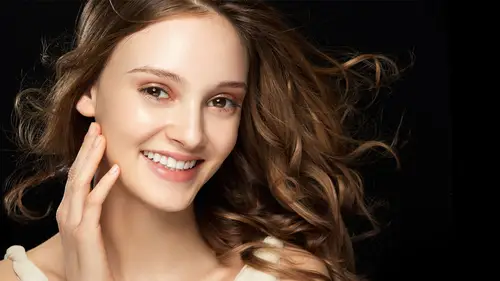
This is your quick reference guide for photographing women and full-figure women. So I wanna take you through the checklist of the things that I'm looking at when I'm photographing a woman to make sure that I'm getting the best portrait possible, whether it's mid-length or full-length shot. And then some of the considerations that you want to keep in mind if you have a subject with a little bit more curve, or maybe someone's who's a little bit fuller figure, because that is the majority of who our portrait subjects are going to be. I'm a fashion photographer, and a lot of times I'm photographing women that are size zero and size two. The average size in the United States is about size 14, and so when I'm hired to do portraits they aren't the same size, they aren't the same shape as my "standard" model, but it's my job to make everyone look beautiful, I need to flatter everyone. So if you understand how your camera sees, if you understand posing, it's going to make you prepared to bring...
out the best in every single subject that comes in front of your camera. So let's go through this checklist, and I'm going to give you the generic, the general women's checklist first. And you can see that right here. I have five things that I'm thinking of when I photograph every woman. And the very first one is that everyone has different strengths, and everyone has different weaknesses. And so my job is to identify what those are and draw attention to the strengths and attention to what they really love about themselves, but then draw attention away from weaknesses. And so, for example, if somebody is a little bit fuller at their mid section, what can I do to draw attention away from that? Maybe it's going to be closed, it doesn't have to be related specifically to the photography aspect of it, but selecting closer we're going to flatter the mid section. And then, as far as posing, it could be kicking the hips away to make the mid section look smaller. And then maybe your camera angle, not shooting from a low angle, where the stomach is closer to the camera. So all of these things. So, really, what I'm doing in my checklist is saying, "Okay, well, what are their strengths?" They've beautiful eyes, I wanna make sure I see those eyes, they're glistening, I have a way to have her eyes connect with the camera, if that's her strength. Or a subject with beautiful long legs, am I showing those legs? Am I showing a pose that shows how beautiful they are? And if there's something that's a little bit weaker, I just wanna push it to the background, make sure that it's not drawing a lot of attention. And this could be lighting, this could be closing, this could be posing. So this is why, as photographers, we have such a big toolkit so we can go through our checklist and be able to draw attention to strengths and away from weaknesses. So that is number one. Number two kind of ties back into this, these are all related, but it's to dress your female subject for success. A lot of subjects, a lot of people don't really know how to dress themselves, and a lot of people just wear what's currently in style, not necessarily what works best for their body type. So before you have a session, make sure that your subject either brings a lot of clothing to choose from or that you have a discussion before they get their portrait done. There's plenty of websites online that help people figure out what their body type is and the type of clothing that they should wear. For example, if you have a subject that is a little bit fuller, that's a little bit round, maybe a bit of the apple shape, and they don't have a defined waist, perhaps you wanna find some sort of clothing that maybe gathers at the waist and gives the impression that there's a little bit of a narrowing point. Or maybe they're wearing a belt. Or maybe there's a subject that has wider hips, perhaps you don't want to dress and posing in a way where they've pockets and their hands in their hips, because this is going to draw attention there. So you're dressing for success by talking about it beforehand. Discuss the clothing so that when the subject shows up you're not kind of just stuck with one option. So that's checklist number two. Number three is curve. When you photograph women you want to include some sort of curve. So if you're looking at your subject and you see lots of locked limbs, locked knees, you see lots of right angles, or you see just a lot of attention, not a lot of curves to shot, you wanna add it, and there's a lot of different ways to do that. It might be showing some negative space and arching the lower back to show curve in the lower back. Or maybe it's getting the leg up so you can see the curve on the leg and on the knee. So when you're analyzing your checklist, "Okay. Are there curves that I could add "to flatter my subject?" So that was number three. Let's go on to, then, checklist number four. It's, if you're including hands in your shot make sure that you're photographing them in an elegant way. And, typically, you want them to be soft, you want them to be relaxed, and you want to see the pinky side of the hand, whether that's by the face of on the side of the body. And so that's why a lot of times what I do is I have people get into a motion in order to have their hand soft. Try the thumb up their side to place their hand. Real soft on the waist. And I'll show them what I'm looking for so I can have soft hands instead of gripped and tense. And the number five is, if you have a pose you look at, you look at it and think, "This looks really static, "it's just really bland", what can you do to get the pose so that different parts of their body is in different levels? Like, can you raise a leg up, for something a little bit more dramatic. Or maybe one hand up, one arm up. Is there something you can do to vary the levels of their body? 'Cause that gives you interesting curve and shape in composition throughout your pose. So these are kind of the five things that I'm looking at. Again, wanna draw attention to their assets, what makes them proud of themselves or what draws you to them, but then kind of put the weaknesses in the background. I use all of these different tools in order to do that. Now, I use all the same approach to a fuller-figure subject but there's a few other thing that I consider. No matter what pose my subject is sitting in, or standing in, or leaning in, whatever pose they're in, I do tend to push the hips further back and the chest further forth, 'cause I'm trying to take the hips and push them away a little bit more to find a waist a little bit more, and draw attention more towards the face. So I'm just going to push this a little bit more to an extreme, and this might mean if someone leaning against the wall I have them kind of lean down the wall at me, or if they're sitting on the ground kind of lean out towards me just a little bit. So that I emphasize just a little bit more with the fuller-figure subject than I do normally. Alright, number two. I pay more careful attention to perspective. Where is my camera angle? I know that with the fuller-figure subject I want to avoid an angle that is low and close, because whatever is closest to the camera looks larger. So if I'm low and close to them that will make thighs or mid section look larger. So I really am careful not to do that. And if I am getting a little bit lower angle I'm gonna go back to this number one on this particular checklist and make sure I'm really pushing the hips back and really pushing the chest forth, trying to correct for that lower angle. But, in general, I'm gonna avoid lower angles. And then, I often, to my advantage, use perspective. I will shoot at a slightly higher angle for fuller-figure subjects because now as my camera angle comes up, whatever is closest to the camera is gonna look larger, eyes and face and chest, whatever is farther, legs and hips, will look smaller. So I'm using perspective to my advantage. Number three is going to be that I'm extra diligent about the posture as well as chin. 'Cause someone that's a little bit fuller figure is more apt to have a double chin, or has some problem with a softer jawline. So I keep saying over and over again, I'm just very diligent, "Chin out and down. Perfect. "Okay, remember, chin out and down. "Put to the top of your head. That's great. "Relax your shoulders", and we say it over and over again. I'm even more diligent when photographing a fuller-figure subject. Number four is that we don't care often if a subject is size two or size 22, as long as they have some sort of definition to their waist. We think the defined waist are beautiful. In many different cultures sizes that we consider ideal, very, completely different, it's very drastic. But nowadays we like some sort of definition to the waist. You can do this with clothing, you can do this with a belt. In this case, for example, even in my clothing, right here, it's giving me a bit more of a waist. But there are other ways to do this as well, and you can do it with posing. If your subject doesn't have much definition, is a little rounder in the middle, it could be posing so that your hands fake a waist. Your subject is actually using their hands to create the impression that there is a waist there. And so I will do this very, very often. And notice how I can slid my hands around. When I have my hands out to the side, farther out, it looks like I have a wide waist and I can't really reach my arms around. But if I fake my hands forth it's like, "Oh, look how narrow my waist is". So often I'll create a waist and narrow it with the pose. Next on my list, and this is true for all subjects, but I'm just a little bit more careful with fuller-figure subjects, is I wanna be aware of my negative space, meaning if the subject has the arms just a little too close to the body and I can't see the side of their body or the back of their body, it's gonna make them look wider. And so I use negative space to define the form. I want to see curve, I don't wanna see everything blended together 'cause then that looks kind of blob-like. I want space. So I'm being a little bit more careful with that. And then, lastly, I am very careful, for full-figure subjects, with seated poses, when they're sitting down, sitting in a chair, sitting on the floor. Tends to happen to people when they sit is everything in the mid section gathers, and also, if you have maybe fuller thighs and sitting in a chair they kind of spread out a little bit. So I need to find ways to be very careful and watch, be very diligent when someone's sitting. They point to the top of their head, they are elongating, maybe they're sitting on the edge of the chair so is not to put indents on the thighs. And making sure that I'm elongating my subject, I'm having good posture. And so a lot of times I will tend more towards a standing pose or a leaning pose, or a pose even laying down than just sitting. So there's just a few other considerations that I have as a checklist when my subjects are full-figure. A couple of other things that I wanna talk about when I'm photographing women. Most of the things I've talked about so far have been clothing and camera angle and posing as well, a few other things, if you have a subject that's a little bit older be wary of posing hands near the face because hands tend to show age more quickly, and it may be something that they would be subconscious about. So just be aware of that for older subjects. Also consider adding movement. This is not something you have to do, but adding a little bit of movement makes a pose or a portrait more dynamic, and that might just be wind in the hair. To capture a moment in time instead of a still frame. Or might just be a movement of a dress or look like a little bit of a step, and that will give you more dynamic posing. So once you've gone through your go-to poses, is there a way you can add just a little bit of movement to make it more interesting? Also, I shoot a lot of really narrow depth of field with women 'cause I love to connect with their eyes and have the background go soft. It creates a very nice mood. When I do this I'm making sure to use back button focus. I use back button focus so I can lock in the focus on the eye closest to the camera, I can focus and recompose with subtle movements, and you will see that as I photograph women outside. Let's talk about my lens choices. Lens choices when photographing women, there's so many different options, there's not really a right or wrong answer. On occasion I shoot a lot of different 45 fixed lens, an 45 1.2, 1.4, 1.8. Any of those will work so I can have my subject lean towards the camera, focus on the eyes and have soft blur in the background. When I'm in the studio I tend to work more with a lens that's perhaps a zoom lens, just to give me a little bit more flexibility. And using perspective for full-figure subjects, I might vary my focal length to use it to my advantage. So I shoot a lot with the 24- for mid to full-length shots, and the 70-200 for close-up shots in the studio. I know a lot of photographers photographing women their go-to one and only lens is the 24-105 4.0. So kind of depends what you're comfortable with. Photographing women, it all depends on the shot that you're trying to capture, what you want the background to look like, the type of focal length you're looking for. So what we're gonna do is we're going to go through three different lighting setups, and the lighting setups we're gonna do one, two and three lights. And this is just for, I don't wanna say generic but a general flattering women's portraits. If you want to get even more intense I have so many different classes here on CreativeLive that are all about lighting: if you want dramatic, if you want high key, if you want something that is harsh, I've got it all, but this is going to be a really great lighting setups for creating beautiful portraits for a variety to subjects. Alright, so what we're gonna talk about for poses is a general pose for standing, where the weight is back and the hips are back with the chest forth a little bit. That will be one pose. Another one is going to be a pose where one leg's up and you create a little bit more added to it, a little bit more shape to your subject. And then, lastly, we are going to cover a sitting or reclining pose, and what I'm seeing as I'm selecting this pose. For our lighting we are going to do one, two and three lights, and we are going to use an umbrella with diffusion. But, basically, what we're using is a soft light source. With one light I could use an octabox, but an octabox a lot of times the bottom part of the body falls to shadow, so here we are using a large umbrella with diffusion, and you'll see that in action with one light. And then from there I'll build up a little bit because perhaps the subject is wearing dark clothing and they're blending into the background on the shadow side of the body just a little bit. I can add a second light to separate them out from the background, and I can have that light just, actually, just light the background to wash across to pop them out. And then, third, we're gonna go a little bit more dramatic with a beauty dish, a background light and a rim light. So let's take a look at those poses, at those lighting setups in action for your quick reference guide for photographing women's portraits. So let's start with our one light setup as well as our essential women's pose. So the light that I have here is a large umbrella and it has diffusion over it, so it's basically a big soft box. I love this because it is portable and I can pop it up and bring window light with me anywhere that I go. Now, when I'm photographing a fuller-figure subject sometimes if I want a little bit more shadow on the side of their body, this might be a good thing, not a ton of shadow, but it gives a little bit more sculpting, and your eye is drawn to the lit parts of the photograph. So if somebody is flat lit you are looking at their body from left to right in completion, but if you add a little bit of sculpting, a little bit of shadow, it actually minimizes the width of what their body looks like. Now, in this case, I have it a bit off just a little bit to the side for just a tiny bit more drama, but you can put the umbrella more centered if you don't like this much shadow. So the large umbrella with diffusion. Let's talk about out super basic, super essential pose. What I would like is I'm gonna have you -- I mean, let's take a picture, this is how she's standing comfortably. I'm gonna show you the "before" shot, pre-posing. Okay. (camera shutter) Great. So this is when I asked her to just stand on the background for me, this is how she stood comfortably. Notice all the things in our checklist that we don't want, when we went back to the essentials of posing she's flatfoot, that doesn't really create a lot of dynamic shape. She also has no negative space, her hands are closed to her side so you can't see the sides of her body. So I wanna fix these things. So my first pose that I wanna try, can you give me a favor? Turn a little bit to the right. Great. And I want you to kick your way on your back hip. Perfect. And I've had, we've not practiced this. Notice how she even tried to bring her knee just a little bit. It's just naturally, that's how it works. Can you actually kind of tuck your foot like that? Good. And bring your knees together. Good. Alright, so I turned her to the side. Now, with some people, she's fine, with some people if you turn them completely to the side you'll see if they have a stomach, so I usually will have people turn to the side, kick the hips back, and just bring their body a little bit back towards the camera. So, perfect, just a little bit back towards me. Great. Alright, so now what I have is I've got negative space, I have a narrowing point, she got narrower at the bottom part of her body here. Great. The next thing that I'll ask the subject to do, can you arch your back just a little bit? That's the way that I'm adding curve. So I've added curve here and in her lower back. I've slenderized here. And then, also, can you lean your chest towards camera? Great. And turn towards me just a little bit. So now I have curve and whatever's closest to the camera looks larger, which is her face and her chest. So I'm gonna take a picture of that so you can see. Great. (camera shutter) And turn your chin towards me just a tiny -- There, beautiful. And take a look at that. Looks great. Perfect. Now, when I am photographing a subject that is fuller-figure, if I want to use perspective to my advantage what I can do is I can stand on an apple box because then I can put her face and her chest even closer to the camera, and her hips and her waist even further away. And this doesn't have to just be for fuller-figure subject, really just if you want to exaggerate perspective. So that's what I'm gonna do with that here. I really -- I, actually, when I met her I told her I thought her eyes were beautiful and I loved her smile, so that's her strengths to me, so I wanna bring that even closer to the camera. And I would love a reflector on this side of some sort to soften the shadows just a bit. So same exact pose. Perfect, right there. (camera shutter) Great. That's a good smile too. Okay, give me one last smile. Good. (camera shutter) Okay. So looking at this photo, loos great. I see her face and her chest look larger, she has curve to her lower back, there's a narrowing point at the bottom of the photo. Now, the one tweak I'm gonna make to this one light setup is I'm going to add a little bit of reflection on the right-hand side because the shadows are a little dark. And this is a happy picture, and she's got a great smile. So just bring it up just a little bit. Okay. So we're just gonna soften the shadows. And I'm gonna bring you around this way a little. And so, if I move the reflector around to the back that's more of rim light, if I move it around to the front a little bit more it's a tiny bit more fill. Let me just do. Right there. Perfect. One more shot. And I see one change I'll make. A little softer with your fingers, a little softer on the waist. Great. Perfect. And lean towards me. Great. (camera shutter) Wonderful. Can you back up like a step or two? Good. I don't want the shadows to go away. Okay. (camera shutter) And one more last smile. Perfect. (camera shutter) Great. So that is lighting setup number one, large umbrella with diffusion, and you can use a silver or white reflector in order to soften the shadows a little bit if you want. If you wanna reduce the shadows you can also bring the umbrella around to the front a little bit, there'll be a little less sculpting. And then, pose number one, hips away from camera, hand on the hip, chest and waist -- Chest and face forth. And then, if you want to exaggerate perspective, shoot from a slightly higher angle. Alright, let's go on to number two, lighting setup number two. Thank you very much. That's perfect. Alright, so I'll have this light a little bit further off to the side, and I don't want her to blend into the background. So I could use a reflector, but I could also light the background so it's a different tonality, I can add another light. And there's lots of different lights that I could use. If I wanted a circle that radiates out, so it's like a spotlight on the background I could use a grid or a zoom reflector with a grid or a snood. There's a lot of different tools you can use. And if you watch my Studio Lighting 101 class I go through all of those different tools. Or I could just add a soft gradient. And so, if I have a strip light, a strip bank, I can turn that on and just kick a tiny bit of light on the background. And so what I'll have is I'll have the highlight side of her face here on the left against the darker part of the background. So that stands out because it's contrast. And then, this darker side of her face over here against a lighter part of the background. Contrast again. Now, one of the things that I use as a trick if I'm working at a small studio, which is what we have setup here today, we have a small space, is sometimes I'll use the background light and I'll angle it so it also hits my subject just a little bit so it also becomes the rim light. Sometimes you have to be resourceful because you're in a small space so you don't have two, three, four, five, six different lights. So I can actually aim this strip light so it is giving here a little bit of highlight on her arm and her lower back and on her hair. If I don't want that I just change the angle a little bit. So this is going to be with two lights in that situation. Now, what I'm going to do for a little bit different pose is I'm gonna, really wanna change the angle that we're at right now of her legs. I've got a little bit of hip but I want something a little bit more dramatic, and there's a couple of different ways I could go with this. So let me try that. Can you put your left foot up on that apple box? Great. And then turn your hips towards me just a little. And, can you put your hand on your knee? That's that. And lean towards me, and hand on your waist. Perfect. So, something like this what it does is it gives me negative space here, but then I've got a really nice curve in her lower back and on her leg. And so, it's a little bit more of a confident pose, a lot of shape to it. I could do something in that direction. I could also, if she were wearing a dress, a full-length dress, is we'd just give a lot of curve, and I can use that as a the base and I don't have to have her hand still on her knee, I could bring it up to her face. Bring your hand up to your face real soft. Good. And I'm gonna have you trace your index finger around the side of your face just like that. Good. And then turn your hand in towards your face. Perfect. And lower your fingers just a little bit. So I can kind of have the hand there, and I can use the hand across the chest, across the leg. So let's take a quick shot of this. And rotate your whole body, including your foot, towards me just a little. Great. Perfect. Comfortable? And you put your hand back on your knee so you can lean forward, lean your chest towards me. Chin out. Great. (camera shutter) And let me get an apple box please. Perfect. Good. So, you can use perspective to get up a tiny bit higher. That's great. (camera shutter) Perfect. (camera shutter) And I'm gonna come in a little closer. And, can you put your hand a little more on your waist? Good. It's a little lower towards the hip. Great. (camera shutter) And then, sort of put your fingers at me, put them that way just a little more, kind of just wiggle, relaxed, shake your shoulders. Good, perfect. And lean forward just a little bit more than way. Good. And chest towards me. Perfect. Right there. (camera shutter) Great. And the last one. (camera shutter) Okay. Wonderful. So that would be my lighting setup number two. And, as I look at this setup I see that there is negative space, and there's lots of curve, I wanna make sure her hand looks soft. She's separated from the background there, and there's just a little bit of rim light on her. But, before I go on to my last shot, I do wanna do one variation of this. I'm actually gonna do my other pose and I'm gonna have her sit. So, I'm gonna have you take a seat for me. And you can do, yeah. And just kind of lean down on your side. Thank you, John. Great. Okay, so for a pose like this what I want someone to do is I want them to lean on their side. If they just kind of sit on their bum what end up happening is everything gathers and you can see it. So sitting on the hip is going to be a little bit better, and I can see her lower back. On my checklist of things that I wanna see is I wanna see curve. So what I can have her do is just arch your lower back a little bit and I added a curve there. And, for her legs, going through my checklist of things that I want, I don't want -- Tuck your knees back, the feet back. I don't want that because it looks like she doesn't have legs, it kind of cuts off, so I want her to pull her legs out to the side but to keep her ankles crossed. If you put the feet one on top of the other, can you do that for me? And then put your feet out. It tends to make the legs look wider because you've stacked one on the other. So if you come back to crossing them and tuck one over, it's gonna make it look a little bit daintier, And it's also gonna make her legs look a little bit narrower. Alright, now, for the rest of her arms and her pose. For her arm that she's putting weight on the key is to not put too much weight on it, because as the subject leans out the muscles flex and the arms are going to look larger. So you're just barely placing weight on. And you wanna watch the hands to make sure they're not in really tense, right angles, a lot of pressure, 'cause it won't look natural. So, how she has it now is perfect. That's really good. Excellent. And, how about the other hand? The other hand there's a lot you can do. You could, let's say someone has a little extra weight that they wanna hide, you can cross the arm over just to hide it, just obscure it just a little bit. Or, can you slide your arm up just a little bit that way? Real soft. I can add some negative space. Or I can put the arm on your knee and use negative space there. So you can kind of vary that other hand to give me variety in my pose. So let's take a shot. Here. Great. And let me make sure this background light is hitting background. Great. And I'm going to get down at a lower angle so that I'm more eye level. And you can cross the arm. Cross for one. Perfect, just like that. And chin towards slight for me. Good. (camera shutter) Perfect. And, can you fluff your hair a little back there? Good. Great. And look up towards the light. And chin down, and your eyes look ... Look at the bottom part of the light. Good. And look your eyes towards me more. And so I'm just watching and make sure I don't see too whites to the eyes. Good. (camera shutter) And let's bring your arm in on that side. Oh, your right arm. Towards your body, and bring it nice and close, and just put it right on the ground next to you. Good. And let's see, now lean out just a little bit. Okay, so what I was going to demo is you'll see if she puts too much weight on it it'll start to look like it's a little bit of pressure and you'll see the hands tense up, but she's actually ... That's pretty good, you didn't get too stressed there. You know what you're doing. That's good. Okay, so you can put your hand out back for one more. There you go. (camera shutter) And chin out just a little more for the light. And then hand on your knee for me. Good. (camera shutter) Perfect. You look great. Okay, cool. So let's finish up that last lighting situation. So, can I help you out? There you go. Perfect. Beauty dish on this one. So we're gonna go a little bit more dramatic. We're going to put, we're gonna have three lights in this instance. We're gonna have a beauty dish on out main light, and a beauty dish has more contrast, more drama. So I've decided that's what I want for this shot, contrast and drama. But, when I do that I'm gonna put the light off to the side, it's gonna add a lot more shadow, and I'm gonna need to separate her out from the background. So I can combine rim lights, I can have two rim lights separating her out from the background. Or I could have one on her, one on the background itself. So let's see what works best for this. And I think I'm gonna add a grid. A grid, you've seen in our lighting demonstration, it focuses the light in, which means the light is not going to hit the ground, is not going to hit the background. So this is going to be really much more dramatic shot. And I wanna make sure that I have the light approximately even with her face or nine to maybe 12 inches above eye level. So if the light's too low the shadows cut across, it doesn't sculpt her face, specially with fuller-figure subjects. If your light is too low it actually can make the face look wider. You wanna have a little more definition from the jawline, and a little bit more definition from the cheek bones. So that's why you raise that light up just a bit. Okay, cool. So I'm gonna put you back in our second pose, 'cause it was dramatic. A little bit more dramatic. So that leg up. Perfect. Arch your lower back, hand on the hip. That hand on your knee. Great. So I have a good shape there. I'll have my second light, the strip light, separating her out from the background so she doesn't blend in too much. Okay. And then let's take a third light as another rim light just to carve her out just a little bit more. Great. Perfect. I wanna give it a quick test, and I need my apple box. Great. And hands off right there. Okay. (camera shutter) Perfect. I'm gonna the light a little lower, please. And turn your hips and everything towards me more, you're a little bit too -- And that bottoms leg, yeah, 'cause then you're gonna get like all, you know, hide up. Perfect. Lean towards me a little. (camera shutter) Great. And softer hand. Just a little bit wiggle. Good, perfect. And great. (camera shutter) Perfect. And I wanna do one more. I'm gonna go super serious, okay? I'm gonna grab my smaller apple box, so you're like, this doesn't have to be so high, and we're gonna just go dramatic. So I'll have you look up that direction. Perfect. Okay. Put your foot back up. Great. Same curve. Beautiful. And you can bring your hand across on this one, over here. Lean your chest towards me. And I'm gonna have you look up this way. Okay. (camera shutter) And that hand on your knee. Beautiful. (camera shutter) And chin down a little. And the eyes at me. Great, I'm gonna go a little higher. And turn your shoulders towards me a little more. Great. Beautiful. (camera shutter) Alright. So for the setups that we have here, anytime you look at a shot like this and if you think the shadows are too harsh, they're too heavy, add a reflector, add a fill card, it'll fill them in a little bit. If it gets a little bit too filled in, if it flattens out your shot, back out that reflector. So that is something I could do here. Check on your checklist to make sure that you're drawing attention to the subject's assets. Have her lean closer to the camera, perhaps, hips away. And then always kind of do a check, how are the hands? How are the eyes? How are the expression? How is the expression? So we have three poses, two standing, one sitting, and we have three lighting setups. Also keep in mind that with the studio lighting classes that I have you can shoot on white and make some of these higher key, can change the modifiers for more drama. This is a starting point just to get you some essential women's portraits. Alright, let's talk about this lighting setup with a little bit more drama to it. We switched over to a pro photo beauty dish, it's 20-inch wide. And a beauty dish is going to give me a little bit more contrast. We've added a grid, which focuses the light in, and it actually makes as if the background felt really, really dark, because now with the grid the light can't reach the background. If these things sound a little unfamiliar to you make sure you check out some of my studio lighting classes, I go into this more in depth. So I use this for some drama, have the beauty dish a little bit off to the side for some shape. And also the bottom part of her body is going to fall to shadow because of the grid. Now what I need to do is pop her out from the background, and how I've chosen to do that for this lighting setup is by using a strip bank lighting the background on the right-hand side, so it gives like a subtle gradient of highlight across. And then I've added another strip light on the left-hand side so that you'll be able to see a nice highlight on her hips and on her arms. Let's take a look at the pose for this shot. Now, if she faces me straight on towards the camera typically someone's going to look their widest, or look wider because they're straight on towards camera. So I need to do a few things to play around with perspective, and play around with pose in order to give her a more flattering shape. The first thing that I want to do is I'm gonna have you put your hands on your waist, and I wanna make sure she doesn't put them on her hips. A lot of people, if you say, "Put your hands on your hips" they do something like this, and you're drawing attention to someone's width from side to side. So instead I want the hands on the waist. But I'm going to have her move her hands in a little bit closer to the front, and it fix the waist or emphasizes that she has one. Now, if I photograph her, and she's quite tall, from the eye level I'm at right now, I'm about even with her mid section and her chest, and so those things closer to the camera is not going to be flattering. So what I'm going to do is I'm going to get up in an apple box and I'm gonna have her lean towards me, and as she does it's going to define her waist even more, make her hips and her waist look even smaller, but she can still face straight on towards the camera. In the previous, for other poses that she turns to the side and leans forward it's a little bit more of the side of her, it's a little bit softer, but this is a little bit more in control, straight on towards the camera, hands on the waist, defining the waist, lot of eye contact. So let me modify that, and talk about my craft as well. So let's take a look at the light before I get her in that pose. (camera shutter) So I've got the rim light on the left, beauty dish carving her out, and a subtle gradient from that strip bank. So now, let me get a little bit higher. Could you put your hands on your waist? Perfect. Let's put both of them on. Great. And I'm gonna have you pulling just a bit. And then keep your shoulders back but your hands forth. Great. Okay, now. (camera shutter) What that does is she seems like she has more of a waist, my eyes are connected to her face, but the problem is the bottom part of this frame, it's too straight up and down. My eyes basically leave straight out, there's no narrowing point, and what I wanna see is I wanna see her have curve. And so to do that what I wanna you do is, can you just tuck one knee in? Okay, so just tucking that knee in a little bit is going to at least narrow out. And then I'm going to have you lean way forward. So all the sudden what you saw is that dress tightening up around the bottom part of her legs, and now I have a nice narrowing point, so my eye will go curve, curve, curve. And so I'm giving her an hourglass figure where as when you're standing up straight with hands on the side, which is very straight up and down and very boxy. So I'm using my perspective, her pose, the way she leans. All of that will work together. And, of course, the background rim light and the background light are going to make sure I can see the contours of her body. Perfect. And cross the knee even more. Right there! Perfect! And the reason I have her cross her knee over even more is her two knees where side by side and it made the bottom part of the frame look a little wider. So let's take a few more shots like that. Great. And relax. Perfect. Great. (camera shutter) And turn your head a little bit to your right. Just a little. Good. (camera shutter) And wiggle your fingers. Tuck them back down one more time. Great. And settle in. Right there, perfect. And elbows towards me just a little. Great. Beautiful. (camera shutter) So this light is dramatic, it gives me something that feels maybe a little bit more cinematic, but her pose works well with it because it is confident, straight on towards the camera but showing her beautiful curves. Now we've stepped outside for some beautiful women's portraits on location. And so I just wanna take you through some of the things that I'm thinking, what I'm looking for, some tips and tricks for photographing women on location. A lot of times natural light is just fine, if you're just going for a beautifully-lit headshot, or a mid-length shot, I don't need to take a lot of gear on location. So right now we're just going to modify and see the natural light that is already here. And we've chosen a place where we're underneath the cover of trees, 'cause a lot of times that's going to be something you have available to you. A park, or it could be someone's yard. And let me show you what I'm looking at, though, where I'm going to place my subject. As I was looking around this environment I wanted to find a location where there were leaves behind that were being backlit by the sun. Why did I choose that? I choose that because when I shoot in a wide aperture, 2.8, 2.2, or if I shoot with the 70-200 at 2.8, what it does is it throws those leaves out of focus, and I get these little bubbles, little focal, and I call it "dreamy bubbles", that's just what I call it, and say, "Oh, great, I found some dreamy bubbles". So if I photograph her right now with the background that I can see of the light coming through the leaves on the trees, it's going to give me a really beautiful and dreamy background. Alright, before I take that shot, though, let's talk about where I'm setting here in the scene. If you have a backlit situation, like we do here, I am going to place her in an area where I know she won't blend in to the background. If she has dark hair I wanna make sure that there's not a black background behind her 'cause she'll blend right in. But, if she's blonde or has really light hair, I wanna be really careful of putting her into direct sunlight 'cause what happens is that direct sunlight hits the hair, it goes overexposed and it becomes distracting. Plus, you see every little stray hair that's there. So in some shots, particularly at high noon, even though backlight looks beautiful, it might not quite work. In the middle of the day you might have to step her over a few steps, just a couple this way, so that she's a little bit more in the shades. And we're actually really lucky right now 'cause there's a little bit of wind blowing in her hair. So that looks great. Let me take a test shot with no reflectors, just to take a look at while it looks like. Okay, let's look at those backlit leaves on the trees. Great. And right now I am shooting at 2.0. (camera shutter) And I'm focusing on the eye closest to the camera, and you'll see all the little bubbles that show up behind her. But, unfortunately, I'm going to need to add some sort of light. Right now what I'm getting is a lot of bottom light, and the ground happens to be covered in needles that are brownish yellow, so what I'm going to do is I need to overpower the light that's there. I don't like the direction, I don't like the quality. It's flat, it needs a little pop. So I'm gonna add a reflector in, and I'm going to add this silver-white reflector. Remember how we talked about with natural light I want it to be equal to her face in height or above. If I want the light to be sculpted I'll move it out to the side just a little bit. So, what we have to do is we have to figure out how to catch the light. And so what I usually do is I will -- I am gonna have you take two steps back. And I'll try to find a little circle of light like we have here so we can actually catch the light in ... Let me just move it this way. I think we can -- Right there. Perfect. So I can then move around the scene once I've found the light. So that looks great. And I'm gonna have you put you chin towards me. And we're making sure that we're feathering the light so it's a little softer. Beautiful. (camera shutter) Take a look. Perfect. I'm gonna have you turn a little bit to your right. I'm going to use the poses that we've talked about before in order to be slenderized. So I'm gonna have you kick your hips and waist back. Perfect. Lean towards me with your shoulders. Hands on your hip. Great. And turn your shoulders back towards me just a little. Beautiful. And there you go. And a little bit more. Good. (camera shutter) Great. And I'm gonna take a step back and get a mid-length shot. (camera shutter) Perfect. Okay, so I'm going to analyze this picture, and right now I'm shooting with a Canon 5D Mark III and an 85mm 1.2 lens, and shooting at about 2.0 or 2.2. As I look at this photo I see that there's a couple of things wrong. One of the things that I know that I want to improve is that one of the rules that I said is whatever's closes to the camera looks larger, so I wanna draw attention to assets away from weaknesses. I'm too short. I'm too short, so I'm shooting up to her for the headshot, and so it's gonna draw attention underneath her chin and not to her eyes, so I'm gonna grab an apple box. You could also take a small step stool on location as well, or try to find an area where you can shoot down on your subject. So I'm gonna just try it like this. Alright, that's good. (camera shutter) Great. (camera shutter) So that's a better director of light, but I think right now with the way it is it's a little bit too contrasted, it's a little bit too harsh. I could feather the lights to make it softer but I'm gonna switch it around to white. If it's a bright sunny day I often find that I lean more towards white when I'm shooting headshots. It's just a little bit softer, more forgiving, more like what you'd get out of a soft box, not so crisp as with silver. Beautiful. (camera shutter) Good. And I'm gonna shoot a mid-length shot. Can you lean your chest towards me? Great. And chin out and down. Good. (camera shutter) Beautiful. Beautiful portrait. So it's soft light on her face, I've simplified the background, it's gonna be nice and happy with a very simplified portrait. I wanna show you one thing that I was talking about a second ago, about shooting whatever's closest to the camera looks largest. I always do this with my female subjects, every single one. Is I try to find a place for them to sit. I'm going to try to find a place for them to sit, on a bench in a park, or even sitting on the floor, or if I have a chair with me. I do this on location with natural light. So, can you take a seat on this for me without falling? Okay. Because what that's going to allow her to do is she's gonna be able to sit down and look up at me, and I'm going to shoot as wide open as I think I can get in focus. And so I'm gonna try around 2.0, and what I'll be able to have is just her eyes and focus, and everything else melts away. And often, on an overcast day, this is amazing light because as she looks up at the overcast sky she's catching the entire sky in her eyes. Big beautiful catch lights. So let's go for -- Wait, and so she's added that nice, soft white reflector. Good. And, can you turn to the side just a little bit? And lean towards me. Beautiful. So now her eyes are going to be closer. And I'm shooting at 2.2. (camera shutter) And turn your chin just a little bit that direction. Good. Good. (camera shutter) And make sure that if you're shooting wide open that you are shooting using back button focus, focusing on the eye closest to the camera. So it kind of depends on where she looks what eye that is, but if I'm shooting at 2.0 or 2.2, unless both eyes are equal distance from the sensor from my camera one is going to be out of focus. So it has to make sure the one that is in focus closest to the camera. So I'm gonna take a few more. You can turn your chin back this way again. Let me do a vertical. Great. (camera shutter) Beautiful. (camera shutter) And so right now both her eyes are the same distance. That'll be perfect. (camera shutter) Great. Beautiful. Perfect. So let's do a couple full-length shots. I'm gonna switch my lens over to a Canon 50mm 1.4 lens so I get a little bit of a wider shot, but remembering that I'm a little bit short, so I'm going to make sure that I'm having my subject lean towards me or I'm standing on an apple box. So let's switch that lens. Now, if you're shooting on location, you're struggling to get the light right, I just wanna show you a quick tip, what I sometimes do is I find the light where I know I can see it, right? It's hitting the reflector, I see it on the floor, and then I'll try to follow it up to hold it and vary the angle. Sometimes it's a little easier to do that than trying to hold it above and catch the light. So I'll follow it below and raise it up. So if you wanna do that for me I'm gonna get the pose right. Poses like we've talked about before for women. What I want you to do is I want you to face me straight on but keep whatever leg over you feel comfortable. Good. Okay, great. Hands up on your hips, move your hands in for a waist, for defining the waist a little bit more. Now, lean towards me. Great. And tuck that knee over just a little bit. Great. So it's giving me curve, eye closest to the camera. And I want you to raise that light up as high, about equal to her face. And you may need to back up a little. She might need to back up a little, I mean. Okay. Good. And right ... Oh, it's right there. So that's what I'm looking for, not too contrasty but kicking just a little bit of light in. Beautiful. This is nice and strong. (camera shutter) Now, if there's one thing that I would improve about the shot as I take a look of this picture, the problem that I see is there is a big bright highlight behind her I think that's distracting, so what I wanna do is I wanna move a little bit so that it is darker in the are behind her. So we're just gonna move up. So we're gonna have you move back just behind these bright highlights. So you're gonna move back over here. Keep going, keep going. Right around here. And you should be able to catch plenty of sun in this instance. Great. Okay, beautiful. Beautiful same pose. Great. And cast way over. Beautiful. (camera shutter) And if you wanna give me a smile. (camera shutter) You wanna turn a little bit to the side? Good. And now drop your right arm. Good, perfect. And lean your chest towards me. (camera shutter) Perfect look, beautiful. Two more of those. (camera shutter) And great. (camera shutter) Perfect. So what I was looking for is I was looking for a location where I could simplify the background, shoot at a wide aperture so that makes that background kind of disappear, but also in a place where I could capture the direct sunlight. If I'm shooting in an overcast day, instead I might bounce just a little bit of that light in her eyes, but since it's a sunny day I want that light equal to or above her face. And I'm making sure I go through my checklist: she's leaning towards the camera so her eyes and her face look larger, checking to make sure that her hands are relaxed, and then, of course, as with any portrait, watching for the expression at the end.
Class Materials
Bonus Materials with Purchase
Ratings and Reviews
Berus
One of my favorite courses thus far on Creative Live, and definitely well worth the purchase price. Lindsay effectively demystifies many of the critical stumbling blocks to achieving a practical understanding of many critical elements of portrait photography. I would rate this course as being perfect for the advanced photographer - a couple of the concepts might be beyond that of a casual/intermediate photographer, but even they would probably gain a great deal from this course. Her discussion on equipment, in particular was superbly done, and allows one to move forward in beginning to make the right choices to achieve whatever effect one is after in terms of capturing the subject. Finally, the great thing about this course, and the thing which makes it such a great value, is the overall scope of what is being taught. Lindsay covers almost everything imaginable, and does it all in a manner which is enjoyable, and makes the time fly by. There were many, many times during the various days of this course during which Lindsay would share some particularly great tip or technique, and I would think "Insert bookmark here." I don't dole out praise easily (actually left a fairly scathing review on another course here recently) but this course has won me over. Highly, HIGHLY recommended. I'm definitely going to check out her other courses as well.
a Creativelive Student
This is Lindsay's best course to date and believe me, she has given us some good ones already on Creative Live. She hit this one out of the park! She was very well prepared and organized. I could tell that Lindsay put a lot of work into preparation for the class because she just kept giving us great information non stop. There was no down time or wasted moments. All future instructors on Creative Live should be encouraged to watch this course just to see what good instruction looks like. Lindsay has evolved over the past few years and just keeps getting better as time passes. Thank you Lindsay and thank you Creative Live for a job well done! Craig Banton
Penny
This class is one of the best investments I have made in my photography business. Lindsay is an excellent teacher. She is a seasoned, yet humble, professional. Unlike some other instructors I have seen on creative live, there isn’t a lot of fluff in her teaching. She sticks to the topics, gets all the information in, but still manages to engage and relate to the audience with real life examples of her own experiences in photography. I have been a professional photographer for several years, but have mostly stuck to natural light. This course gave me the confidence to tackle more advanced lighting setups and expand my capabilities as a photographer. I really appreciate that she doesn’t bash flat lighting, like other lighting videos I have tried to watch. Most portrait clients do not want photographs with dramatic lighting, they want to look their best, and I’m glad that she acknowledges this. This class gives you the information you need to create whatever photos you want to create.
Student Work
Related Classes
Portrait Photography