Retouching Images with the Spot Healing Brush
Lesson 11 from: Adobe Photoshop Mastery: Retouch and RestoreBen Willmore
Retouching Images with the Spot Healing Brush
Lesson 11 from: Adobe Photoshop Mastery: Retouch and RestoreBen Willmore
Lesson Info
11. Retouching Images with the Spot Healing Brush
Lessons
Class Introduction
03:50 2Tonal Rescue & Noise Reduction in Adobe Camera Raw
14:04 3Retouch a Hazy Image in Adobe Camera Raw
07:33 4Recover the Brightness Range with Levels in Adobe Photoshop
11:34 5Use Curves to Restore Details on Vintage Images
48:12 6Color Rescue & White Balance in Adobe Camera Raw
10:12 7Selective Color with the Adjustment Brush in Adobe Camera Raw
06:29 8Correcting Color in Faded Images with White Balance
13:02Correcting Color in Faded Images with Levels & Curves
26:02 10Additional Examples of Color Correction
14:26 11Retouching Images with the Spot Healing Brush
14:27 12Fundamentals of Retouching Vintage Images
30:29 13Overview of Retouching Tools
46:51 14Refined Adjustment Techniques
21:29 15Refined Channel Adjustments
05:31 16Refined Texture Adjustments
07:16 17Refined Compression Adjustments
06:57 18Adding Color to Vintage Images
12:32 19Adjusting the Background of an Image
13:48 20Audience Questions & Final Tips
15:44Lesson Info
Retouching Images with the Spot Healing Brush
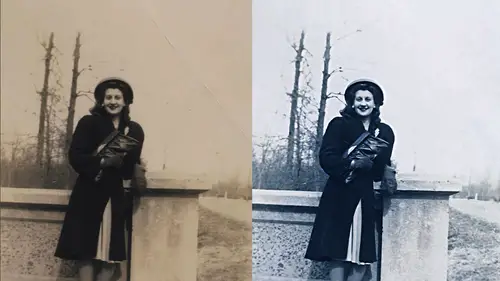
And the session we're going to get into retouching so let's dive in and see what we can do work with a few of the images we've already worked with and some that we haven't and let's see I'm going to start off using the tool that I would like to use for just about everything which is the tool that does most of the work for you and that is called the spot healing brush and so the spot healing brush is great for getting rid of small little blobs that are in your image that you simply want to remove and so let's go take a look at an image this one has a few blobs we need to remove my guess is someone changed their lens well it was windy in there at the beach and that means the wind was kicking up the sand and it went right and to where their camera sensor wass doesn't look like something you'd really want to spend much time fixing but let's see if we can at least get it to the point where it doesn't feel like the sensor dust specks that air here are so bad that they distract from the the i...
mage is a hole so to fix this one I'm going to start off with something simple which is to come up to a tool called the spot healing brush that's what it looks like it looks like little band aid with they dotted rectangle behind it with that tool, you can change your brush size the way usually do, meaning you go up here to your size, or you can use the square bracket keys, whatever method you prefer, and what you want is to get a brush that is the tiniest bit larger, then the area that needs to be worked on so that if one of these sensor dust specks is what I need to get rid of, I need a brush large enough so that the circle the represents my brush is not touching the problem instead, it's touching the surrounding area because it's going to pick up the color in the brightness from whatever that little circles touching. We want that circle to completely encompass the problem we're trying to get rid of, and then all we need to do is click and let go, and if we had a large enough circle, it should tackle it. If it's not large enough, you'll see see a little hint of it here just they're just a hint of the old edge, and that means I need a slightly larger brush one I think, enough to truly encompass that problem area click, and it will figure out where from the surrounding image it thinks that should copy from, and it will come in there and replace whatever it is a click on and it can work great for little blobs like this but do you really want to watch me get rid of all these blobs well let's get rid of the blobs on the most important parts of the image the parts of the image that has content that if it was wrong when it got replaced it would be obvious and so here see some on some skin and those are the ones I'm going to concentrate on with this tool then I'm gonna cheat for the rest see one on her clothing right about here and you can by the way you don't have to just click and let go you can click in pace he like paint like that and it could do a larger area if you wanted s o I just get rid of those then I might also have to do that for parts of the water but if you think about both the water in primarily the sky though let's take a look at what really should be in the sky if all of those specs weren't there there's really not a lot of detail but if we zoom up we can't just put a solid color in there because there is grain or noise in there if that's missing it won't look like it fits in with the rest of the image so if you ever are using the spot healing brush and it just doesn't seem to be picking up on exactly the right areas to copy from you khun switch to instead the normal healing brush with the healing brush you have to tell it where to copy from where you can uh option click in one area clicking and windows to say this is where I want a copy from and then you go somewhere else you paint over an area and that's where it will apply it well I want to show you how you can kind of trick that tool into doing interesting things here's what I'm going to do I'm just going to select the general sky that we have in fact I don't even need to slip this guy let's let's do a new document I'll do it with even less than I was planning on I'm gonna create a brand new document and I'm going to make this document the same size is the document that I was just working on and if I come in here I could just choose the name of the document from the top when I'm creating a new document that means use the same size is one of the documents I currently have opened click ok and I'm just going to fill this with a solid color and I don't really care what color ends up being in there but just be safe I'll put gray in so that there's no influence so I just changed my color picker to gray I'm going to choose phil it will fill my foreground color and I'm going to end up copying from this document and so instead of copying from part of the actual document I want to apply this two I'm in a copy from this what right now is a document full of great now the problem is if I do that at the moment I can take mine healing brush aiken option click in the middle of this document to say I would like to copy from here then I can switch to the other document and even though I've told it to copy from another document it can apply it here so if I come in right now and I start painting and here I can use this to get rid of things and I just paint over huge areas in fact I can grab a brush that's this big and just paint over the sky over running out of space in that other document you see a line there were ended so let me choose undue just wrong because I'll mess it up nancy I'll start over here you know just go over partway let go and you see how it's actually clearing things out because the only thing any tool that has the word healing attached to it does is it only copies the texture from where you're copying from it doesn't copy the brightness it does not copy the color the brightness and color comes from where you applied it from what was around the edge of wherever you applied it. Now, the problem is we don't have the right texture. If you zoom up over here number, we had grain, and if I slide over to where we've applied this group, so I think it thinks I want to paint their get smaller brush, okay? If I slide over, you'll notice that that texture most likely at a certain point ends do you see how this looks smooth? So all we need to do is switch to that other document and add some texture to it. There are many different ways of adding texture. I could come over here too, noise and there's, a choice called ad noise or that type of thing, but I find the most natural looking noise will come from something called the camera raw filter camera filters, founder to the filter menu, and if I go into we have most of the same adjustments, you have a normal camera, and if I go over here to a tab called fx that's way of grain, and what I'll do is just zoom up so I can see this at one hundred percent view to see what my grain looks like, one hundred or two hundred, and I'll bring this up, and all I'm going to try to do is get something that resembles the grain that was in the other photograph so when it completely replaces the contents of the sky instead of putting them perfectly smooth content it's going to put in this texture so it would be best if I probably had that other picture next to it to compare it to but we're going to do this kind of a quick and dirty version and I'm going to guess to mate that to be similar texture click ok so now this document instead of being just solid gray if I zoom up on it in that structure so then what's tried out I'll grab mine healing brush I'm going to send it a copy from near the upper right corner come into my other document now assume out and I'll start near the upper right corner or right at it get a huge brush mike over here I'm not going to go all the way to the left side because another document is the same size as this one and if I go all the way the left side I'll probably run out of document because I just won't have enough so stop about here we'll do that other side is a separate peace and I'm just going to make sure I don't touch her head or the transition where the water ends with sky int now what it ends up doing is it takes the brightness and the color from right outside of where I ended up painting and that's where it's all coming from but the texture is coming from that other document come over here do the same thing again this time I go to this document, maybe I'll copy from the middle just tow know how much space I have available around it it's slightly smaller brush for over here start getting in there just don't touch the line of where her hair is or where the water begins you areas that might have to go over twice, but that sky still has texture and it still has grain in it because coming from the other document the one we were copying from and so I can use that as a generic for any time I want to work on this sky the only place where I can't use that is where we need very specific detail, which might be down here in the water and that's where I'll switch over to the spot healing brush and I'll have to deal with individual blobs and that's where I might end up spending usually about three minutes here because it doesn't take long to click. Click between these so with the spot healing brush gets picking where to copy from and in this case it should be picking from a nearby area that would have texture similar to the water but up for the sky was where we didn't have a lot of uh, true detail we just there wasn't any texture or anything else up there we can get away with sometimes copying from a separate document that contains when you might call artificial information in this case just being some, uh, grain put in. So now if I zoom out let's, take a look at before and after I'll choose revert before all those specs were rather distracting, and if I choose undue after it's getting to be where the suspects are not the main subject matter here instead you can pay a little bit more attention to what we have. Yes, the issue of running out of space from the other document could you not just select from where you've painted it into this document? Sure I could or what I could have done to avoid the problem as a whole is just make the other document twice as big as this one, then I would never run out of space because I'd never end up getting to the point where uh, I moved that far. Um, so anyway, this gives you some idea of just one of the little tricks we could dio in, you'll see as I use any tool that has the word healing attached in on ly copies, the texture for variation in brightness from the area you're copying from the color in brightness comes from where you applied it and so that's why I was able to keep the color of the sky that was here that other document I was copying from just so you know this could be any color let me go to uh I'll put a color in here and so it's this color I can come over here and option click in the middle of it if I use it over here well first see that color sometimes when I'm painting the moment I let go it just uses the colors from the surroundings and that's where the color and the brightness comes from the color of this document isn't used it's only the texture and that's why we needed just get some texture and the grain that would look like it might be appropriate question or comment I may answer this by african could you do that similar before when you had the brush and you painted the color with the brush and then you change the luminosity with that work on this or is it going let's try it let's go over here and she's revert and see the problem with doing it luminosity it's a good mindset as faras like that you're connecting up some of the other ideas that we used is I could come in here with a brush just pick an area that doesn't have a speck in and pain with my layer and luminosity mode and that can get the specs to be a different brightness level, but the problem is the specs are, but we're at thirty percent capacity here. Okay, the specs are possibly less colorful. So even if I do this, which might work, if I zoom up, I might see not in this case actually it's going to work in this case, but often times what I would notice is that where the specs used to be, it would be gray and let's say the surrounding area was red. You would still see these gray specs within it. They would just be the same brightness as the surroundings in this particular case. Ah, you like here, you might notice it now why you might want a second. Something feels odd because usually ok, in this particular case it would work, but in some cases, those specs, if there are quite a bit if they were dense, they are gray specs, they're not red or green or something else, and if this background that was surrounding them was not close to gray, they would just become the same. Brightness is the surroundings, but they would still have less color in those little areas, meaning we'd have the same amount of color and the specs as we do right now, their brightness would just match the background, so anyway that's it was just one trick
Class Materials
Bonus with Purchase
Ratings and Reviews
a Creativelive Student
Wow! That is pretty much what I thought about the course. It was my first live studio experience and it was fantastic! Ben is a great instructor because he presents the information in a straight forward manner that is understandable, detailed, and concise all at the same time. I have a couple of his other classes and the handbooks his wife creates are exemplary and make going back and reviewing the rebroadcast so much easier. Also, I want to give a shout off to the Creative Live team...Kudos! They are an excellent host...they are professional and fun at the same time! The content they produce has helped me tremendously to expand my knowledge and skills and mostly importantly they are affordable!
Wilson Blackwell
Super class! Ben is the best at explaining Photoshop and how to make full use of it. This class included techniques I've never seen or heard explained in other photo restoration classes I've taken. And the accompanying book, while I've only glimpsed through it so far, is expansive, well laid out, attractive, and looks to cover everything Ben went over in the class - it's a valuable resource as well (thank you, Karen Willmore, for all the effort you put in to produce a worthy complement to what Ben teaches.)
Old_Redeye
Ben is one of my favorite instructors on CreativeLive. (That's saying a LOT because they are all so good!). Besides being very thorough and understandable, Ben sets himself apart with two things. 1. He thoroughly demonstrates a process, then does a recap of all the steps he just took. That makes it much easier to remember. 2. His wife takes notes during the broadcast and creates a handbook which is available to download when you purchase the course. Some people find it easier to learn by reading than by re-watching the video. I like it because I can find information by using a word search. I feel so fortunate that I was able to sit in the audience for this class. It was great to be able to talk directly to the instructor and interact with the other students.