Recover the Brightness Range with Levels in Adobe Photoshop
Lesson 4 from: Adobe Photoshop Mastery: Retouch and RestoreBen Willmore
Recover the Brightness Range with Levels in Adobe Photoshop
Lesson 4 from: Adobe Photoshop Mastery: Retouch and RestoreBen Willmore
Lesson Info
4. Recover the Brightness Range with Levels in Adobe Photoshop
Lessons
Class Introduction
03:50 2Tonal Rescue & Noise Reduction in Adobe Camera Raw
14:04 3Retouch a Hazy Image in Adobe Camera Raw
07:33 4Recover the Brightness Range with Levels in Adobe Photoshop
11:34 5Use Curves to Restore Details on Vintage Images
48:12 6Color Rescue & White Balance in Adobe Camera Raw
10:12 7Selective Color with the Adjustment Brush in Adobe Camera Raw
06:29 8Correcting Color in Faded Images with White Balance
13:02Correcting Color in Faded Images with Levels & Curves
26:02 10Additional Examples of Color Correction
14:26 11Retouching Images with the Spot Healing Brush
14:27 12Fundamentals of Retouching Vintage Images
30:29 13Overview of Retouching Tools
46:51 14Refined Adjustment Techniques
21:29 15Refined Channel Adjustments
05:31 16Refined Texture Adjustments
07:16 17Refined Compression Adjustments
06:57 18Adding Color to Vintage Images
12:32 19Adjusting the Background of an Image
13:48 20Audience Questions & Final Tips
15:44Lesson Info
Recover the Brightness Range with Levels in Adobe Photoshop
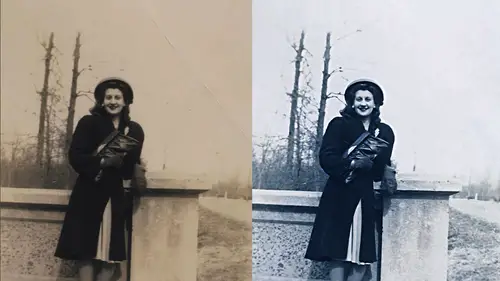
So the first thing I think of what I'm thinking about total rescue is camera if it's a modern photograph usually camera is going to be rather helpful as we head into more vintage images, you'll find it to be less helpful because we just need more sophisticated tools that will allow us to paint the adjustments in precise ways into the image and so we can start exploring those ahs well, so I'm just going to start opening aa few vengeance images and see how we might be able to address some problems in this image I see kind of a metallic look to it that I want to deal with and after we deal with the metallic part we're going to end up needing to adjust it totally and I just want to make sure you know, two tools that I are the primary tools I using photo shop for that so first off to get the bluish out of this image I'm gonna de saturate the image I am usually going to use adjustment layers for this and I'll do that just so that a moment here just so that I can easily undo things later on i...
f I ever mess something up it's not permanent it'll take me just a moment here to get my layers up and working because ok, my layers panel was empty usually they're icons that populated and photo shop just hadn't redrawn the screen so took me a moment to figure out how to get it to refresh if you ever have it do that by chance. What I did is I just had it somehow change what was in this portion of my screen. I switched over to one of the other tabs that we're here and just switched back and that caused this to refresh, but I wasn't sure if that worked, so I was just blab and they're trying to fill some time until I figured out how to fix it. So if you want to create an adjustment layer in photo shopped at the bottom of your layers panel there's a half black and half white circle on click on in the first place I'm going to go to is levels because it's very useful learn how levels works in levels. This is what we get, and there are three basic adjustment sliders those of the sliders that air found up here near the top just below this bar chart. First let's talk about the bar chart because it's going to be useful on occasion, not on this particular image but on many of the image that was that we encounter. That bar chart is called a history ram it simply describes which brightness levels are found in your picture in which ones are not if you look below down here shows you all the brightness levels you could possibly have darkest one on the left, which is black, the brightest one, which is white on the right. And if you were to pick any one of these brightness levels here and go straight up from it. If there's a bar on that bar chart, then that brightness level is found somewhere in your picture. You pick another shade from down here and go straight up. Then this one is in there as well. Because there's a bar in the bar chart, you'll find one of those bars. At least one of them will always go all the way to the top. The one that goes all the way to the top is the one that's, the most prevalent in your image. It takes up the most space it's, the most common. If you were to count how many little pixels each one of these shades takes up, whichever one's going all the way to the top here is the one that gets the highest count in your image. So if you look up here, we have two lines going all the way to the top. And what those air telling me is that I go straight down from that, that whatever shades air directly below it in this little bar, they're the most prominent in this picture, they take up the most space then, compared to those, the other shades take up less space because they have shorter bars. If you have really short bars like these, it means whatever shades or directly below that take up very little space within your picture. So if you look at the far left of this image, this finish the cyst, a gram noticed that the history graham is really, really short on the far left with that tells me is whatever is directly below that down here takes a very little space whatsoever. So if I look at my picture that tells me black, if it's in there at all takes up just a few specs now, let's, look at the three sliders that are found in levels and let's see what they can do for us first, just to have a more interesting history, graham, I'm going to adjust this image to make it look different than it does ignore what I'm actually doing because we're going to work with the end result of this let's just say this is what the image looked like when I first opened it. I'll do a levels adjustment layer and let's see how that history and might look different on some images I just did the image to make it so we didn't have any black. We didn't have any way, so now if you look at this, this is what you'll often have in an old faded photograph and if you see a history graham where it doesn't extend all the way to the left, what that means is we don't have any dark stuff in that scan if the history and does not touch the left side, it means we have no black because the far left is where black is if on the other hand you have a gap on the right side, all it means is you don't have any of the bright shades in your image just go straight down you see all this stuff it's not found in that picture the brightest shade could be found just go to the end of the history am wherever it ends go straight down that's the brightest shade in this picture on the far left go to where the history amends go straight down that's the darker shade so in many images, if I noticed that it looks all faded and just doesn't have much contrast, the first thing I would do is go toe levels and see if there's a gap on the ends of the history graham those gaps indicate we don't have black or white and here's how we fix it this slider here forces areas the black bringing in like this what it does is it simply takes whatever shade is directly below that enforces it to black along with any shades that are darker than that. And so if I ever run in here in this history, graham isn't very wide first thing I'm going to do is pulling this slider until it touches what's that going to do it's going to take the darkest part of my picture and force it to black then if I have a gap on the right side of my history ram, I'll pull in this slider because what that slider does is it takes whatever is directly below it whatever is right down here in my picture that makes it white and so in this image we don't have any white in the image to begin with if we did the history and would extend all the way over there instead the brightest we have is right here that's whatever straight down here that's the brightest we have in this picture I'll bring this slider over until it touches the history graham and by doing so now this image is going to use the full brightness range. So if you want to see before and after there's an eyeball icon right down here, if I turn off that eyeball it disables this adjustment temporarily if I click it again, it turns it back on so you can see the change so here's before there's after so any time you open an image that just doesn't look like it has the full brightness range the first place I would go to his levels you're probably thinking what of those other sliders do just in case you're not used to levels mention the slider in the left forces things the black slaughter in the right forces things toe white the middle slider you could think of it is just controlling the overall brightness that's what I think about in my head when I'm using it but if you want to technically no what it does it takes the shade that's directly below down here it makes it fifty percent cray so if you happen to move it over a darker shade that's going to end up brightening up your image because it takes something that used to be darker than fifty percent gray and brightens it up to fifty percent grade if you move in the other direction over here it takes whatever is directly below that makes it fifty percent gray if that happens to be something that was brighter than fifty percent gray it's going to be dark ing up your image to do that but I don't think about that in my head when I'm using it I just look at my picture and I move it right or left and it will be an overall brightness change I want to see it there's my overall brightness change so levels is the first place I might head to when I see an image that doesn't contain the full brightness rank because the history graham's helpful to tell what we have and then pulling in these sliders he is also helpful down the bottom if you happen to want to know what these two sliders do because I used them tow adjust this picture to make it so it didn't have the full brightness range these you won't usually need to use when you're restoring pictures but you want to know what they do this takes what is currently black in my picture in changes into the shade this point at this takes was currently white in my picture and changes it toe whatever shade I point this at so what I did to mess up this picture because I just pulled in this slider say make it so we don't have any black in this image make it so we don't have anyway but you shouldn't need to use those when you're actually restoring an image so let's work this image I'm going to get it back to its original state I'll do that by going to the file menu in choosing revert first thing I'm going to do in this case is that little bluish look that's in there let's get rid of that I'm going to do that by coming in here too my adjustment layer papa and I'm gonna choose human saturation what human saturation is going allow me to dio is just take a slider called saturation and turn it all the way down that's going to pull all the color out of the image and alternative to this because some images need different kinds of adjustments is if I throw that away, I could have also gone in here and chosen black and white. Those are the two main ways of making that pulling all the color out the advantage of going to black and white is this. If there was any hint of color already in your picture, then you have these sliders you could move around. And so if I move this slaughter for the reds, we could make things that used to be red, brighter or darker or things that used to be yellow, brighter or darker. And so if you're trying to pull the color out, you can either go to human saturation or you can go here to black and white if you need to adjust individual colors there's a little helper in here and that is this little hand icon right there. If you click on that, then instead of having to figure out which slider would effective personal of various area in your image, you can just move your mouse on top of an area that used to be color, click and then drag left or right and it's going to figure out what color that area used to be. And if you move into the right, it will brighten everything that was that color and moving to the left. It will darken it, there's all sorts of things. You can do that. So, that's. The first thing we do is plot some of that color.
Class Materials
Bonus with Purchase
Ratings and Reviews
a Creativelive Student
Wow! That is pretty much what I thought about the course. It was my first live studio experience and it was fantastic! Ben is a great instructor because he presents the information in a straight forward manner that is understandable, detailed, and concise all at the same time. I have a couple of his other classes and the handbooks his wife creates are exemplary and make going back and reviewing the rebroadcast so much easier. Also, I want to give a shout off to the Creative Live team...Kudos! They are an excellent host...they are professional and fun at the same time! The content they produce has helped me tremendously to expand my knowledge and skills and mostly importantly they are affordable!
Old_Redeye
Ben is one of my favorite instructors on CreativeLive. (That's saying a LOT because they are all so good!). Besides being very thorough and understandable, Ben sets himself apart with two things. 1. He thoroughly demonstrates a process, then does a recap of all the steps he just took. That makes it much easier to remember. 2. His wife takes notes during the broadcast and creates a handbook which is available to download when you purchase the course. Some people find it easier to learn by reading than by re-watching the video. I like it because I can find information by using a word search. I feel so fortunate that I was able to sit in the audience for this class. It was great to be able to talk directly to the instructor and interact with the other students.
Wilson Blackwell
Super class! Ben is the best at explaining Photoshop and how to make full use of it. This class included techniques I've never seen or heard explained in other photo restoration classes I've taken. And the accompanying book, while I've only glimpsed through it so far, is expansive, well laid out, attractive, and looks to cover everything Ben went over in the class - it's a valuable resource as well (thank you, Karen Willmore, for all the effort you put in to produce a worthy complement to what Ben teaches.)