Portrait Retouching Session
Lesson 48 from: Photoshop for Beginners: Essential TrainingMark Wallace
Portrait Retouching Session
Lesson 48 from: Photoshop for Beginners: Essential TrainingMark Wallace
Lesson Info
48. Portrait Retouching Session
Lessons
Class Introduction
00:52 2Introducing Photoshop
02:37 3The Class Materials
01:36 4How To Open Files
01:42 5Using The Home Screen
02:35 6Exploring The Interface
03:30 7Getting Additional Help
01:36 8Understanding Workspaces
05:11Tools and The Options Bar
03:50 10Why You Should Use a Tablet
04:31 11Finding Hidden Tools
04:23 12How to See What You’re Working On
08:12 13Selecting Things
08:01 14More Selection Tools
12:25 15Testing the Magic Wand and Quick Selection Tools
07:25 16The History Palette – Undoing Things
05:24 17Resolution and Bit Depth
07:03 18Photoshop Preferences
01:31 19Menu and Item Shortcut Keys
02:39 20Non-Destructive Editing
02:57 21Working with Layers
12:19 22Groovy 3 Exercise
11:43 23Layer Effects and Styles
05:38 24Layer Masks – Karen on Beans
08:33 25Using Adjustment Layers
05:38 26Martian Karen
03:37 27Advanced Compositing Using Layers
08:43 28Non-Destructive Editing Techniques
05:22 29Understanding Smart Objects
07:28 30Smart Sharpen
06:42 31Understanding Histogram
06:24 32Adjusting Curves
03:48 33The Healing Brush Tools
10:26 34The Clone Stamp Tool
07:47 35The Burn and Dodge Tools
05:55 36Understanding RAW Files
01:44 37Adobe Camera Raw
04:18 38XMP Sidecar Files
02:14 39Camera Raw: Edit
12:24 40Camera Raw: Crop & Rotate
03:13 41Camera Raw: Spot Removal
04:56 42Camera Raw: Adjustment Brush
08:17 43Camera Raw: Graduated Filter
05:40 44Camera Raw: Radial Filter
05:11 45Camera Raw: Red-Eye Removal
02:04 46Camera Raw: Snapshots and Presets
09:39 47Neural Filters
10:09 48Portrait Retouching Session
36:53 49Scenic Retouching Session
11:25Lesson Info
Portrait Retouching Session
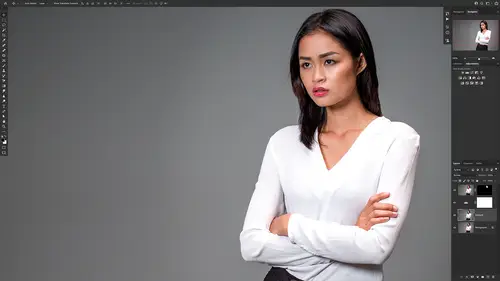
we've got two more sessions and what we're going to do is we're going to do a portrait retouching session and a scenic retouching session. These are going to be a little bit longer sessions. But the reason for that is I want to show you how a retouching session works in real life. These are not scripted. And so you're gonna see me doing some retouching and making all the mistakes and having to undo and all that kind of stuff because I want to give you a flavor of what this is like in real life and not a scripted version where everything is premeditated. So I don't really know how I'm gonna do the retouching, but I do know that we're gonna use all of the different tools and techniques that we've talked about and put them into practical use. So you can see an example of how this works. So you can duplicate that at home and create your own workflow, your own steps for retouching your portraits and scenic photography. Now, I'm gonna give you a little bit of a bonus on this first retouching...
session because I know I told you that there's a better way to remove subjects from the background than using that object selection tool and the magic wand tool and all those things. So I want to start there because I told you I was gonna do it. So let's do it. We're gonna go back to Karen on beans and so what we're going to do here, this is not gonna take very long. It's sort of magic. What we want to do is we're gonna take this Karen dot psD file. I'm gonna open that from my recent folders, you can do file open and find Karen dot PSD in the class materials and open that. Just get that open in your version of Photoshop. And then what we wanna do is we want to double click the I mean it's double click the hand and show all of Karen here. Now remember when we did the selection before we had issues here in her hair, when we looked at, you know the selection of her hairs right here and by her neck we had issues where we couldn't actually extract that white from the background. And so what we're going to do now is we're gonna grab our beans again. So I'm gonna go file open and then we're going to get beans gonna open that. We're just going to open that and then we're gonna drag this over on to Karen and then command T. So that I can, whoops. I have already made my first mistake here, Command T. On this layer. So I have a nice bounding box there. I'm just gonna make it over Karen and I'm gonna drop this underneath her. Okay, we want to remove Karen from the background so she floats over the beans and we want to do that in a way that this hair sort of shines through in the quickest way possible. Well if we go over here close to the navigator and instagram third down, there's these little lines here that's called Properties. If you click on that, you will see that there's a button here called remove background. Now this doesn't work on smart objects, it only works on normal layers. So what we're gonna do here is I first need to be on Karen, make sure you're on the Karen layer and then click remove background and bam that removes the background. Check this out if we look closely, we can see that the uh the objects, the background around her hair have been mostly removed. So we've done a much better job of removing the subject from the background than we did before. And the nice thing is this is on a layer. So if you look at this layer, you can always, I'm sorry layer mask, we have a layer mask here, We can paint in and out areas that Photoshop maybe got wrong, like we have a hole in her neck here, we need to paint that back in. Now we shot Karen on a white background. So she's always going to have a white color cast on her neck and fingers and stuff. So we wouldn't be able to get rid of that necessarily using this technique. But there is one thing that we can do that can sort of help us out with these strands of hair. So we can go back and click on Properties once again and then make sure your clicked on the layer mask over here and we have the properties open. And then we're gonna refine this selection, we're gonna refine what we did. So what we'll do is we're gonna say select and mask and we get this new dialogue over here. So what I want to do, let's go down to almost the very bottom. And there's this little thing that says output settings. I can click decontaminate colors and that's going to clear up a lot of that issue. In fact, right over here on this side it completely fixes the issues. So I'll say okay then we're gonna have to go in there and do some adjusting ourselves. So right here we have a hole in Karen's neck. So I'm gonna go into this mask, hit D. From my default colors. And then I need to click on get a B for brush and then I can brush back in her neck and then I can go in and do some correction, change the color tones and things like that to make that match exactly. That would work. Let me show you this one more time very very quickly with a different image. So I'm gonna go in here and I'm gonna show you how to place an object on a layer without opening it and dragging and dropping it. So what I'm gonna do here is I'm going to click file and then I'm going to say place embedded, you can do place linked or place embedded. Place embedded says take the file that you're using and then make it a part of the new file. So when you save that file it's inside the file. If you say place linked it's gonna link to a file and put that in your new file. But if you delete that file, the other file, well the link is going to be broken and you're gonna have issues. So we're gonna do place embedded, we're gonna put that issue that item here. That's what you would do if you drag and drop it would be placed embedded. So we're gonna place a new image in this. So what do we want to place? Of course we want to place wanna dot D N G. So click on that and then click place. Now you notice this is gonna open adobe camera raw, we're just gonna leave this as is and say okay now it's going to say where do you want this? We're going to get a bounding box so we're going to make this a little bit larger, something like this, Bring this up something like that. Now this is a flat top so it doesn't match exactly but that's okay. I'm going to click the little check box to accept those changes. Now if I go to properties we don't have remove background. The reason for that is this is a smart object. So there are a lot of things you can't do too smart objects, I need to convert the smart object to a normal layer so I can do this same thing. So you'll see here in the properties again there's a third one down, click that make sure you're on wanna and then I'm going to say convert to layers so when I convert that it's going to change that from a smart object to a normal layer. Do you really want to do this? Yes I do. Okay. Now that I've done that I can now see remove background and when I click on that whammo The background has been removed and wanna is on the beans and so if we go in 100% you can see that her hair has been absolutely perfectly removed, her arms, all of that stuff, she is perfectly on the beans and that's all there is to it. So that's one of the ways that you can remove subjects from the background when you have things that are really finicky and do it very quickly and very accurately. Okay that's the bonus section. Now let's talk about retouching an image start to finish so I'm gonna close everything here and what we're going to do is um I have a secret included in the wanna dot the wanna dot DMG file so that raw file of wanna have included some bonus things. So let me show you that. So go to file, open and then make sure you choose wanna dot DMG and then click open. Now we're in adobe camera raw. Now the thing is this file that you see right now, I've made adjustments to it. You know that I've made adjustments to it because in adobe camera raw you can see there's a little dot here on the basic panel and a little dot here on the crop panel and if we look in here you can see that. I've done a bunch of things have changed the profile and the temperature and exposure and all kinds of things. What I want to do is show you what this would look like if you got it straight out of the camera. We'll remember what we talked about snapshots earlier. So I've made a snapshot and included it in this file. So if you go down here to snap shots, we have basic changes made, that's where we are right now. Some basic changes to this image and then zero values, click on zero values and that's gonna undo all the changes. So I've zeroed everything else and no changes have been made. The crop is not there anymore. So click on that and then that's their starting point. Don't click open yet. We want to stay in adobe camera raw first. So my workflow for editing um portraits and scenic photos is the first thing I do is if I'm working with a raw file, I always do global adjustments first in adobe camera rock, I want to get the color corrected. I want to get the tonal values corrected. I want to get the blacks, the mid tones and the brights to be exactly where I want them to be. I want to do all of those basic tonal corrections first. Once I've finished that, then I like I prefer the tools, the retouching tools in Photoshop to the retouching tools in adobe camera raw. So any skin retouching. I do that using the healing brush in adobe Photoshop instead of using the healing brush in adobe camera, I just prefer it. You can choose to do it a different way if you like. But the first thing we wanna do is let's do all of our color corrections. Now the cool thing about this image and the thing I like about it is it's intentionally made so that you can interpret this however you want. You can make it cool. So it's more bluish, you can make it more warm. You can make it more saturated or de saturated. You can do whatever you want with it. There is no right answer for editing this portrait and that's true of most most portraits. You can edit them however you want. And so we're going to interpret this. Uh the way I think it should be interpreted but you can do it differently, make it your own and see how it goes. So let's jump into this. The first thing we want to do, you can see that. I had an error here. I think there's a, one of the lights that I was using in this image is shown up here. So we had a light bar that was here. I need to get rid of that. So the very first thing I'm gonna do, I'm gonna go to my crop tool. Now I know this image was shot to be used in video. So when I was shooting this, my thinking was, I want this to be cropped 16x9, I want this to be shot for video so we can do that. Um so we can go in here and change this aspect ratio to 16 x nine and then I can drag this crop around and I want to get that little light out of there. So it's gonna have that her hand is going to be out of there also chops off her head. And so I think for this edit, just to show you how it works. I'm not going to use a 16x9 aspect ratio. Let's go to the original aspect ratio and then let's just go in here and drag this up. So it gets rid of that light bar will drag this down. It's hard to see her head. It's okay, you can always come back and and redo this. So we've gotten a good crop there. I like that. Okay, now we need to change the exposure and the color because this is way under exposed. We can see on our history Graham, we've got a lot of darks and not a lot of lights. So I'm gonna do a global adjustment to get my global exposure set. So I'm gonna do that with exposure. It's going to move all the values at once. So I'm gonna move that over to the right, something like that about right there. Now we can see that we don't have anything overexposed. But when I look at this on my monitor, it looks like her skin, her skin tones are overexposed for my taste. They're too bright. So when we look at this, those look too bright for me. So I want to do some corrections just in the highlights. So just in the areas over here in these highlights and so what I can do is I can grab my highlights slider and then I'm going to drag that down just a little bit. Okay, so I'm just moving the highlights down that's bringing back some of that exposure in her skin. If I go back to fit, we can see that that's looking much much better. I like that. She also, to me looks orange. The color is off. And so what I'm gonna do is I'm going to try to reset this white balance a little bit by clicking on her shirt or sometimes I'll click on teeth. I just need something that's white that's not white enough. And so for me a neutral color is her shirt and really you're looking for a neutral color doesn't have to be white. Has to be something that's totally gray. Something is totally white, something that's neutral, not a mix of colors, sometimes even backgrounds at work. So this background here is a gray background. If I click on that it gives us something that's neutral but it's a little bit too cool. So I can go back here and warm this up a little bit now. It's too green. I can change the tint and bring some of that color back in. You know, we're getting there. Maybe let's just check what this is on her shirt here. This should be a nice neutral color, it's a little warmer. So color temperature it's up to you to sort of play with that. So we changed our exposure, we changed our color temperature. I want to change maybe the color profile to play with those. Now I can choose these profiles that are here or I can click over here to the right and I can browse profiles. So Adobe has a bunch of different profiles built in. So here's one for portraits that looks a lot better. The skin tones look a lot better. Here's one for standard images. Here's one for neutral images so you can hover over these so you can just put your mouse over them. The cursor over them to see what they're gonna look like before you click. So I like portrait here. That's pretty good. Let's look at some of these artistic images here. So that was that was to read. This is too green. I don't like that. I don't like any of those. Maybe a black and white would be good. Oh I like that, it's pretty good but I don't like I don't want to do a black and white of this. I want it to be color. You can go through here and see some of these different um profiles. So I think the profile to me that I like just right off the bat, I'm gonna go back to adobe camera and I'm gonna do adobe portrait. Yeah I like that. So I'm gonna click that. So now we have changed that to adobe portrait so now we're gonna go click this and go back and there it is Adobe portrait. So we have this nice sort of a neutral skin tone. It's not to read, it's a little de saturated and so I might want a little bit more vibrance to this. I'm gonna bring that up. I might want this to be a little bit warmer. Just a hair. So we're just playing with these touches here. One of the things that I've noticed here is that her hair is just disappearing into the background. So what I wanna do is I want to work with the shadows, the dark areas of this image. So down here we have a shadows slider. So I'm gonna start pulling up the shadows just a bit and now you can start seeing her hair appearing from this background. And so that's also adjusting a little bit of our highlights. I might need to pull those highlights down just a hair and then the blacks, the absolute blacks. Maybe I'll take those down just a bit. This is really a contrast e image. It's sort of cool. I think I'm gonna cool this off just a bit. So I have a bluish background that's sort of cool. And so I'm liking what I'm seeing here as far as the tonal values and you might want something brighter or darker it's up to you but I like what I'm seeing here so far. Okay so I've done my basic adjustments. The other thing that I could do here, there are these sliders here, texture and clarity. So texture. I'm gonna drag it all the way to the right, it's sort of like a sharpening so it increases the contrast between different areas. So that will help you if you have a scenic photo or something with lots of texture in it that really pronounced that texture. And then clarity is also a similar thing to that. And so you can bring that up And for me um I just like to play with these two things for me in an image like this, I like to increase the clarity just a bit Just a bit, maybe about 10. And so now what we can do, I'm going to put this 100 and then bring this in. I'm just checking this. I'm gonna click this little eyeball that's before very drab and unclip that to see what's happening after. Now this image when I shot it, you can see that this was really shallow depth of field. So this I is in focus. This I is not, it's a little bit soft, her hands a little bit soft, we might have to sharpen this up just a little bit, we can do that. So I'm gonna close this basic tab right here and I'm going to go down here to detail. And right now the sharpening is at 70, which is pretty high, but this is a pretty large image. So I'm actually going to take this, I'm gonna open this disclosure triangle so I can see the radius and all of those things and I'm gonna increase the sharpening To about yeah, I'm gonna keep on going till it's about 90. Yeah, I like that. So it's sort of covers up my mistake that I made here with that being out of focus and so I like that. So I'm gonna keep that there, I can turn that off, turn it on and you can see that sort of pops it makes your hair pop a little bit more. It's pretty cool. Now we could do some other things here, we could do some color grading if we wanted to. And so if I wanted, for example, this background to be a little bluish, I could go into the shadows here, pull this over and I like that. Look at that, that background is a little blue. So I just do it touch of that. I'm adding some blue to the background. See this is before, it's brownish now it's bluish, it cools that off but just in the shadows it leaves her skin tones alone. I like that. I'm not gonna do anything else to the mid tones or anything. So I've got a nice color grade to that. I don't need to do any other effects. I don't need a vignette or anything on this. So I like where we are right there. So I've cropped this, I've done some basic adjustments to the color and the tonal range. And then the other thing I might do here is, well, nothing. I like that right there. I need to do some skin retouching and healing some things. So I'm gonna do that in Photoshop. So now that I'm done with this, I'm going to openness and this is going to open this in Photoshop and I have this as a background layer. I didn't open it as a smart object. So if I wanted to return to adobe camera and make any kind of adjustments. Well I can't with the native file, I can use the adobe camera raw filter, but I'm not using the data from the actual raw file. So if you want to be able to go back and forth and do changes, make sure you open that as an object. I didn't because I want to do some skin retouching and I need a normal layer to do that. So what I'll do here is I'm gonna double click the hand to fill this area and then I want to make a copy of the background layer. So the background layer, I want it to be non destructive. I don't want to touch that now. So I'm going to hit command J to change that layer to a new layer and then I'm going to type skin retouch And so now we have a layer to do skin retouching on that and to do retouching I like to be at 100% so I can really see what's going on here and looking at wanna we don't have a lot of research in that we need to do. But what I am gonna do is I'm gonna get my spot healing brush and we can see that we have a little blemish right there on her chin. I'm going to zoom way in and let's see if we can fix this little bump right here. So we're gonna get our spot healing tool. I'm going to use my left bracket to make this smaller and then let's see if we can heal that and it's not doing a very good job of healing that because it's on a border. So I'm gonna go, I'm going to undo that. Let's see if we can do this using our spot healing tool with content aware. Let's see if it can be aware of the content that's better. Still didn't do a great job. And so here's something that is sort of cool. Remember I said earlier the clone tool is something you wouldn't use much. This might be a perfect time to use the clone tool. So let's go grab the clone tool and then what we're going to do is we're going to make a brush that's about 23, maybe 20 pixels, something smallish. Okay. And then what we're gonna do is we're gonna try to go from here so I'm hitting the ball. Turkey go over here, low net over here on this. I was off a little bit so let me go in angle is not just right there. So that's why that's got some issues. So we're gonna go back now to the spot healing brush, see if we can fix that up a little bit just by healing it in there we go. Okay, I think when we zoom out from 500%,, let's zoom out to something like that. We can see that. It doesn't look as dramatic as it did before we are in a good place. So we got rid of that little bump there. Okay. The other thing we have is a little dot right here. Let's just go in here, we're gonna do proximity match on this guy. We're gonna just brush that out really fast and we got that and then maybe we're going to do some retouching here, just a couple of spots on her arm and then wanna has a scar right here. Let's see if we can fix that up. So we're gonna just zoom in a little bit more so let's see if we can fix this scar. What can we use for that? Let's try the patch tool. Let's draw around this, drag up this way. The select. It looks pretty good. I think we've got some edges here that need to be fixed and de select that. Go in here to our spot healing tool and we'll just sort of brush around until that is fixed up. We'll get some of these spots. Okay, you get the idea there's a little scar right there, we can fix by brushing that off. And then let's go back to looking at what we have and I like this image. So we have the image, It's all done and everything looks fantastic. That is my flavor of that retouching. I think one more thing I'd like to do and that is to add a neural filter to make her skin look a little bit better. So what we're gonna do here is I've got my skin retouch layer, go to filter neural filters and then we're gonna go to skin smoothing and then bam oh that handles it. So maybe we can have her skin a little bit smoother. Then I'm going to save this as a duplicate layer masked so it's non destructive and I'm going to click on that and there we have it. We have a portrait of wanna that's been retouched. I'm gonna leave her tattoo because I think she likes it. I like it. It's good. And so let's take a look at what we did. So here is the first part that's the skin retouching part, that's the neural filter. And if we zoom out we can see the entire thing and I like that. Now the cool thing is this is a raw filter or a raw file. So if I want to go in and change this and make it a black and white or something, I can just open up the raw file and do a different change or do whatever I want. Okay, we have time for just one more portrait retouching session. I want to show you a different flavor, a different portrait so we can try some other things and so what we're gonna do is we're going to go into Photoshop one more time. I'm gonna open and what we want to do is we want to go to Conga. So Conga is here, this is I think a beautiful portrait. So I'm gonna open that and remember we the last time we worked on this in the last session we made this all blew, we made it like this. So adobe camera raw, it remembers what you did the last time. So when you open that file it's gonna say I remember all the changes that you made. So that's why we make these little snapshots. So we have the black version, the blue version, all those kinds of things. So I don't want this blue version here and I don't want any of these changes. So I'm gonna undo all of those healing changes for right now. These are things we did earlier and then I'm gonna leave the detail. I like the sharpening on that. But these basic adjustments I don't like. So we're gonna go back to as shot to get this color temperature back, we're gonna go in here and we need to do some things so Right off the bat I can see that the background of this has all kinds of issues with spots. So I want to remove those first of all. So I'm gonna go in here to 100%. I'm gonna use my hand tool to go and find all of the dust spots in this image. There's tons of dust spots. So this is perfect for adobe camera raw. What we're gonna do here is we're going to go to the spot removal tool, healing brush something about nine and I'm just going to start tapping these areas that have issues to get rid of these spots. I really eight the spots. So we've got all these little things, we've got to clear up now. One of the things that you can do to help you see where the spots are. So we've got two spots here. There's this little button here that says visualize spots. I click on that, you can increase the contrast and you can really see where the spots are. So I need to get rid of that one. I need to get rid of that one. I need to get rid of that one. So that will help you see on a white background or solid background where you have problem areas. I'm just panning around here visualizing any big spots that I have. I think I've corrected most of them. Here's one, here's one and we've got this one and this one and this one and this one, okay, I'm gonna unveil belies the spots and then when I click this to fit you can see that we removed a lot of spots. So I'm just cleaning up the image. That's the first thing I want to do. So I've done that. The other thing I want to do here is again I want to do my global changes. I want to get my color corrected. So right now uh we have too much orange in this image. I don't like the background, I wanted to be a little bit de saturated so let's go grab our white balance tool, I'm going to click on the background and I'm gonna change my color temperature just a little bit so it's bluish. And then what I want to do is I want to take my vibrance, that's what making everything sort of crazy and I'm going to take that down just a little bit, my saturation down just a little bit. I want this to be de saturated and then I'm gonna leave the exposure and highlight and contrast levels the way that I had them. These are what we did in an earlier session. So I'm gonna leave that and bring that up just a little bit. And then what I wanna do is I need to change this color. It's driving me nuts. So I'm gonna take the color mixer here, we've got some oranges. I'm just going to take those down. Just a hair, take these down. Just a hair about like that. Okay, That's about where I want it to be. So I'm gonna go back into 100%. Yeah. Okay, this is great. We have this beautiful portrait. The other thing that I want to do here is uh in this image, we have too much headroom here. So let me go in here and I'm gonna crop this down, We crop this up just a bit and move this over to the side. So she's on the rule of thirds that looks good and there's one other thing I'd like to do, I'd like to make that background a little bit darker and instead of using a vignette. So if we go in here and use it in effect, I could make a vignette. The problem with that is a vignette. It's indiscriminate. It just centers itself on the image. I don't want that, I want it to be centered on concha. So what we'll do here is I'm gonna, instead of using a vignette, I'm going to use a radio filter. So I'm gonna go into my radio filter here and then I'm gonna reset everything. I just want my exposure to be down a little bit. So I'm gonna take my exposure down by Three plus stops just so I can see what I'm doing to start with and make my feather about maybe 15 or 20. And then I'm going to draw this big thing. Now, I need to invert this so that it is outside of the circle that's being affected and not inside the circle. And then I'm gonna tilt this just a bit, gonna make my feather a lot more, make this a lot larger, a lot larger and move it up a little bit and I wanted to affect conga at all. I just wanted to be on the background, something like that. Okay, I just want to make this subtle. I'm gonna take this back up from what it was to maybe quarter of a stop, something like that going to take the overlay off and we can see that we've just sort of made some contrast and focus that on conga and so we can see how she looks and so I can turn this on and turn this off. That helps to isolate her. I think that's pretty good. Now it's time for us to hop into Photoshop, I'll click open and now we have this background layer, I want to make a copy of that so control command J. And then again I'm going to name this retouch so that layer is the one I'm going to be working on now, I am going to double click so I'm at 100% and I need to do some skin retouching and so to do that, what I'm going to do is grab my spot healing brush and then using my tablet here, I'm just gonna very quickly go in and correct some of these blemishes here that we have on Conchas face. And this is a really fast retouch, I can go in a little bit more if I need to see things. I'm gonna hit B to get my brush, I'm gonna make the brush a little smaller, I'm just gonna be really picky and go in here and grab some of these. Ah oops, so I didn't make a huge mistake. So I hit brush because I'm thinking I'm working on a layer mask and so I hit B instead of J which is the healing brush. So I was actually painting on conga. So I can go into my history palette here and I can go, oh go back to when I was an idiot. And now I can go back here and get the right tool. Okay. And now I can go in and start being picky and healing this instead of painting things on her face. And one of the things that I like to do is I like to have models that have real skin. And so for me, a lot of times what I will do is I will spend a lot of time retouching skin using this methodology, just going in and healing all of the things that are that stand out, but leaving the texture of the skin so that the person looks like an actual person and not a barbie doll. And so for me, I would probably spend quite a bit of time just doing this and making sure that her skin looked pretty accurate to real life. And so I'm not a big fan of all the filters and stuff that you see nowadays, maybe I'm a little old but I like the skin to look like actual skin. And so that's why I would go in here and do this. But because we can we're going to add a little extra step here to see how well it does. So I'm going to go and just get the last little bit of this cleaned up. Okay, I don't want to spend all day doing this because I am aware that we're making a video and you're watching this at home. You don't want to see me doing all this little nitty gritty work, but we're pretty darn close so we need to retouch this maybe right here. Okay, we can see if I just click on this the before and after just using the healing brush. I've done a massive amount of work in a very short amount of time. Now. This would take a lot longer if you had a mouse to try to do that using the tablet, you can really go in and do things very quickly. Got a hot spot on her nose. I'm gonna fix that really fast. Okay, Before after, If we zoom out to 100%, that looks pretty good. We've got a little spot right here that needs to be fixed. Let's check to see maybe on her finger there. It looks like there's a a little bit of something that needs to be fixed. I'm hitting J to get my healing brush. Somebody fix that. You have to be really, really picky if you're doing retouching and I'm not being as picky as I should be because I know we have some time constraints. So I would normally fix that and okay, We have a good shot. So at 100 looks pretty good going all the way out. That looks pretty good as well. It looks like I missed a spot right there. I don't know how I missed this spot, but clearly there's a spot that's jumping out to me. Let's see if we can fix that really fast. So there it is. Sometimes things jump out at you later That you don't see initially, especially when you move around like this, things will show up and show up. I like that retouch. So what we're gonna do now is I'm just gonna add the neural filters so we can see if we like it or not. We can choose to use it or not. So again, we're going to go to 100%. So I can actually see what this is doing to my image filter, neural filters. It's going to load in the filter here. I like skin smoothing and I like that. I like that pretty much. I'm gonna take the blur down just a bit. Yeah, that's pretty good. We're gonna do a duplicate layer mast. I'm going to say, okay, I think that looks just beautiful. So we've got this beautiful portrait and I like how it looks. Let's just take a look really fast. There's our background before the skin retouching after the skin retouching with a neural filter. I'll zoom in all the way. So you can see that. That's how we started. That's with some retouching and that is with the neural filter. We have a really beautiful portrait. Okay, now let's take a look at how we can do these similar things instead of on a person. We're going to do it on a scenic portrait. And I think you'll be really surprised at what we can do with this picture from Nepal.
Class Materials
Bonus Materials with Purchase
Ratings and Reviews
Katie
Mark did a great job at explaining things and going over them multiple times throughout the lessons. My only issue was that sometimes it went a little faster than I could keep up and I needed to rewind it a bit and start again. But from someone who has never worked in photoshop before I 100% recommend this class to anyone trying to learn.