Lesson Info
14. More Selection Tools
Lessons
Class Introduction
00:52 2Introducing Photoshop
02:37 3The Class Materials
01:36 4How To Open Files
01:42 5Using The Home Screen
02:35 6Exploring The Interface
03:30 7Getting Additional Help
01:36 8Understanding Workspaces
05:11Tools and The Options Bar
03:50 10Why You Should Use a Tablet
04:31 11Finding Hidden Tools
04:23 12How to See What You’re Working On
08:12 13Selecting Things
08:01 14More Selection Tools
12:25 15Testing the Magic Wand and Quick Selection Tools
07:25 16The History Palette – Undoing Things
05:24 17Resolution and Bit Depth
07:03 18Photoshop Preferences
01:31 19Menu and Item Shortcut Keys
02:39 20Non-Destructive Editing
02:57 21Working with Layers
12:19 22Groovy 3 Exercise
11:43 23Layer Effects and Styles
05:38 24Layer Masks – Karen on Beans
08:33 25Using Adjustment Layers
05:38 26Martian Karen
03:37 27Advanced Compositing Using Layers
08:43 28Non-Destructive Editing Techniques
05:22 29Understanding Smart Objects
07:28 30Smart Sharpen
06:42 31Understanding Histogram
06:24 32Adjusting Curves
03:48 33The Healing Brush Tools
10:26 34The Clone Stamp Tool
07:47 35The Burn and Dodge Tools
05:55 36Understanding RAW Files
01:44 37Adobe Camera Raw
04:18 38XMP Sidecar Files
02:14 39Camera Raw: Edit
12:24 40Camera Raw: Crop & Rotate
03:13 41Camera Raw: Spot Removal
04:56 42Camera Raw: Adjustment Brush
08:17 43Camera Raw: Graduated Filter
05:40 44Camera Raw: Radial Filter
05:11 45Camera Raw: Red-Eye Removal
02:04 46Camera Raw: Snapshots and Presets
09:39 47Neural Filters
10:09 48Portrait Retouching Session
36:53 49Scenic Retouching Session
11:25Lesson Info
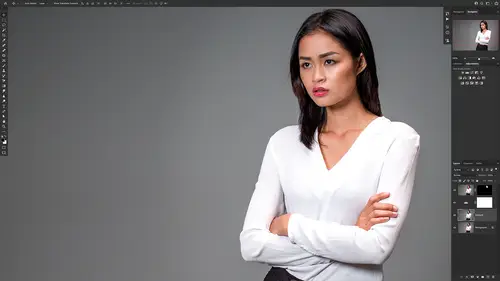
More Selection Tools
to do more detailed work. We need more powerful selection tools because most things that we select are not square or perfectly round. And so what we're gonna do is we're gonna dive in. I'm gonna show you the lasso tool and some more advanced selection tools and so hop over into Photoshop with me and if you have the image that we just worked on, let's close it. Um and don't save it, we want a fresh image here. So I'm gonna click on wanna dot jpeg again to open this file. So we have a clean fresh file to work with and then don't forget we need to go to this background layer and click on this lock to unlock it so we can do things with it. Okay so over here on the left hand side we have our rectangular and elliptical marquee tool that we just worked with. We have some more advanced tools just underneath that and so right underneath that the first thing we have is the lasso tool and the lasso tool is great because you can just lasso stuff, it's like using a rope so I can go in here and usin...
g my pin tool or you can use your mouse. I'm going to lasso just gonna draw around wanda's face to select that and you can see that this is something that would be impossible to do with just those old tools and like we had before you can do the same modifier keys so I can hit the plus key and say hey include that that I missed. You can hit the option key to subtract maybe you did something there, subtract that section. Oops I messed that up, let me go here and draw this in to add to the selection and then you can go and you can cut this out if you want or you can copy. So I'm gonna copy that, I'm gonna copy another one, I'm gonna copy another one, I'm gonna copy another one and so you can see that you can make really fast changes to your image. Now I'm going to de select that. So the lasso tool allows you to really get in and copy and select items that are irregular shape but maybe you need even more control. So instead of the last, so I'm going to click on the lasso and I'm gonna go to the polygon lasso tool and so to do this, what I'm going to do is I'm going to zoom in so I'm gonna double click my magnification window and grab my hand by hitting the space bar. I'm gonna zoom in to wanda's. I I'm not even gonna go a little bit more than that so I'm gonna go here too. Oh maybe 200%. So I'm way in on Wanda's either then I'm gonna grab this, the polygon lasso tool and instead of just lassoing and just clicking and drawing, I can click the point and then move to a little bit and move a little bit more. So what I can do here is I can get the point here and then see that's holding on so I can go to the next little point that I need and then go to the next little point and they go to the next point and you can see how I can really precisely go through here and select this. So I'm just going to do this really quickly but if I needed this to be perfect I could take a little bit more time. But that's what this tool does. Okay so I just I'm going to close that up now. I have my selection. If I double click the hand and select that out. You can see that I have selected her. I pretty much exactly. That's really cool. I'm gonna control d to deselect that. So we have the lasso tool, the polygon lasso tool and then this other one the magnetic lasso tool. So years ago this was the bee's knees. It was awesome. So what this does is you can draw and Photoshop will look for an edge and if it's season edge it will magnetically snap your selection to that edge. And so let me zoom in here to an area that has an edge. So maybe over here I've got the wrong I'm going to zoom in here to want his shoulder. You can see the edges sort of okay um I'm gonna use one of her faces. I think that's a better edge. So I've got one of these faces. Maybe I want to select that again so I can grab this magnetic lasso tool as long as I'm close to an edge. If I click and drag along, see how that just magically snaps to that edge. You've got to be close though so I can sort of drag that around now if I mess it up like I did, you can always go in and add to or subtract from the selection and so you've got to when it's at the end, it's like wacky. You can hit the escape key that messes everything up. What you need to do is watch how this tool has a change in its appearance. So I'm going to really quickly drag this around. Not being too precise. Okay we've got this face notice as I get to the very beginning, the tool has a little circle that means it's to the end and it's closing the loop and that's how I can do that. So then I can use the same modifier keys. I can hit the minus key to say, hey, I messed up this. Let's deselect this area and it does. So I can go in and work with this magnetic lasso tool to grab things that have a nice edge to them. But there's even more powerful tools now in Photoshop for selecting things. That's what I'm going to do here double click the hand so I can see everything and then underneath the lasso tool and all those tools we have three more tools, the object selection tool, the quick selection tool and the magic wand tool. So let's talk about how each of these things work. So first what I want to do is reset this image so I'm gonna close this image, don't save and then reopen wanna dot jpeg and then unlock this layer. So we have a fresh clean image. And then what we're going to do is start working with these other advanced tools. So let's start with the quick selection tool and what the quick selection tool does is as you paint, Photoshop is going to look for areas that are the same basic color and it's going to select those. And so I can start over here in the left hand side and as I paint notice that it's saying oh yeah this is a solid area, I'm gonna paint up here above her head and then I'm gonna paint over here to the right and whoa what happened? Well if you look want his hair in the background are very, very similar in color. And so Photoshop is saying hey these look the same to me. And so it's selecting all of that stuff. Now, what you can do is we can go in here and we can make this brush smaller by hitting the left bracket and then I can hit the option or all key to say, hey select this area, I'm going to sort of work with this but you can see for this image this is, you know, it can select something pretty quickly. It doesn't do a very good job. You need a lot of contrast for the quick selection tool here to work well. Alright, let's look at something else that is called the magic wand tool. So what I'm gonna do is de select it control or command D. And the magic wand tool. What it does is you can click an area in the image and Photoshop will say, okay, I'm looking at this specific color and I'm going to select everything that that is that color. And so at the top at the options bar, you'll see that we have a sample size five by 53 by 3, 11 by 11. And so what that is is it's saying how many of these pixels the dots that make up an image, do you want to choose as your sample? And so what I'm saying is I'm gonna choose a three by three average. It's a pretty small sample. If I wanted a larger sample, I would do a little bit larger sample. So we're just gonna stick 3x3. It's a pretty good starting place. The other thing here is the tolerance in other words, it's saying if I select a shade of blue, how far off of that shade of blue can I go, what's the tolerance? Does it have to be exactly that shade. If so the tolerance would be zero. I'm only selecting that specific shade if it's maybe 30 or 40. It's saying that shade of blue maybe a little bit lighter and maybe a little bit darker. You're saying how much leeway do I have to go when I select that color? And then the other thing we want to choose is contiguous or noncontiguous. So continuous says if I select a color, select everything that that's color um unless it doesn't connect and so if maybe you're in a square you click anything in that square will be selected if it's outside that square and it's the same color. It's not gonna be selected if I don't have that. If it's discontinuous is not selected it just looks at the whole image and chooses everything. So let's learn how that works. So I'm going to say continuous and then I'm gonna go here and I'm gonna choose this sort of dark area right here, I'm going to click on that bam and it selects all this stuff in the image and select everything that is a similar color. And it also selected wanda's hair because it thinks it's the same color. But notice it didn't select anything inside. So once it hits these borders. So her body is the border, it's not selecting anything the same color inside. So now let's do the same thing. I'm going to de select that. I'm going to deselect contiguous and select again, bam now notice that this border of the change in color, her skin and her arm. It's selecting inside. That is saying I don't care if it's connected or not. I'm going to select everything that that is that color and it selects all this stuff. If we go let's make the tolerance to something like 10. So we're taking how it will tolerate the different color variations. If I click notice now it doesn't select as much of her hair, it doesn't select this lighter area here. And so it's doing a little bit better job. It's not selecting what we want necessarily because those colors are very very similar. So what I can do here is I can again say add this little part at this little part. Subtract this color right here. So it's just choosing colors. So this is something that works on high contrast image is an image like this not so much. So now I'm going to d select this and show you the new the latest and greatest selection tool that I think is just wonderful. And that is the object selection tool. So I'm gonna click that if you don't see the object selection tool in your tool bar, you can always go down here to these three dots, the ellipsis and edit the toolbar and add that. So it might not be in your toolbar. If you don't see it, make sure you add that like we talked about earlier. So okay I'm gonna go up here to this object selection tool and I'm gonna tell Photoshop I want to select, wanna, I'm just gonna drag the square around her and that's what I want to do. Photoshop is now going to think about it and watch what happens. This is sort of magic. So it looks at the image and ban, it does a pretty darn good job. So all those issues that we had before for wanda's hair where it's very similar to the color of the background. This eliminates a lot of those issues and it fixes things. You'll notice if we zoom in way down here, you'll see that it didn't get this little part of wanda's pants because it's so similar. But look, we can take this object selection tool, we can hit the shift button, we can say, hey select this little area and add it and it adds it when I didn't get it. So add that and we can just keep doing that until it adds everything in and then we'll have a really nice clean selection, I'm going to zoom out and you can see that we have wanna selected and we did it with just a couple of clicks, The object selection tool in my book is the best option for selecting this stuff. It's really, really awesome. I don't know
Class Materials
Bonus Materials with Purchase
Ratings and Reviews
Katie
Mark did a great job at explaining things and going over them multiple times throughout the lessons. My only issue was that sometimes it went a little faster than I could keep up and I needed to rewind it a bit and start again. But from someone who has never worked in photoshop before I 100% recommend this class to anyone trying to learn.