Portrait Neural Filters
Lesson 2 from: Photoshop AI: Getting Started with Neural FiltersBen Willmore
Portrait Neural Filters
Lesson 2 from: Photoshop AI: Getting Started with Neural FiltersBen Willmore
Lesson Info
2. Portrait Neural Filters
Lessons
Lesson Info
Portrait Neural Filters
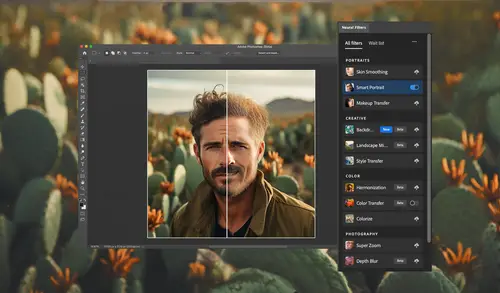
(rhythmic upbeat music) Let's explore the top grouping of neural filters. Those are ones designed for working on portraits, and they are going to use facial recognition technology to figure out where is a face and where are the edges of various features in that face. This filter will only work with images in general where somebody is looking towards camera. They can be looking a little bit away, like maybe about this far, but once you start getting it where you can't see both eyes or it is just difficult to tell exactly the shape of the face, then they often won't work. But let's dive in and see what they're capable of. If you look at this particular image, I zoom up, you look at the face, could use a little bit of smoothing. So let's come over here to "filter", choose "neural filters", and the first neural filter at the very top of the list is called "skin smoothing". And when I end up coming in here, it will show me on the right side selected face. If that doesn't appear, you might...
instead see some yellow text that says "no face is found", and that would indicate that the person is not recognized. Most likely they're looking too far away from the camera. I'm going to turn on this little switch here. Now we get to come in and we have a blur and a smoothness setting and you can already see the end result if you want to see before, and just to the right of the image on the lower right edge of the image is this icon. Here's what it looks like without the skin smoothing and here's what it looks like afterwards, and I think it is a nice improvement in this image. And then what I'm going to do is come over here and we can adjust the blur amount. If I reduce it, we're going to get less of a smoothing effect, and if I increase it, it's going to do a more extreme version, and so we can try that out. Then we have a smoothness slider, and I can also fine tune it. As I bring smoothness down, you're going to see a little bit more of the fine details in the face, like the individual pores on the skin, but the blurring is still applying. So some of the larger details should still be softened. Here, I'll show you before and after. And you see up here where there was some redness in various areas in the before, and in the after it's smoothed out, it's just that the smoothness setting allowed us to see more of the very fine texture that's in here. As I bring smoothness up, you'll see that some of that detail starts to be harder to see. So I think that's looking okay in this particular case. Then before I click "okay", down here I need to choose how this should be applied. Most of the time I end up applying it as a smart filter, and therefore I can always come back in at a later time and modify the settings. So let's click "okay". Then if you look in the layers panel, you're going to find the image itself. It's been converted into a smart object, which is what this icon in the lower right corner indicates. And then below that it shows the filter that's being applied. It just says "neural filters". If you double click on that, you would go back into the filter and you could modify the settings. And then right here is a mask where you can limit where those changes affect the image. So let's see if there's any areas where I don't like the look of this filter. All I'll do is come down here to where it says "neural filters" and I'll turn off this eyeball which will disable the filter. And so I'll turn that off and then I'll click it again and turn it on. And I'll just do that multiple times to see. And if you see that it might be a little slow when you click on this one. If you click on this one, I think it goes faster because this might be recalculating it a little bit, whereas this is just hiding. So this should be a little more instantaneous. So I'll off, on, off, on, and I'm just scanning around the image to see is there any area where I dislike this. And I think there is. What I don't like is what it's doing to the nostrils of her nose, it lowered the contrast in them quite a bit and I'd rather not have that happen. So what I can do is click on this mask and you can tell if it's active or not because its corners will be highlighted in little white brackets. And then I can come over here, grab my paint brush tool and make sure my foreground color is set to black. When you paint with black in a mask, then you end up hiding whatever that mask affects. In this case it affects where the filter is applied. I'll then come up here and make sure I have a brush that is at least partially soft-edged, don't want to use a hard edge brush, otherwise it might be obvious where I stop painting with it. And I'll get a small enough brush then just kind of paint right there where I didn't want the contrast to be lowered. Maybe the little shadow under the nose as well. But this filter is smart enough to be able to recognize particular features in a face, and so it should limit its effect to skin. So if you look at things like the lips, even though those are skin I guess, it's not being affected 'cause it knows that they generally shouldn't be smooth. And the same is true around the eyes. It's being relatively careful in those areas, so you don't have to mask all that much. Then let's switch to an image that has more than one person in it. And if I return to neural filters and I go back to skin smoothing, then up here where it says "selected phase", you're going to find one of the two faces shown, but over here you're going to find rectangles that indicate which phase you're currently working on. And you can click between them by just clicking on your image. And when you do, you'll see the selected face in the upper right change, and you can have independent settings for each face. So in this case, this is a picture of me and my wife, I might make it so the blur is a little bit less on mine, or I'm a little bit older so maybe I should do the opposite and put a little more in there. And then I can click on the one for her face and maybe have the blur a little less, but you can fine-tune it separately for individual faces. And not only can you click on the image to switch between them, you could also choose from this menu where it will have isolated each face that it found and you could just as easily switch between them. But this image was captured far enough away where it's not a really tight close-up. So I don't think skin smoothing is appropriate. So instead let's move down to our second neural filter, which is smart portrait. I'm going to turn that one on. And just like the other one, that is able to end up isolating faces and it will do the same thing with the blue rectangles, allowing you to switch between the various faces in your image. Now here my wife is smiling, but I'm just kind of straight-faced. So let's see if there's anything we can do about that. All I'm going to do is come over here to this section called "featured". And there we have a choice called "happiness". If I increase the happiness, it should put a smile on my face. The only thing about it is it usually makes people's teeth visible, and if their teeth weren't there to begin with, it might not look really like their real-world teeth. Now if you ever find one of these sliders to seem to be completely unresponsive and you don't see the little progress bar down here at the bottom, then you might run into one other issue that occasionally happens with neural filters, and it's something that just happened to me. And that is in the upper right, watch out for this, it says, "We've temporarily disabled this filter because of an error", and it doesn't really give you any explanation. That doesn't mean this filter won't work, most of the time. All you need to do is click "cancel" and just return to the filter again, and the majority of the time it will end up being able to work just fine. So in this case, we're targeting my face again, I have smart portrait turned on and now it's turn up the happiness and it's disabled again. If you find it still doesn't work, then coming up here and disabling your graphics processor can be something that occasionally fix it or actually quit Photoshop and start it back up again. Then it could work. And you might also want to check your internet connection because this does require the internet. So I think I fixed it. Let's see if now I can make myself a little bit happier. You notice though how much of my face it's replaced here, but remember we can mask the results afterwards, and therefore if it affects areas I don't want to, I can easily try to disable it, but let's see what happens if I try to get myself to smile. See how the teeth start to show up, that's kind of standard with this feature if you try to really push a smile. I'm going to bring that back down. And I have found that if you want to get somebody to look like they're smiling a little bit more and you don't want the teeth in the grin, instead come down here to an area called "expressions". And there you have a choice of surprise and anger, and you can put these in a negative setting. And if I take surprise and I put it into a negative range, I find oftentimes it gives me a little bit more of a smile without getting teeth to appear. Also negative anger can do the same, but let's get out of this particular image. I'll click "cancel" and go for one where we're a little bit more of a close up on an image. So here we go. And let's see how much more effective it might be when we work with a little more of a close up. All the portrait filters usually work better when you have a larger version of a face. So let's take a look at this image, which is actually a picture of me. So here I'm smiling, teeth showing, let's see what happens if we make me less happy. I notice a change, not just my mouth, but also my eyes. And that's why it's useful to be able to mask things. We'll bring this down even further. Let's also come down here to "expressions", and there we have surprise and anger. And I could possibly get my mouth to change even more if I change one of these. Let's see about bringing anger up or down. But in either case it seems to not be what I'm looking for. Let's try a negative surprise. And positive. Let's bring happiness back to normal and see what else we can do with our face. Bringing up facial age, it's going to end up exaggerating wrinkles, changing hair color. The main issue with this is if you see this blue box, that's where it located a face within the image, and a large number of times when you use this, that blue box will encroach in on the edge of the picture, and it will partially cover up the hair. And if so, having hair turned gray like this or anything like that is going to be limited in how much it can affect the image. That's especially true when playing with hair thickness. Let's bring the facial age downward to see if it can smooth out my face. Oftentimes it ends up toning the cheek structure where it will bring in a little indents in this area, we'll darken the hair, that type of thing. If you stare at my cheeks, you might notice a difference when I bring this back to the middle where it was slimming me. Let's see about thickening up my hair. It looks kind of funny, but this can be quite useful because what I would use it for is to mask this, and not apply it everywhere. Instead apply it mainly only around this area where usually get flyaway hairs, that type of thing. But so often I'm able to do it because this blue border, which I cannot change 'cause it's determined by the artificial intelligence, will encroach into the edge of the hair, preventing this from being effective. So here under expressions, we have surprise and anger. Now I find most of the time when increasing these, anger can occasionally do an okay result, but surprise not usually so great. But what I use these for more often than not is actually moving them into the negative range when I need somebody to smile and I don't want their teeth to show. But in this case, let's take a look and see what increasing surprise will do. And just remember we can mask this. So if my eyes are too distorted, I can always bring them back. Or I bring to negative surprise. See there I'm getting a little bit more of a smile. I'll put it back in the middle. And then let's try anger. But it's hard to make a smiling person look angry. We can bring it down though and it might often make me look like I'm smiling a little differently. Let's put that in the middle, and let's look at one of the features I use in here the most that I think can really help an image. And that is here under "global", there's a choice called "light direction". And if you look at the original lighting in the scene, it looks like the light was coming from the right side because the right side of the face is, or right of camera is brighter, the left side is darker. Well oftentimes I wish there was a fill card over here to bounce some light into that shady area, and it's difficult to get it to look good when doing it manually. But here we have a choice called "light direction". And if I move this towards the right, it's going to make it look like the light source is coming from the right. So it's going to add more brightness and shadow on that side. If I bring it the other direction though, oftentimes this can look like a little bit of fill light. You see how it brightened up that side of the face. So with doing that, I would usually come in here and say I want to apply this as a smart filter. I'd click "okay", and then this mask that's down here. The problem is this filter will often darken areas, like over here, and that's not what I want. If I turn off the eyeball for this layer, we can see that it both brightened one side and darkened the other. Well what I'd like to do is take this mask and I'm going to invert it. If you just come over here and choose "invert", it will turn black. That's going to not allow the adjustment, the filter, to apply anywhere. Then I'll grab my paint brush and I'll paint with white. I'll come up here and make sure the hardness for my brush is at zero so I have a really hard, or a really soft edge brush. And then I'll come in and just paint it in where I'd like it to be on this side of the face. And if I want to further limit it, so if I happen to paint too far towards the right, I don't darken things, then I could here in my layers panel, come down here to the neural filter. And on the right side is this icon. If I double click on it, I'm able to choose a blending mode that's used when applying that neural filter. And what I would do is set it to the choice called "lighten". Then therefore., it would be incapable of darkening the picture. If I click on "okay", now if I work on that mask once again, and now I paint on the right side of the face where it had darkened it previously, it will be unable to. And therefore I can get into things like any eye sockets or other portions of the image without being concerned about darkening anything at all. So now let's turn off the eyeball for this smart filter. And you can see how I'm using the filter as a fill light on my face. And when I do that, the only part I don't like is down by the lip, I think it's getting to be a little bit too much. So I need to click on the mask, then paint with black, and then I can just remove it from wherever I'd like. And so that's one of the main uses that I use for this particular neural filter. Let's open another image and then we'll return to the same neural filter. Go for our smart portrait. And in this case you notice how small the blue box is, in that it does not include all of her hair. So if I try to do something like increase hair thickness, it's going to stop right where that blue box is. And so you can see up here at the top how her hair has not been thickened, but that doesn't mean that this isn't useful. If I end up applying that and I click "okay", applying it as a smart filter, then you can see that distinct line that's coming across, so it's going to limit where I can use it. I really wish I could resize the blue box, but you can't. But now if I go down here to the mask, and I once again invert this to make it black, and I grab my paint brush to paint with white, now it's usually right around the edge of the face where it might be useful to come in and paint in a little bit of that. It will change the transitions in the hair, and I can get a little bit of fill in in those areas. Oftentimes it smooths away a lot of the fly away hairs that were in there, but you do have to be careful. If you look here where I painted up too far, it's looking unnatural with the blend. Well, all I need to do is paint with black instead of white and I can remove it, and I want to get it just on the very edge of the hair and not let it come in very far because otherwise it won't match the existing hair. I'll choose "undo" there if I want, but see if I can get that to kind of feather in to the hair and not go in too far. If you want to see before and after, I'll just turn off the eyeball on the smart filter and you can see how those edges have been filled in a bit. Let's throw away that neural filter, and head back in there once again. And in this case you see that she's looking just the tiniest bit to the left of center. Well, if in here I can expand these out, and under "global" is a choice called "head direction". It will attempt to rotate the head. Now most of the time this is only useful for rotating head the tiniest amount, but let's just see what happens if I attempt to rotate her head towards the left a large amount. Remember you can see before and after by clicking this icon near the lower right of the image. Before and after. And you can see the cheeks look like they've rotated a little bit, but her hair gets distorted a lot. Also, you notice her neck no longer aligns with where it should be. Well, you can try to fix the head alignment with the choice right here called "fix head alignment". If you move this slider, it's just going to physically move the entire head to the left if you move it that direction or to the right. So here, and we need to move it quite a distance to the left. So I'll move this slider over to see if I can get her neck to better align. There we go, now we're lining up a lot better. The other thing that we have is down here at the very bottom on your settings, there's a choice here called "mask feathering". It's creating a mask to limit where this applies to the image. And if I bring this up higher, it will soften that edge, and I need that down at the bottom where the neck is. And so I can bring it higher and higher if I'd like to try to get it to blend in. I think regardless though, I'm going to have to mask this because of the amount it's changing her hair, and I would want it to possibly only affect her face. But there you get an idea of how you can change the head direction a bit. Here let's try to shift her head the opposite direction. I'm sure that's going to make it so the alignment will need to change once again. This time the this fix head alignment is going to need to go the opposite direction. A little bit more. There we go. Let's turn off our preview, so you can see before and after. It's of limited use though because look at how much distorted her mouth. But in this image I didn't really need to change the angle of her head. So let's go to the upper right click this icon, which is going to reset all the sliders in here, getting us back to normal. And what I would use this for the most on an image like this is you see the dark left side of the face, I'd like to lighten that up. And so that's where, once again in here, the choice called "light direction". I just move this into whatever side is dark on the face. So I'm going to move it towards the left, and you see how it lightened up that side of the face. Finally click "okay". And once again with the mask you can just type "command I" if you're on a Mac, "control I" on Windows, if you'd like to invert that. And then over here to change from black and white, you can use these little arrows, or just type the letter "x". X will exchange those two colors the same as clicking on the little arrows. And then I can come in here and just paint that in on the dark side of her face for a bit of fill light. And so if I turn this off, before and after, then that works out rather nicely. Then let's switch to another image to learn its limitations. And that is if you're not looking towards the camera, then it's not really going to be able to be very effective, even if you choose neural filters and it still sees a face. And in this case you see it says "selected face", therefore it is seeing a face. Any change though I make to this, like if I try to make her smile, you're going to find it just cannot handle a sideways face. As you see, it's absolutely useless. And that's why up here, it's going to tell you, "face detection is obstructed, may be less than predictable", which I wouldn't easily agree with there. Now there's one more filter in the portrait section. Let's take a look at makeup transfer. I'll cancel this image, and let's go find a few others. So here we have an image, and I don't know if you can tell all that well, but she's wearing makeup, and so we have a little darker here and other areas around the eye. Well, if I go to another image where somebody's not wearing makeup, I can choose "filter", and then "neural filters", and within that portrait section is one called "makeup transfer". And I'm surprised this one does not have the beta badge because I find it does not usually produce great-looking results. When I do this, it needs a reference image, and that reference image can either be one that I currently have open, and if so, I click on this menu and choose the other image. And it will analyze it, finding any faces, and if it notices makeup when it comes to lipstick or eyeliner, that type of thing, it will attempt to apply it. Or I can click on this folder icon, and then it would allow me to choose an image for my hard drive. I don't have one waiting there though, so I'm going to click "cancel". But you could always have a folder of images that are different types of makeup. But I find that if you get someone that has a good makeup job that actually has colorful makeup around the eyes and things that this is not very good at applying it. It can be okay though with thickening eyelashes and eyebrows, and it will shift the color of the lips. So of course when you click "okay", it's one of those things where you will likely have to mask it. But I think the lips are overdone, so I'm going to click on this mask, and I'm going to paint with black. Black would usually remove an effect like this if I use my paintbrush. And if I paint, you'll see that just go away. Well, I might want some of that look, just not the full strength of it. And that's where I can adjust the opacity up here at the top of my screen. You can type the number keys in your keyboard when you're in the paintbrush tool to change that setting as well. And so I might type the number five to say I want to remove 50% of this effect. Then when I paint on it, it might not look quite as bad. But I have yet to have great success when using the makeup transfer filter regardless of what kind of source material I get. But if you do want to experiment with it, what I'd suggest you do is to experiment with stock photography that has various makeup applied. You can do that through Adobe Stock. You can download sample images and use them, but I find it to be a very limited use. So that's the first section of neural filters known as portrait neural filters. And it really depends on the image as far as your success goes. But what I use those for the most is adding fill light to the side of a face. And also if I got somebody that just does not have a great smile, not very often I adjust the happiness, but sometimes moving the anger and surprise sliders into the negative range will give me a nice curvature on the lips without making teeth suddenly appear.
Class Materials
CLASS MATERIALS
Ratings and Reviews
Chris Evans
Introducing the brand new Neural Filters and the how to get the best out of them. Ben does this with his usual ease. The examples he uses are clear and precise and the extra tips he throws in are worth the price of admission alone! Brilliant class!!!
Audrey Agin
Oh Ben you are wonderful. I will have to watch this again. Parts are Medium to Advanced and that is what I am needing. These lessons showed so many different situations that a person may come across in their photography or restoring old photos. You also showed some work arounds! Most other teachers may mention something that the topic can also be applied to, but do not show how to do it. That is so frustrating! They stop short of giving a full lesson. You go deep into your lessons, I can always find info to help me out! Thank you!
Aston Moss
Great step by step instruction with some excellent ideas as to how to enhance and completely create images.