Filling with Text Prompts
Lesson 5 from: Photoshop AI: Getting Started with Generative FillBen Willmore
Filling with Text Prompts
Lesson 5 from: Photoshop AI: Getting Started with Generative FillBen Willmore
Lesson Info
5. Filling with Text Prompts
Lessons
Lesson Info
Filling with Text Prompts
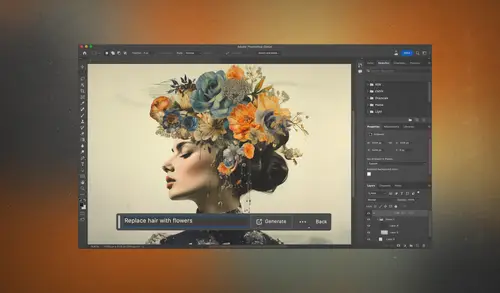
So far what we've done with generative fill is where we haven't had all that much control over what happens. Instead, we just tell it where we want something to be removed and it does the work. Or try to expand an image. And we don't have to give it any input. Well, now let's take a look at how generative fill works with prompts. A prompt is a simple text description of what you would like it to generate. And there's all sorts of possibilities with this. We can tell it to change what somebody's shirt looks like, give them a new hair do, replace an entire background, or generate an object that didn't exist originally. So, let's see how it works. First, let's see how it can be used as an alternative to what we've done so far to create a wider view of a scene. If you remember in a previous video, I showed you how you can use the crop tool to expand an area and have generative fill fill in the newly empty areas. Well, when I did that with this particular image where there was a shot of my ...
wife taken on the helipad of a ship, here's what it produced. It almost looked like she was at the beach or something. It just didn't look like what I wanted. And that's because I didn't tell it anything. I didn't tell it what it should generate. Well, let me show you a different result that I got when I was able to type in something and actually tell it what I envisioned for it. What I wanted is to actually see the front of the ship, the very front tip, so there's nothing behind me from where I'm standing. And the curvature of the front of the ship right around this, that's not actually what was in the scene because I needed to stand somewhere to take the photograph, but let's see what it produced when I could type in and tell it I actually want the front of the ship. So this is the type of thing I'm able to do. Well, let's take a look at how generating areas using prompts works. Let's close this image though, and we'll start off with one that looks like this. What I'd like to do here is here are three friends, and it's just a boring background. I want it to look as if they're at the beach. So, let's select the areas that we'd like to keep out of this scene. I'm gonna go over here to our object selection tool. I'm gonna hover over an area to see if it happens to recognize this person, and it seems to. I'll click, then I'm gonna hold the shift key to indicate I want to add to that selection, and I'll click here. And then I'll alt shift once again, and I'll click on this other one. Then what I'd like to do is add the chairs that they're sitting on, except for the wimpy looking middle one. So I'm gonna hold shift and see if it gets this chair. It looks like it sees part of it, so add that. And see if it gets some of this rest. I'm not sure, that might have been the same selection we got, in fact, it looks like it. So I'll try the chair over here. It doesn't seem like it is recognizing the chair. So what I'm going to do is hold the shift key, and I'm simply gonna draw around the portion of the chair I'd like over there, hoping it will add it to my selection. I'm gonna then draw around this area here, hoping it will find and add it to my selection. And I'll do that also in these other areas where I see the white chair extending beyond the person's body. Down here, just below where he's sitting. And many other areas. Now this will take me a little while, I might fast forward here, just because it would be boring to watch the whole thing. I think I'm near the selection I need, but I wanna double check it to make sure that I don't miss sections. So I'm gonna type the letter Q for quick mask, something I used in one of the other videos. That's gonna take a selection and turn it into a red overlay, where the areas that are red indicate areas that were not selected. I'll then grab my lasso tool. I'll zoom up on the image, and I'll see if there's anything that's important that I'm missing or something that I should include that's not. There's just a little connection there. Usually I use keyboard shortcuts for filling with my foreground color, and any time you add black, it adds to the red stuff, indicating an area that's not selected. And if I fill up my background color, it takes away the red stuff, indicating an area, a larger area selected. The keyboard shortcuts are command delete for background color, and option delete for foreground color on a Macintosh. Now, those would be, let me think, control backspace for background color and alt backspace for foreground color if you were on Windows. And so anyway, I'm just gonna look around here. I'm not gonna include his chair because I would like it to generate an alternative chair. But right here's a little portion of the chair I'm missing. I see a big portion of the chair right here that's missing. So I'm gonna be sure to add that in. And just refine this. I see part of its leg also. At this point, I think I have the selection about where I need, where all the areas covered in red are things that I would like to replace and the areas not covered in red is what I want to keep. So I can turn off quick mask mode by typing Q. Now, with this, I currently have mem selected, and that's what I'd like to keep. So I need to select inverse to get the opposite, and then let's do a generative fill. And this time with generative fill, I'm gonna tell it what to put there. So, I'm gonna first start off with something simple. A single word. I'll just say beach. And let's just see what it comes up with. Then we'll refine what we're asking for if it doesn't give us what we really envisioned. That's not at all what I had in mind. It looks more like they're on the surface of the moon or something. Let's try the second and then the third one. None of those are at all what I was looking for. And that's because I really wasn't all that specific here. So what I'm gonna tell it to do is to give me a sandy beach, and I also want to see the ocean, with ocean behind. Just so it's not near where I am. And let's see if that's any better. That's dramatically better. That's much more of what I was thinking of. Let's see what the other variations look like, and they all look like now we're getting much closer. Now, notice the sky. Well, I wanna have a dramatic sky. So, I'm gonna say under a, under a dramatic sky. Not quite what I was thinking of. I don't want stormy. So, let's modify from there. Instead of saying dramatic, I'm just gonna say spectacular. And see if that gives me anything closer to what I want. Second version and third. The sky is still not quite what I would like. So, I need to be more specific. All right, let's just say that this is the sky that I like. Now, we've generated a bunch of variations of this because I was trying to get it to change from its initial idea of just the word beach, which did not produce at all what I liked, and then a lot of different variations. Well, let's choose my favorite variation for the bottom of the photograph, where the beach is. So I'm just gonna click through these and decide which one I think best represents the beach. And I'm thinking in here, let me go through a few more, let's say its this one. But this one doesn't have the sky that I want. So what I'd like is the beach from this variation and then the sky from this one. Well, how do I do that when they're sitting here as these variations. Well, the way we're gonna do that is I'm gonna duplicate the layer. One way of duplicating a layer is just dragging down the new layer icon, so now we have two versions of it. And when you have two version, each one can use a different variation. Then, I'm gonna mask this so that it only is used where the sky is. We already have a mask limiting it so it does not effect the people. And I'd like to have a second mask that limits it where it doesn't appear down here at the bottom where the beach is. Well, if you wanna have two masks and a single layer, what you need to do is take that layer and put it inside of this. This might look like a folder, but it's called a group. If you click on the icon when a single layer is active, you get an empty group, and then you'd have to draw this layer on top of it. Or you can hold the shift key when you click the group icon and then you will put it inside the group, even if it's single layer. Now that group can have a mask attached. If I click the layer mask icon right here, now any part of this I paint with black is gonna cause this layer that's contained inside of it to disappear and reveal the layer that's underneath. So I'm gonna come in here with a semi soft brush. I'll get a huge brush and I'm just gonna come in here and say, I don't want it to affect the bottom because I like the sand better on the version that's underneath. And I'll come in here and paint across. Now, it does look like the beach ends at a different part, but I think it looks like it blends in rather well, the color of the water. So I think I'll just go across like that. So now we have the beach from one variation, and we have the sky from another. But there's more that I want to do. What I'd like to do now is I want to make sure he's in a chair. You see these guys are in white rocking chairs, but the guy in the middle, that's my brother-in-law, uh, he's not. So what I'm gonna do is try to draw where I think that chair should go. It looks like it was kind of behind their heads, so I'm gonna say about like this, maybe into about here. I'm just gonna draw it all the way across, and then up, down, and maybe about like that. And I'll go across. Then down at the bottom, I'll hold shift, add my selection. And I think it should probably come out about there. Maybe fill that area and can fill this area down here as well. And maybe this area down here I'm gonna allow it to fill with vb share. And the only thing is I don't want it to replace him. So I need to remove him. I'll hold down the option key that's on Windows, and I'll just take away the central portion, leaving just a little bit of overlap on the edge. About like that. And then I'm gonna do generative fill. So I'll just go to the edit menu, generative fill, and I will say, I already can predict if I just say rocking chair, it might make a wicker one or something, so I'm gonna start by saying white, simple rocking chair. And we'll hit generate. That's a little too simple. Let's try the others, and I think well, that one's kind of fun. It's more like a beach chair. I don't mind it. Let's move on from this image. First, with this image, let's extend it. We'll go to the crop tool. We'll have it set to generative expand. We'll end up pulling this down here, and let's see if we get all the legs and the torso in here. Probably don't need it to be quite that tall. Maybe about like that, adding a little bit of space on the sides, and let's see what it generates. It'll leave an empty prompt. Now, let's zoom out. And the hands look terrible, and the tie pattern looks terrible as well. Let's switch between the three different versions it's gonna deliver us. It can generate another one. And at this point, we have something we could use as a starting point. And at this point, I'm just going to first come in here and see if I can get into refine this area specifically with just an empty generative fill. I like that a bit better. Let's see if we can get either a tie that looks appropriate or no tie at all. I'm gonna come over here and select the entirety of the tie. Maybe a portion of a collar, so it has some control over that area. And then let's generate that, and let's just say white button down shirt. And it seems to like the idea of a tie, but right there we have a good version. The other thing I could've done is a tie is kind of formal, so I would say casual white button down shirt. And then I would think it would have less of a tendency of generating ties, but we'll see. Of course it gives me a tie. It just thinks the tie should be white. Let's try white button down shirt comma no tie. The main thing is the shape that I selected is kind of dictating the fact that it is in the shape of where a tie would go, and therefore it is trying to insert one the majority of the time. So I'll go with this version because it is the best of what I was looking for. But now when I look at it, my hand here, I really don't like the fingers, and fingers with AI are things that it is rather terrible at doing. So I'm gonna see if I can maybe get this hand to be tucked under the shirt, so I'm going to make a selection here that includes all the hand. I missed one little tiny spot there, and there we go. And let's just see what happens when we leave an empty prompt, because that usually indicates you wanna re-touch out whatever's there. And if my hand was going under this arm, you wouldn't see much of it. That's what I was thinking of. Let's go to the next few. And I'm liking that one. I don't really like this part of my arm and the look of the cuff. It looks like I've got some weird veins and other stuff, so what I'm gonna do there is I'm gonna make a selection of the general area that I want replaced. I think the hand is fine beyond there. Then we'll do a generative fill. And now here I can be detailed or I can be generic. Let's see the difference. I'm gonna say what I literally think should be there. White shirt cuff. Hit generate, and let's see if it can understand that. Sometimes it's useful to have that kind of detail. Other times it's better to just say what is the bigger picture of what's there. So in this case I don't like that. I don't like that, and I don't like that. I don't wanna watch or anything else. So I can generate another one, just to see if it'll ever give me what I want. But it seems to think that people always have to have watches, and some where them backwards. So instead, I'm just going to simplify. Why not just say I want a shirt. Because that should be part of the shirt in that area, and let's see if it does any better. Sometimes you'll be amazed. I do think that's better. Let's see, I think let's just generate some more because two of 'em were close. I think this is the closest to what I want. I simply don't want a watch. And so I'm gonna come in here and select that area where the watch is contained and do an empty generative fill in an attempt to have it remove the watch. I think that one's the best. All right, then let's next try to change what kind of pants we have. So, I want just a generic selection of the area where I want to be able to affect the results. That should be good enough. And I'm gonna come in here and say I want jeans. Or I could say blue jeans since there are so many different kinds and colors these days. So let's see our variations. I kind of like that one, but I'm not sure what's coming out of the back pocket there. So, I'm going to just select that area and do an empty generative fill. That looks better. Then we could come in here and do the entire background. Well, I'm gonna come in here and need to make a selection, so I'm gonna use our object selection tool. I'll hover over this area. It seems to be able to find me just fine. And then that's the area I don't wanna change. So I'll select inverse to get the opposite. And we will simply do a generative fill, and I'm just gonna say white wall. What's nice is it should figure out where the highlight is on me, where the shadows are, and so it adds highlights and shadows to the wall that it generates. So, here it put me in what looks like a corner, which looks kind of cool. Another corner there. And there is a wall, I kind of like the wall, so I'm gonna go with that one. And just to show you that you can change just about anything, I'll come up here to my hair, and remember, when it comes to making a selection, the size of your selection will somewhat dictate what your results will look like. So if I wanna have spiky hair, I might want to have it tall or something else, but I'm gonna come in here and just select that, do a generative fill, and just call it simple stylish blonde haircut. (instructor chuckles) Let's try the others. Oh, that's funny. And one more. And sometimes you'll need to generate quite a few variations. That one's not too bad, but let's try our other two. I'm liking that one there. So I don't know if you remembered what we even started with here. Let's go to the bottom of my layer's panel, and I'm gonna show you just what we started with. We started with this photograph that pretty much starts at chest level. We ended up with an entire body in a new environment, new hair, arms. We were able to choose all of that type of thing. Let's go to a different example because there's one concept that can be useful, and that is this image that I used when we were re-touching. And if I turn off the re-touching, which are these two layers, you'll see all the people that used to be in there, and you see these green ropes that are here, and there's only a little hint of them in this image. And I'll turn those back on. Well, I don't think the green ropes quite look appropriate in here. They're just not rendered well, so I'm gonna select this area here. And one thing was with an image like this one, I couldn't think of what those green ropes are called. And so I didn't know what to type in, other than green ropes. And that's a little too generic of a request. And so one thing that I commonly do is I'll simply Google something. So in this case, these ropes are quartering off these little alcoves in the side. So I would simply Google quartering off green rope. And when you do that, which I can't show you Google, but I can tell you what the result is, is when I search for that, the only thing that showed up is Google was trying to sell me this exact kind of thing. And what it told me is it's a velvet stanchion rope. And it can also use the word hanging. And so therefore, I can have a more specific ask or request. When I do my generative fill, I'm gonna type in green, and I'll actually paste what I, copy from a website, green velvet hanging stanchion rope, and I'll put a plural. And I'll hit generate and see if that is going to be appropriate. But often times that's useful when I'm not sure the terms I want to use. And so I'll Google it on a kind of generic level and kind of see what suggestions it has. Not bad, I just might wanna check the other versions, and it seems like some are better than others, and I'm actually gonna go with that one. It looks relatively clean. Well, hopefully you have a pretty good idea of how to think about generating content using prompts. Simple text descriptions of what you need, and the better you get at describing precisely what you would like, the better the results will be.
Class Materials
CLASS MATERIALS
Ratings and Reviews
Tommy Keith
Highly recommend following and watching Ben's classes to stay up to date on Lightroom and Photoshop. Even if you never watch any other classes on CreativeLive, just watching Ben's classes make the cost of Creator's Pass worth it. He not only teaches you the new material, he is such an expert on Adobe that you learn ton's of short cuts and creative ways to help you in your every day processing. Thanks Ben!
Laura K.
Ben, thank you for continuing to return to Creative Live and to provide update courses here. VERY GRATEFUL!!!!!!
Audrey Agin
Ben is a great teacher, easy to understand. I have watched the majority of his classes, and always looking for his next new subject.