Masking Pt 1
Lesson 14 from: Photo Editing in Lightroom Classic for The Photo EnthusiastJared Platt
Masking Pt 1
Lesson 14 from: Photo Editing in Lightroom Classic for The Photo EnthusiastJared Platt
Lesson Info
14. Masking Pt 1
Lessons
Introduction
01:49 2A Tour of Lightroom Classic
16:19 3Basic Adjustments
23:16 4Synchronization
16:47 5Tone Curve
08:41 6HSL
03:52 7Color Grading
04:53 8Detail
07:34Lesson Info
Masking Pt 1
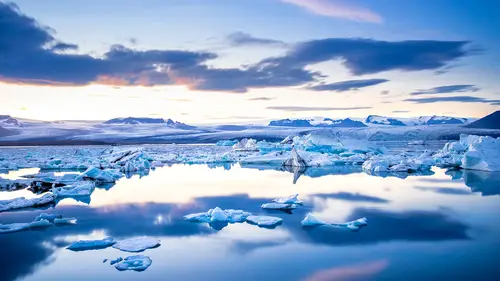
So now it's time to talk about masking. Which is a new thing and an old thing inside of Lightroom. So it's been around for a long time but it was under a different name. It was called local adjustments. So local adjustments were things that you could you could either use a brush or you could use a circular gradient or a regular gradient in order to select a certain area of the photograph to do something to it. So you may remember doing that if you're new to lightroom, you don't remember doing that, but that's okay because we're gonna show it to you now. So I'm asking is a new thing as of 2021. We call it that because it's got so much more power and so many more controls. So instead of just the three brush linear gradients and radial gradient, we also have the ability to select a subject to select the sky. We can also mask by color range, luminous range and depth range if we have multiple lenses on our camera, like on say an iphone. So there's a lot of ability that we have here plus all...
of these can intersect with each other and so we can create really amazing masks really quickly. So the question is, what is a mask? Well, let me just show you a mask in process. So first let's close this and let's do a little work on this image. So I'm gonna go in and I'm gonna choose adobe vivid and I'm going to play around with the exposure on this. I'm brightening it up because I like it really light. I like a lot of information in here and then I want to bring those shadows back down like that. Maybe bring the bring the blacks down just a little bit and I wanted so see that highlight. I want that sky to be darker, but I can't get it darker and if I bring the white down, it doesn't quite do the trick either. I'm just going to make sure that I'm in the zone. So I'm close to where I wanna be because remember this is an HDR image. So we have plenty of information here. It's just that our global adjustments aren't doing the trick, which is fine because that's why we have masking, we have the ability to work on anything anywhere anytime. So I'm going to give a little clarity to this image and I'm gonna play around with the temperature. I want it to be nice and blue. I don't want it to look warm. I want it to look nice and cool. Okay, so I like all of the ice and I like the blue of the water. So I'm happy with that. I'm not happy with the sky and I'm not happy with the reflections in the water, but we can take care of that simply by going into our masking capabilities. So let's go into the mask and at this point we're going to choose a linear gradient. So I'm going to click on a linear gradient. it just opens up a little box up here, that is my gradient, but notice it's completely black right now, meaning it's doing nothing and I can turn on this show overlay button. So when I turn on the show overlay button, then it's always going to show a mask and it's going to show it as read. But I can click on that and change the color that I wanted to show. I can also click on this triple dot button and I can choose what kind how it's going to show. It is going to show an image on black and white. Image on black, image on white. There's a lot of you can play around with the way the mask works here, so just play with it. I like it being read. So that's the way we're going to keep it. And then I'm gonna go up here and I'm gonna do 100% of whatever I'm doing up here, and I'm gonna drag that gradient down towards the bottom, right? And that's how we create a gradient. Then whatever we want to do within that gradient, we can come over here if I double click the effect inside of this area, this is everything we can do to a gradient right here. Everything we can do to a mask basically is right here. Everything from tim temperature, tend to exposure, contrast, highlights, shadows, etcetera, etcetera. It's all there. So I'm going to double click this little thing that says effect and that's going to reset it so that there's nothing actually happening. So if I turn off the show overlay, nothing's happening, The gradient is doing nothing. I'm going to turn that back on and as soon as I start adjusting it so I take the exposure and go down, you can start to see it doing something so I can bring the exposure down a little bit. I'm gonna bring the whites down a little bit like that highlights down just a little bit. Now we're starting to see a sky. I'm liking the sky, that's great. And I can bring this down and really get the whole sky in there. So I am creating a gradient that's darker on the top and zero, no change on the bottom and I can do whatever I want with that. I can change this to blue or I could say, well I want to increase the warmth of the sky. Actually, we want it to be a little bit more blue. So that is how a gradient works. Now, if I want, I can also create a radial gradient. So once I have one mask, I can come up and create another mask by hitting a plus button here. And again, I can choose any of these ways to select my mask. So I'm going to choose a radial gradient and now I'm going to draw over the top of the water right here, see that it's kind of that area that needs to be darkened down and look a little bit more like this area up here. So now what I'm gonna do is I'm going to go in here and I'm going to bring the exposure down on it a little bit, bring those highlights down. And by the way, let's turn on that, show the overlay, see how it goes outward. If I want, if I want to reverse this so that it's happening on the outside of the circle. I go over here to the top of the radio gradient and click invert and now it's happening to everything outside of the circle, but I want to inside the circle so I'm going to do just like that and I'm going to come in here and play around with that until I see instead of a bright white. I want to have full detail inside of the highlights of that water. And then I'm gonna play around and say what, what do I want? Well, I'm gonna bring it blew just like I did before. Good. Okay, so now here's before I'm going to turn off all the masks and here's after before, after before after. So I've helped the image just by toning down those bright areas. So I'm teaching you now the basics of masking and so you need to know all the tools. So we're going to make another mask and that is a brush mask. So the brush is just a regular brush and I can change it by using the bracket keys and I'm just going to get it to a decent size and I can change what it's going to do before I ever use it. So I'm going to I'm going to increase the exposure to maybe a stop. And the thing is is that if you change the the tool, if you change the effect that's going to happen before you start brushing the next time you pull up another mask, it's going to lock in that effect. But if you if you make the mask and then change the brush settings, then when you make another mask, it's gonna go back to the old settings. So if you ever get in the habit of making a whole bunch of masks and you're like, I want it to keep doing the same thing. So I want to make a brush over here and then I want to make a brush over there. Just make sure that you change the settings to generally what you want before you made the mask and then start painting and it will kind of remember those settings. Now here's another tool to know there's a thing called auto mask, right at the top, right below the brush size and feather and all that. There's an auto mask. If you click that on the auto mask, will actually see the edges between all of the things you're painting. And so if I go in and start painting here, it will know see how it didn't spill over into the water, it will know not to spill into the water because it's looking at those edges and that's really quite useful. Um So I can, I can be a little less worried about accuracy because I have the auto mask on, but I also have a secret weapon and that secret weapon is that I know that I can readjust and rework my mask with other tools and so I don't have to be super accurate, but I'm gonna try, I'm gonna turn off the auto mask so that I can get out here a little bit without getting all sorts of weird masking because the auto mask can go a little wonky when it's on textures because it masks here doesn't mask their masks here, doesn't mask there. So sometimes you have to be a little bit careful about using the auto mask too much. So I am just brightening areas that I want to have glow. I think I could stand up, brighten back there as well, awesome. Okay, so I've got some good brightness now, I can start playing with it and brightening it up or darkening it down. I like how bright it is there, I can bring the highlights up but I'm going to bring the shadows back down, you see that. So I'm only bringing up the highlights and the exposure and by bringing the darkness back down, see how I get, I'm gonna turn this on and off. So each mask can be independently operated now, instead, it used to be that you would just have to turn all the masks off and then all the masks on to see what you've done. But now you can go into each individual mask and just turn off that mask and see what you've done. And I think we've done a good job at getting some visual interest right up here into these floating icebergs. So I like what I'm seeing here, that's pretty good, but notice that the black area down here is still intact, it hasn't been brightened up because I actually, in the mask, I actually brought the black point down, even though I brought the other things back up. So I maintained the contrast of the darkness of those areas. So I didn't have to be super accurate. I could spill over into the dark areas because I'm only brightening up the mid tones and the highlights. And I'm taking the shadows on the black backed down. So I don't have to be all that accurate, which is really helpful in saving time working on an image. Now, once I've done that, I can go on to another mask and this time I'm going to use a mask that's very different. So I'm going to use an AI mask. So I'm gonna click on, create a new mask and this time I'm going to select the sky and it's going to compute the sky and boom, it found the sky, look at that. So now there's the sky. It kind of assumed that these white areas were sky, which is kind of a mistake on its part. But that's okay. It did a pretty good job at selecting the sky and all I want to do with that is just bring the entire thing down just a little bit, which is find that it went over the sky a little bit. That's fine because I can also go in and say, well, I want to remove certain portions of this and I can do that by subtracting. So I can either add to the mask or I can subtract from the mask. So I'm gonna play around with this mask. Play around with my effect that I've made on the mask. And then I am going to, since I've got the sky selected, I need to then go in and subtract those areas of the mask that wasn't accurate. So I'm going to go in and hit subtract and I'm gonna subtract with a brush. So with the brush, I am subtracting this area. So I'm gonna do that by turning the overlay on so I can see where it made a mistake and then I can turn on the auto mask and I can come in and just a race out, see how it sees the sky, it sees the edge and it's just removing it from that edge And we're density is at 70. So it couldn't fully remove it. So I'm going to go to 100. There we go. See that did a great job of finding the edge of that mountain and removing it from the sky see. So now I did most of the work with that sky and then I'm going to do the rest of the work there. Okay, so now we've selected that. I can turn off the auto mask because I don't need it to select down here. I'm just going to remove it like this. That's no big deal. But we did a great job at selecting the sky. So now I can do whatever I want to that sky and it's independent and I can even click on that, double click it and name it sky and it is now the sky mask and we see it right where it is and I can do whatever I want to that mask just by clicking on it and then I can play around with the total sky. Now, we don't want to go too far because we want it to look real. So we're just gonna kind of play with it and make sure that we get the very best. There we go. Now, see that we've got really nice sky going on there. So I have the ability to select the sky. I have the ability to add or subtract from that mask. I have the ability to use a brush to make a mask. I have the ability to use a radial gradient to make a mask. Or I have the ability to use a regular gradient to make a mask. So let's do a different mask. This time I'm going to click the plus button and I'm going to do a radial gradient and I'm just going to drag that radio gradient right there across the sky and I want you to watch the way I manipulate this circle. So I'm gonna take the circle and I'm gonna grab it from the edge. And that little curved arrow means I can tilt it. So I'm gonna tilt this radio gradient like this and I'm going to drag it way out here and I'm gonna take the feathering way out so that it's super feathered all the way 100%. So it starts at 100% here and then by the time it hits here at zero and I wanted to go all the way to about there and I want to be nice and skinny just like that. Okay, so now that I have my radial gradient and I'm putting the center of it right here next to the edge, I don't want it to be further over here, I want it to be right there at the edge. Once I've done that I'm going to make the effect. So I'm going to double click the effect so that I have nothing and notice that it shows me the gradient now because I can't see any effect. And now I'm gonna take my temperature and I'm gonna warm it up like that, see that I'm creating son. And then I'm also going to take the tent and I'm gonna warm it up too because I want it to be kind of a warm glow. It's, it's magenta, it's warm and I can even take um a color and click on the color. And if I click on this color chart, like I'm going to add green and then I keep holding it and I drag off so I'm still pushing down, then I can go choose a color anywhere here in the sky and it's adding that color over the top of the photograph. So if I want it to be kind of a warm, magenta, orangy look like that, I just simply hold there and let go and now I've got this saturated color that I can, that's 0%. And then if I change the saturation in the color selection tool, I can either go to zero or to 100%. So I'm just kind of scaling back and forth until I like what I see now, I like that I've got this beautiful color coming in. The problem is is that it's going everywhere. But I do like the fact that it's really intense here and it's slowing down by the time it gets here, it doesn't exist anymore and I can always grab this and drag it out a little bit, see that so that see how it's blue now. And then I'm dragging it out. I've just created a sunset look and it's okay that it's glowing across the mountains here too. So I I don't mind that it spills, but maybe it's spilling a little bit too much. So now what I have the ability to do is the same concept as what we did with the sky except now we're going to the mask and instead of subtract or add, what we're gonna do is we're gonna go to this triple dot button and when we do that we're going to intersect. Now intersection is important because what intersection does is it says here's mask rule number one. Here's mask rule # two only where those two collide is the actual real mask rule. Everything else doesn't exist. So you make a mask rule here, which is our our circular gradient and then you make another mask rule And where those two agree where they overlap each other. That's what we're selecting. And so I'm going to create an intersection and I'm an intersection with a luminescence range. So by clicking on luminous range. I am now going to get to choose how bright an area is affected by this warm effect. And so I can simply just click on it and drag and I'm just dragging a square over all the areas where I'm okay with this warmth hitting and by doing that I've created, do you see how it just selected only those brighter areas. So now I can turn this on and off. So that's without and that's with, that's without, that's with and I can go over here to the luminous range and adjust it so I can take the luminous range and I can increase it so it starts to spill over. So if you see it's going to start spilling over the top of the mountains. So if I go too far down, it just spills over the mountains like it did before. But if I bring this back up and this is important, this is the hard line and this is the bleed. So this is your feather here. From here to here is a feather and then this is the hard line that says nothing gets past this line. So I'm going to make sure that nothing gets past that line right about at middle gray. And then the feather allows it to spill, see if I keep it here, it won't pass that mountain. But if I allow it to feather all the way down to darker gray, not all the way, but like let's just put it at like 25%. So now it feathers from 25%. So beyond 25% lower than 25%,, You don't get anything and then above 25% feathers up to 50. And then from 50 on its fully active. And that's how we get that effect. So now this is what it looks like. That's that's no sunset, that's the sunset. And all I'm doing is I'm just taking what actually exists in the photograph and I'm emphasizing it and I can do the same thing once I've got this. So I got this idea. Now all I have to do is create another one. So I'm gonna click on here and I'm going to choose to make a radial gradient and I'm going to put that right here in side of our water and I'm going to make it go all the way across, put it in the same kind of area. I'm gonna kind of tilt it up like that and then I'm going to create the same kind of gradient. Um So I want to double click the effect. Then I'm going to warm it up, give it a little magenta. There we go. And I'm gonna give it a color and I'm just gonna go right back up here and choose that same color there. So now it's doing the same thing to the reflection that it was doing before. And I can go in here and say all right now I want to do a um intersection and we're going to intersect it with a luminous range and I'm going to use my little color dropper to say this is the range boom. See how it skips all this dark area and it just warms up where it's reflecting in the water and it's reflecting what's up here. So now we have that same concept going on right here. Now if I hover there are two points on this set of rules, the first rule is set this to the side. So the first rule is the radial gradient and it just shows you the circle. The second rule is the luminous range and the luminous range actually exists in the sky as well, but only where they intersect which is the total mask. That's what it's showing you now. And so you have the ability to infinitely use all of these different tools to select very specific things. And as a result of that, you have the ability to do some pretty amazing work inside of your photographs because you can really select very specific things. Now. I can try going here and saying select the subject and watch what happens. It selects these because it thinks, oh that's the subject, whatever this is, must be the subject. I don't know why maybe it thinks that's a whale or something. So it's selected this little area right here. It did a pretty good job at selecting those little floating ice chunks. So I could always go in and subtract out from this with the brush and just subtract this area here and use the auto mask feature to make sure that I don't go into those. There we go. I'm just un selecting around those there so that's what it saw as the subject. And so now we could just simply go in here with the subject and we could brighten up those just a little bit and maybe give them a little bit of warmth. And now once you've done your masking, you can always come back into your normal photograph and start playing with the global settings a little bit more in order to unify everything. So once we've got all these adjustments done individually inside of our masks, we can always go back out here to the to the global adjustments and work on those as well.
Class Materials
Bonus Materials with Purchase
Ratings and Reviews
Byron Sieber
Jared does an excellent job at taking a subject and breaking it down step by step. He includes great explanations along the way to help you understand why he is doing something. His results, which are great photos, speak for themselves.
Michael Grosso
Excellent overview of the features included in the most recent upgrade of Adobe Lightroom. Very practical applications are covered at a very good pace. Thank you!
user-814d7a
Excellent class with great detail on the new Masking tools! Thanks, Jared!