Shoot: In-Studio Lighting Demos
Lesson 8 from: The Starter Portrait Studio: One Light, One ReflectorChris Knight
Shoot: In-Studio Lighting Demos
Lesson 8 from: The Starter Portrait Studio: One Light, One ReflectorChris Knight
Lesson Info
8. Shoot: In-Studio Lighting Demos
Lessons
Class Introduction: What are you going to learn?
03:16 2Directing the Eye
03:27 3Light: Hard, Soft and In-Between
12:11 4Shoot: Controlling and Shaping Light
08:14 5Shoot: Position of Light
08:22 6Shoot: Distance From Background
03:11 7Shoot: Contrast
31:01 8Shoot: In-Studio Lighting Demos
18:19Lesson Info
Shoot: In-Studio Lighting Demos
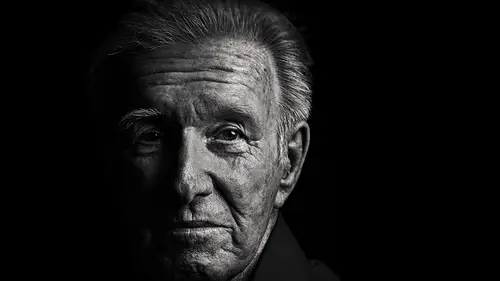
Now, we're going to put it all together, everything we've been talking about, and I'm gonna show you several different lighting setups that you can achieve using one light, a variation of modifiers and a reflector or a negative fill. And they are all gonna be a little bit different. I'm also gonna be switching out modifiers. You can get most of these things from most of these modifiers. I'm just kinda doing it to show you a little bit of variety, so don't feel strapped in to feel like you need to get all of these things, because there's a lot you can do with it. It's more about the position of the light and how you use it than anything else. So this is actually what we're gonna be looking at. We're gonna be creating several different varieties on this. We're gonna do a split light. We're gonna do a silhouette. We're gonna do like a painterly Rembrandt style. We're gonna control what those shadows look like. We're gonna do a soft beauty setup. And then we're gonna do a hard beauty setup...
, and I'm gonna kinda run through these relatively quickly, and you're actually gonna see that because we're just using one light, the time to change in between is going to be really quick. Alright, so we're gonna start with a split light with a silver reflector. So I'm gonna start with a beauty dish and a grid. This is gonna help me control the light a little bit. Thank you, and do me a favor. Come forward please. Can you face this way? Great, and kick the hair back for me please on the other side. Well, you can do both sides. (equipment squeaking) Great. Actually, could you tuck the hair into the turtleneck. Mhm. Cool. Kay, so we're gonna start with a split light, and I know we didn't get into lighting patterns. There are tons of those courses available. Also in the book, I have a chapter on it, but lighting patterns which is basically split light, Rembrandt light, loop light, paramount light, the lighting patterns on the face. They're just names for things, but split light basically means we're gonna put half the face in shadow. I actually really like this kind of light even though I don't use it very much because it actually goes back to filmmaking a lot more successfully. If you look at old film noir movies or even modern movies that do throwbacks to film noir. Whenever you see a character in split lighting, if the cinematographer's doing it right, what they're usually telling you is that this particular character has two sides to their personality. And if it's a good guy in the beginning of the movie but they're lighting him with split light, and it's like a film noir because that's the kind of movie it is, that person very much may be the bad guy by the end of the movie. And so you can actually use it as visual clues. A really cool thing about, if you ever watch the show Breaking Bad, used to use a lot of split light when it would light the main character because it was about the duality of personality. And I always thought that was really kind of fascinating. So what I'm gonna have you do is turn this way for me please and come forward a little bit. And I'm gonna kinda end up shooting this at camera a little bit, so I'm gonna have to block it. But come forward a little bit for me please, great. And so what I have is a really beautiful split light. Turn your face back to me just a, a little bit less. Great, right there. And let's get a meter on that please. Where do you wanna point the dome? What's that? Where do you want the dome pointed? On the lit side, please. (equipment beeps) Eight. Great. So what's gonna end up happening here is I may get a little bit of a flare at camera, so what we're gonna have to do is block it from hitting me with a flag if it's at all possible. And split light means half her face is gonna be in the light, great, and half it's gonna be in the shadow, and so we have. Maybe kick the hair just a little off, other side, other side. Like this? Yep. Great, great, great, great. Reach the neck forward just a little bit. Good, and turn your face just a little more to me. Great. And so this is gonna be very dramatic. (camera flashes) Kay. And so what I have is a split light, and there's not a whole lot. Let's reset this. Great. And so, again, split, very dramatic, very dark. If I wanted to kind of play with this a little bit, I could, but we're gonna modify this a little bit. We're gonna add a little bit of fill to the unlit side of the face, and so I'm gonna use a silver reflector to kinda catch some of that light on the other side and bring back a little bit of something, something to the shadows over there. Can someone come up and hold this so I can flag from the other side? Sure, could I maybe get a volunteer to come up and hold a reflector? Wow, wonderful, thank you so much. Alright, I was gonna have that come right about there. Bring that in nice and close, very good. (camera flashes) Great, and so we ended up with, it's very very subtle, but a slight kick of light to the shadows, and obviously the closer this is, the brighter it's going to be. Could you kick the hair back one more time? Try that one more time. We're gonna bring it in really close. I'll try to get as close as I can. Beautiful. (camera flashes) Mmkay, and so this gives you a little bit more light. This is not something I do very often, but you can see how when you wanna do it, works really well. This is gonna be maybe a little bit more effective if you actually do have a secondary light, because you wanna make it really bright. But it's pretty cool nonetheless. Mmkay, so this gives us this really nice stylistic fill. So here we are before, right there. No fill to the fill, mmkay. Now, let's put the two by three. Thank you very much, I appresh. We're gonna put the two by three on. And we're gonna make a high key beauty portrait using one of these. Something a bit more ethereal, because we're going very dark, very moody right here, right? Now this, I'm gonna actually, I want rendered, kind of a little blown out. I want it to be white, so I'm probably gonna wanna figure out what this is and then overexpose it by a couple of stops. (men mumbling) And I'll push. Good, okay. What's my, uh? Power level? Power level on this? About seven. Seven? Take me up to ten, please. And so what I'm gonna do with this, is I'm gonna basically use this to create a white background behind my subject. Kay, and I wanna make sure that this, the bare part of this is behind her. Otherwise it's gonna flare at camera, and this is gonna affect contrast in a big, big way. Take a step forward. Yep, come forward for me please. Wonderful. Little more. Beautiful, and then just step right up into that light for me. (man mumbling) Uh, can you lower that for me a little bit please, John? Yes, just about four inches more. Great, that's great, mmkay. So this is gonna cast the light from the background. Obviously nothing from the foreground. So depending upon what you want this to look like. (camera flashes) That is way too bright. (camera flashes) Kay, that's still pretty bright. Take me down to eight please. Kay, great. And so the closer she is to the background, the more that light is gonna wrap. And if she were to come, good, were to come forward, we started to get less wrap, and it just becomes a little bit more of a pure white background, so you can create fun silhouettes from this. Do me a favor, turn your body to the side for me. Uh huh, and back up just a little bit. Here, pull the hair around the backside for me please. Great. Great. And then, what we're gonna try to do is hide it a little bit under the chin. Yeah, there we go. Here, just kinda pull the hair so it's a little bit. This little piece right here, great. Alright, now do me a favor, step forward just a little bit. Back up. Good, and then head up, kay. And now what we have here is a (camera flashes) bit of a silhouette, alright, which looks nice. Let's reset that and there you go, nice silhouette, and then if we want, we could bring a light around to fill it in. We're not gonna get a huge amount out of this, because it's at an F18. Well, we'll see, we may get a little bit. Turn back to the front for me please, good. I really don't know if we're gonna get much out of this, but probably not is gonna be my guess. (camera beeps) (camera flashes) Okay, so we got a little bit. It's a little bit poppy, but this was more about the silhouette, I think, than anything else. Now, I mean you can kinda sorta get away with it, sort of, but you know it's a little bit more effective here. Now, we're gonna take this away. Watch your back. Hop right back in for me. Go to that portrait thing for me again one more time, please, the side, great. And I'm gonna put this right behind her head. Kay, you need the power up? What is my power? Eight. Leave it here for a minute. And not necessarily the best thing to do with this particular hairstyle, but again just to illustrate a point. (camera flashes) Mmkay, and so we can basically just by removing the modifier, alright, go from here to here very quick and easily, right? Let's put that back on, actually, you know let's go to the umbrella for me please. Big one or small one? Go to the big one, please. With diffusion? Yes, please. Coming through. So now we're gonna go into that kinda more painterly Rembrandt light. (footsteps) Kay. Let me just loosen that. Kay, alright, hop back in for me please really quick. Hop right in, yeah. Thank you. Mmkay, I'll bring this around. Turn your face back to me a little bit. That's pretty right there, good. Can we meter this for me, please? Mhm. (equipment beeps) 13. Great. Kay. Tilt the, there, perfect right there. That's great. (camera flashes) Now this is wrapping around quite nicely, so what we're gonna do is have you come up a bit. Keep coming, come come come, good right there. Just to kinda show you the difference. (camera flashes) Great, and now what we've done is we've added a little bit more drama to the face by putting her a little bit closer to the side. Okay, reset that. So we went a little bit more to the front, a little bit more to the, so depending on where she is with the umbrella, it changed the fill, right? Go ahead and grab that white umbrella for me please. Now at the moment, we've got light on the background. We can also move it. And now there's a little bit less light on the background. (camera flashes) Great, now go ahead and bring that in for me please. And this is gonna control the fill from the front. (camera flashes) And let's bring it in a little bit more. And we're gonna put it over this way a little bit. Turn your face a little more to the light for me please. Good. (camera flashes) Great. That's allowing us to control the fill. We're gonna do two more quick setups. Will you grab me the beauty dish, please? Yeah. Great. Soft beauty dish, and we're gonna use the reflector as well. And we're gonna create clamshell light or paramount light. Come forward a bit for me please. Great. Alright. Yep, bring that in really close for me please. Well, I still need to get in there. Yeah, you get the grid on there too. The grid's not bad. Try that, kay. (camera flashes) Kay, and so now we have this nice soft light from the front. Let me take this off. We can see the difference. Seven inch? Uh huh. Kay, with or without diffusion? Uh with, please. Great, and so this is just a standard reflector. A little bit of diffusion over the front of it. I think it softens it up quite nicely. And so this is a little bit harsher. We're gonna need a meter on this. Mmkay. And then do me a favor, turn your face a little bit. Go back at the light, good. That's real bright. Hold on a second. I'm gonna turn that down. Okay. Because that's really bright. Twenty. Let's turn that down even more, because that's crazy. Fourteen. Wow, kay. I'm gonna overexpose by a stop, that thing we did earlier. Turn your face right to me please, good. (camera flashes) Great. Turn your face this way, a little bit more, turn turn turn. Good. (camera flashes) Head up a little bit. Turn your face back to me please. Good. (camera flashes) Kay, so, oh one more time. (camera flashes) Great. Cool, so... Through that rapid succession, I'm gonna do a quick little process, so we got this, high contrast, black and white. This was that classic old film. We have, let's mark that. We're gonna go to the softer one. This is your, where's my, okay good. Thank you. We're gonna bring that in a little bit. We have this one here, which is your high contrast. So your flatter, your flatter beauty. And we have, let's go this one here, this one here. Contrast. And there we go. Flagged in, flagged here, flagged here, flagged here, flagged here. And so in a very short amount of time, we can create a very different set of images using these tools, kay. Now obviously we could spend a little bit more time developing them and refining them a little bit more. This is really just to be the starting point of where you actually take this kind of lighting. But you've got the very dramatic to the very light and bright to your classic beauty to your high contrast beauty to your simple kinda painterly light to the silhouette effects just swapping out a few different modifiers to get you to these results within a few different minutes.
Ratings and Reviews
a Creativelive Student
Chris's style was excellent straight to the point, I picked up what he was putting down and at the end, I loved seeing all of the different looks I could get from one light. This is my kind of tuition. To the point, full of great info, rehashed at the end. More like this, please.
JennMercille
You can never learn enough about light. I loved this class! I recently downsized from a huge studio with multiple strobes and every kind of modifier, to a small home space with one large window and a few reflectors. This class was very informative and helpful with that transition. Chris Knight is an interesting and very knowledgeable instructor, and he was a joy to watch. I highly recommend this course!
a Creativelive Student
You should teach a course on how to teach! This course gets to the point, and gets the job done. I loved it. Thank you.
Student Work
Related Classes
Studio Lighting