Lesson Info
22. Post Processing/Final Sales/Photo Gallery
Lessons
Day 1
1Course Introduction
11:28 2Flow Posing
1:21:36 3Kelly's Home Studio
39:16Day 2
4How to Set Up Your Home Studio in a Week: Planning
34:23Day 3
5How to Set Up Your Home Studio in a Week: Foundation
18:23Day 4
6How to Set Up Your Home Studio in a Week: Essentials
30:48Day 5
7Portfolio Building Clients & Shadowing Other Photographers
36:57Day 6
8Babies Posing with Young Siblings and Families
45:14Day 7
9Babies Posing with Older Siblings and Families
1:24:27Day 8
10Posing with Stunt Babies
34:27Day 9
11Go to Poses that Most Newborns Can Do
1:05:41Day 10
12Advanced Posing for Newborns
1:26:00Day 11
135 Essential Props & Props Safety
49:47Day 12
14Making Your Own Props & Safety When Making Them
49:11Day 13
15Posing with Props
1:06:42Day 14
16Shooting for Composites with Siblings and Parents
53:43 17Editing for Composites
28:04Day 15
18Outdoor Sessions with Props
13:48Day 16
19Marketing Evolution
31:20Day 17
20Branding and Product
54:55Day 18
21Building Your Marketing Plan
1:02:08Day 19
22Post Processing/Final Sales/Photo Gallery
57:36Day 20
23Client Delivery
21:40Day 21
24Pricing Packages: How to Price Your Work and Plan for Growth
1:03:23Day 22
25Policies and Workflow: Contracts, Client Agreements, and Lawyers
59:32Day 23
26How to Create a "What to Expect..." Handout for Clients.
32:36Day 24
27Building Your Team
39:14Day 25
28Balancing Career and Life
57:52 29Bonus Video: Creating a Concept Piece: Start to Finish
42:49Lesson Info
Post Processing/Final Sales/Photo Gallery
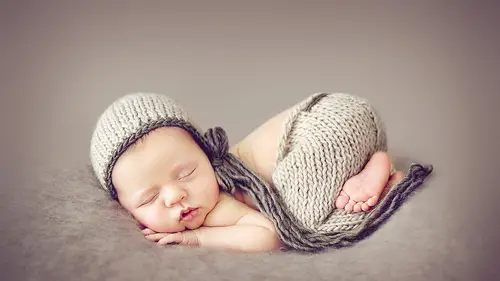
the signal we're going to talk about post processing and I'm going to take you through a few steps that I do teo get my images to that finish state I'm going to use a couple of different techniques but I'm gonna walk you through the steps as we go so I don't tend to use light room when I'm working I use photo shop and I often use alien skin to edit my images now as well so I'm always looking for new ways to speed up my work flow make it as quick as possible so I spend less time in front of the computer and more time doing other things I can either spend it with my family or I can spend it working on my business and I do use actions but their actions that I've created myself and their workflow actions just to make all those manual steps that I would do easier and to speed things up so I'm going to take you through those as well and I'm going to show you the before and afters so we're going to edit two images from with that we've shot during our flow posing and we'll go from start to fin...
ish nice and slow and then we'll be able to look back at the previous image and the finished image to show you what it is that I actually present my present to my clients so this is something that um I like to show when people are sort of looking at my actions and things like that because could be able to see what you are doing to an image and you can see in the before images that's actually not a lot of difference really in the after image it just looks finished that's all it is it's just a few little things that we've worked on to get them to that polished finish state and the baby's perfect in the first image we've just made a little bit lighter a little bit area we've given it a certain look that's about it so one thing that I do kind of look at when I am in post is removing anything that's not meant to be there and if I've got any form of distortion from my camera I'll fix that but I want everything to look perfect because when their clients come into the studio with their baby and they're looking at them and they're taking pictures with their iphone they were looking at there perfect baby they don't think that there is anything out of place or anything wrong when we look at them they look perfect sometimes depending on their camera angle whether we're too close wrong choice of you know lends anything like that we considered blow things up a little bit weakened bring emphasis to areas that we shouldn't so I'm going to fix those I'm going to make everything look perfect I'm gonna take away stuff that's not meant to be there but I don't go to the extreme with my client images when I would get an award image it would be very different so for this we're going to sort of remove you know any little blemishes that don't need to be there at a little bit of light where we want take away some of the skin rids and we're just going to finish it because as far as I'm concerned I look at an image um straight at a camera a lot of our clients today and a lot of everyday people who are photographers have good cameras they're so easy to purchase and they're affordable so I need to make my images something they can't do I need to finish and polished them in a way that they can't you know a lot of people don't agree with photo shop but it's a tool that we have to provide like we have talked with it's a tool we have provided to us to use and when we talk about compensating images and doing all of that kind of stuff what we doing photo shop has been done for you know since time photography started they were doing complicit images in the dark room it's you know it's just a digital version ofthe a darkroom that's all it is with all the tools and for me the trick with press processing is when a lot of people said it's how you know like arms any starting out of find it so hard the trick is to play and use every tool every function and then when you understand what every tool does in every function you can look at an image oh gosh you know I've really got to fix that and then you'll know which tall to use you'll know which area of the men used to go to what to select what to use so it's playing spending lots of time in there and getting to know all the different functions I was hired as a re toucher previously in a studio so I was able to learn a lot of new techniques on top off but we didn't have youtube when I was starting out with elements and things like that we didn't have all these online education resource is available to us like creative life so I would buy magazines and I would I would look through all the steps all the processes and the guides and I would practice like crazy and just alone how to do it so that's what I recommend to you do do what you have to do to get yourself to that place and learned from different ways different techniques and different instructors that's an incredible photoshopped instructors that come to creative life to teaching you know I love watching the classes and I'm always learning how to do something new fetish shop is is you know it's phenomenal with what it can do and I still don't know what every single function you know I can do because I haven't obviously attempted certain things but I'm always looking for new ways to to it it so when I show you what I do it is basically what I do you don't have to do it if you know a bit away that's perfect there's a million and one ways to do everything on here but I'm gonna show you how I will take an image from start to finish and then that way you can either pinch for a few steps or if you like it that's fine if you starting out that's fun if your experience that's fine as well do what works for you and not necessarily what I do I think we have a quick question do you always add it on a laptop or to have actually that's a good point say here at creative live I'm using my laptop and my wakame tablet at home I work on a twenty seven inch I'm eh screen but attached to that I haven't aiso monitor so it's a fully self calibrating monitor something that I took a little while to be able to afford to purchase for myself because it was a big item expense but it is so worth it because I now also print my own images so that when I'm I'm saying what's on my screen was coming out of my print exactly the way it looks on my screen another thing that I should also mention when you are editing on um on a computer when you do do a print and you can see a visible difference in the lightness and the darkness hold the print up against the same image on your screen and turn the brightness of your screen down to match the print and then when you start working on those images your prince will start to come out looking like they do because if you are working on say a laptop like this or or an m you know a moneta apple monitors tend to be quite bright so they make everything look really beautiful and crisp and clean but when it comes to print it's not going to print the exact same brightness because we've turned it up see it's important that you bring the the the luminosity of your screen down to match your prints and then you won't have any problems from there on in but there are a few things that I'll just quickly mention about calibrating when it does come to printing your products you know beautifully the company that I used brilliant prints they have color profiles so on their website I can go to the resource is grab guide and I can download their color profiles and install them into photo shop said that way when I'm editing I can use my shortcut key which is command why and bring that bring that guide over my image to see how it's going to print understanding color government's color spaces all of that stuff is a whole other world it is is I remember listening to a speaker in australia years ago and he was so real nicholas lee intelligent this man he blew my mind away I had no idea what he was saying but I couldn't take my eyes off him and he was talking all about color gamut and color space and things like that and different monitors and how how you know they all can affect the color gamut in space as to the final printed product so when I first listened to him I again I was dumbfounded I didn't know what what I was hearing I didn't know what to do so I went on to research it from there and I learned a little bit more about it and he's he's an incredible man understanding how all that works right through to your printed product is is something that I recommend you also have a little look at it if you want to study it in depth go for it but it's um it's a pretty full on topic and then we're gonna look at my photo galleries so once I finished editing a couple of um you know a couple of sessions I upload them into the galleries online and this's kind of what they look like I have my client um my client area so I give them a name and a possible it and then I resize the images to like a and nine hundred one pixels wide I think it is and I put my watermark over it and then I upload all of those into the gallery they're given a password I email the client and I say you know your online gallery is now available and it will remain active for x amount of time so then it would also says on there if you have any questions at all please contact me you know I'd love to talk you through it blah blah blah but during the time of my session I'm got all of my products in my studio I'm talking to my clients about what's in in my my price list do they have any questions you know did they like any anything in particular so I'm walking them through that step and I've also got an album in there already for them to touch and feel and look at so I'm starting to sell that as well and it's important that we do communicate with them about what their home has what they need all of those things because we need to be able to share with them you know how we're going to present those products in their home or where they're going to have to have them and if they're living in a small place that all that blah blah blah that's fine but when they're ready to place their order they usually email me I'm about to have a new website built myself which has got an online gallery built into it by a company called photo merchant and they do these incredible websites they used to do a lot of just online proofing galleries so it's f o t o merchant yeah I think that's exactly how it's spelt for dimension and they're building me a website based on what my needs are and they're they're not expensive like I used to think getting website made would be ridiculously expensive but because I'm using a very old website that has an online gallery it's it's just easy for me to use for my clients that way but unfortunately it is a flash site so google can't read any of their content in there and I've kept it around purposely for the online gallery because I've been trying to find the perfect people to build my website so they're going to build me a website where people will see something like this they'll be able to click on it we'll come up with the options on how they would like that image would they were like it is part of the digital collection if they would like it is say the large canvas or the small campus and everything will be itemized and it'll also take them to an area where all the prices of there so that then they can check out and it's so easy to customize and way we're having a play with the photo gallery part of it the other day and it's it's incredible because at the moment mind doesn't look like that it comes up like a slide show certain clients gotta click back through every single image but if you can see it like that it just makes its home it's so easy to go here I've looked at that image now I want to look at this one again close up and select it from that perspective so your client galleries if you are going to do them online need to be easy to navigate through they need to be easy for your clients to understand and have all the right information in there as well so they get you no color and a black and white version if I think that it will look ok is a black and white image but not every image is converted to black and white but I like black and white so I give that to my client is an option and the reason I do do that is because I would rather see my black and white as opposed to going and printing it somewhere and changing it to monochrome because it's there's a huge difference in that so that's something very similar to what my my clients will view when they seen the galleries when it comes to photo galleries it's you know it's a hard thing we're going to talk a little bit more about impressing and why I do myself the way I do them but I do offer my clients and online gallery and they know how many images they're going to get in that gallery from the moment that they received my pressing information when they first enquired it says in there they're going to get twenty images um obviously there'll be more because there's a black and white version off that and sometimes a session run short you know I might have less images in there but that was just an example previously off what my clients would receive so we could fit onto a slide so I'm probably aiming for around twenty to twenty five max would never go over that but some of those is gonna be detail shots off the hands the feet the eyelashes all that kind of stuff which I'll show you in a moment how I use those and then you need to let your clients know how long did your clients have to wait for the galleries you know at the moment I'm a three to four week wait they need to know when to anticipate their get their galleries would be nice if you could get him they're images in a week but sometimes things don't always pan out and it's better to give yourself a little bit of questioning space as opposed to say yes I'm going to get it to you this week and you don't get it you know some of my clients have to wait a little bit longer while I'm traveling and you know I feel terrible for them but sometimes just just the way it goes but if you allow your safer itself a little bit of space time to breathe and you deliver before that time then you're exceeding their expectations which is always going to be a bonus for and how shall how long should a gallery stay open that's that's pretty much your call you know how long do you want to give your clients to order for me I don't want them to take a month because you know if they're gonna come back and look at it every day every second day and you know that interest in the impact is going to be lost over a longer period of time so I want them to get that wow factor and go wow and I do leave my gallery's open for two weeks I also contact them if I haven't heard from them in that two week period because I've got to be understanding they might have certain things going on they might just have completely forgotten because sleep deprived they haven't gotto their pajamas for a weak things like that I'm been there have been issues so I know what they're going through but when I do close the gallery for any reason that they haven't come back and placed in order or I haven't heard from them or I have heard from them and they don't have time to order until a specific date if I close the gallery it's going to cost them a feed to reopen it because my time is valuable and you know that also gives them a better incentive to to actually order while the gallery's open is imposed to taking longer and closing it then having it re opened again all of these things has stipulated in my pricing and information that is sent out originally if someone forgets to read all that information and they come back then I simply referred to the pricing information that they've previously received in a very polite way and just say that you know that's fine I'm more than willing teo teo closer gallery and reopen it so I just wanted teo teo remind you again that there will be a face off to reopen your gallery and then they usually come back in order that's fine but in the past I've had a few people talk to me about their galleries and say but you know I never hear back from them and I said well you know they happy with their like do you think that they're happy with their images now like you they photos a beautiful so that's fine but what we need to remember is that if we just always assuming that they don't you know they just aren't gonna buy like they've completely wasted the time we don't know what's going on in their lives I've had clients that have lost their business and they've come back eighteen months later and spent two thousand dollars on products so always be a little bit understanding all of your clients and what particular circumstances they could go through I also had a couple separate not long after they had their baby and so I closed the gallery and then when one of them contacted may it was actually the male when he contacted me he said you know we've separated unfortunately is it possible for you two give me my own private gallery so I can place an order for myself they both placed orders which was which was really good but I did have to give them enough time to sort of get through that because having a baby and then going through something like that is quite distressful so always listening to your clients and you know just helping them out as much as you can and don't always assume that they are they don't like your work or you know they're just those bad clients didn't order sometimes they're going through things that you know way don't fully understand so being patient is key but also having a deadline as well because you are running a business so you need to be professional with the way that you do it um in which images straight to include so sometimes you know when you're shooting a lot of images from a session when you're first starting out because you're trying all the different angles and things like that it'll take you a while to develop that flow to know right I'm going to do twenty images I'm going to get a living in my bag I'm going to get four from two props and I'm gonna get seven images from my couple shop you know I already know when I'm shooting that that's how my session is going to go but when when you're you know it's still developing that flow your own flow it takes some time to know that so I always like to include images that how different I don't like to include images that are taken in the same setup just from a slightly different angle because sometimes you'll see five images in a row in someone's gallery and they all look the same if you're including images that looked the same it becomes confusing and then I don't know which one to pick don't give them that choice but give them twenty different incredible images that they cannot fall in love with and one every single one printed on my big package in all those products that's what we're aiming for to sell those products and it's funny because you know I don't batch I don't light room it's because my twenty images all need to look different they needed to be it they need to be edited individually whether I'm shooting from above or on backlighting you know I'm shooting for a specific effect so they need to be edited individually and and looked at from that perspective yeah we have a question do you find obviously you d'oh when you're putting together an album are you lacking enough images for building an album for the client no I'm no actually because I do a fifteen page like a fifteen spread and I do the twenty images and so the album is designed in a way that includes all of the images from their session and I actually use an album designer them that works for the company that used that that do print them so the company that I use this photo amounts and albums in australia but they're also a part of brilliant prints they worked together and they do on my album and melinda that works there I just drop box her thie gallery and then she designs the album I get to proof it actually don't let my clients proof it because it says in the pricing and information that's originally sent out that you know it's all creatively you know processed and done by may they do select which images go on their campus which had just gone all of those things but when it's a product that includes all of the photos you know it's got every photo in it so um that's something that her and I do together because if I allow my clients to sort of come in and make changes they could make up to four changes that's a lot of time that I'm spending doing that in a lot of album companies only allow you to make x amount of changes before you've actually got a pay for an extra change so yeah so what I'm going to show you now is how I used a few handful of images from my galleries um t help market my business a little bit more using video and using another an emoto slideshow this is something I like to give my clients as a gift it's it's a birth announcement so at the time of decision when they fill in their name address and details there's a little section there for them to be able to to fill in the birth details if they wish it's entirely up to you but I do this is a gift I used to give my clients this little biscuit cost twelve dollars for the baby on it each so one hundred twenty six clients times twelve that's a lot of money two hundred fifty dollars friend animo no membership a year that's not a lot of money so I'm saving a ridiculous amount just by creating this small slide show of images from the gallery and the images that I can get it really quick and convert to bonds somewhere so the trick with something like this is keep it short attention spans are long limited to five images or less put symbol slides in there with text on it and put beautiful music on it and finish with your logo so that when I shared is this announcement around the world with their friends and family if one's going to see who's created it ah ah ah how cute was that it was so easy to do it literally takes me about ten fifteen minutes to throw those images into photoshopped finished them save them upload them to an emoto and pick a sweet little song and you know what you don't have to share it on social media you upload it to either you table video and then you give them the link and let them share it that's their baby that's an incredible gift to them to do and again we're expect exceeding their their expectations by doing that by creating something that's really beautiful and you know I don't know about you guys but I've got friends and family around the world and trying to share a birth announcement you know like the back of envelopes and stamps it's a pain in the bum it's so much quicker to actually do this so final sales for may is you know when does selling actually stop you know your shell you should yourselves be conducted online or in person and for me I do online and that's because it suits my life and my business in the sales start the selling starts at the very beginning your first point of contact with those people and it follows through every point of contact that you have the right till the end when you were delivering their product so for me you know that first point contact when I'm selling impressing information I'm not sending them a pity if that's full of text I'm sending them a pity if with beautiful pictures that selling what I do and minimal amounts of information precise information on those slides about you know what's included in this ishan where is this session then each package and each product is photographed beautifully to go into that and then they get to see what it is that they're getting so I'm selling that product right from the very beginning I'm telling them how incredible it is I'm showing them how incredible it is and then I'm also showing them more work off mine so they look at it and go right this is different to anything else I've seen those other ten twenty websites that they've contacted mind's going to stand out and you know to some people not for everybody because I'm not for everyone world different but yeah it's going to stand out and then you know I'm coming back to the post processing photoshopping something I love to do I said I actually don't mind sitting in front of my computer go to remind myself to get up and go outside and take a break and you get lost in what you're doing and I love playing so I'll I'll start with two images that we've shot an outflow posing and I'll talk about um there we go look at him I'll talk about what I would do to this particular image so firm a composition is probably a fairly important aspect of how I cropped images how I shoot them and then how I sort of finished them off with like been yelling and blurring and all of that kind of stuff so the crop is something I would do in the beginning of my post processing I can see here that we've got a few little bumps and things around the top of the head he looks natural he looks beautiful but if I had distorted his head in any way then I would have to fix that and I think we had a question earlier about warping and the walking tall is great for fixing any heads that you've slightly distorted because I don't know about you but I had a client in my studio with her second baby and there was a picture of her first baby on the wall and she said and she was laughing while she looked at it and I said what's wrong and she's hideous so big and I had distorted that in camera so I'm going to fix that because I want my clients to look at their photos and not see anything wrong with them I want them to see the photos and know that that's the perfect baby that they've brought into this world and not find anything odd with it at all so yeah I'm always looking for that and the trick is when you ever you are you know working on an image is les is always more and knowing when to stop editing a photo some people get a bit carried away with that especially in the beginning I would and then I get to a point and they were just like oh I'm gonna start again so for this particular image right here I can see that he's head does look a lot bigger than the rest of him but that's because of the way he was lying but to take emphasis off that there's a few things that you can do you can you can warp it or you can liquefy either either work really well but it's knowing how to use both of them so that you don't make anything look ridiculous if I was to do a global war part to show you I'm going to make a copy later sir command j and then I'm going to go into transform command tea and I'm working with a mac a mac book so if you're on a pc it's some control is that right yeah it's been a while so if I right click now in the selection and going to war if I do a global warp and I start warping his head I'm warping the rest of the image taken say I'll just pick a person to just for a minute I'm changing the way his face looks I'm changing his butt on changing everything so I don't want to do that so we delete that layer I only wanna walk a certain area so I'm going to use the lesser toe I'm gonna come in around the top of the foreign over the top of the head and select that area right click feather we'll go twenty two because I'm lazy and I don't want to go to zero to the other and the keyboard command j community again and I'm going right click walk so here I can actually just adjust that selection I'm not having to do the whole area usually start with one area if you moving down in here you're going to move the whole lot so that's why I'm moving around the sides just just a pool more of these areas in if I start to kind of move down here you can see I'm taking it off the side so you've got to be careful a swell using a liquefied tool on the walk talk and take a little bit of practice so his face still looks the same but we've just taken a little bit of size off the top of his head because they want everything to look like it's in perspective as well um if it's too much then you just go back and you re do it again so up here we now have a little bit of a line so I'm just going to erase that out with the fairly soft brush where we put it on your seventeen race that's so blends into the background and then we'll merge those I don't tend to leave a lot of layers open when I'm working because I worked through my images very quickly with with the workflow that I have so the next thing I'm gonna do is warp I'm insert done that is cropped my image and I usually do a twelve by eight ratio or a ten by eight ratio and I always leave the resolution blank said that photo shop can leave the maximum amount of pixels with inside that constraint so when I go like that I can see my rule of thirds and you've got your your points here and this is where I want to try and position the baby with inside those so I'm gonna bring the bottom on up here and bring him into my bottom said don't take too much off the image because I like a little bit of space around I don't want to much space in the foreground because it would become distracting the backgrounds meant to be soft and blurry so we want them in the foreground where our eyes gonna land you can rotate your selection if you feel like you need to but I'm happy with it right there um so I noticed that he had maybe a little bit of jaundice in his skin he was a little bit yellow so I've got to be careful with those yellows and his body seems a little bit more yellow his re feet seem a little bit more red but he did have really quite pink feet which were beautiful and his fingers were pink and his face is darker than the skin on his back I want even out all of those skin tones so the action set that I've created is just my work flow action it's found on my on my block my little pieces photography slash blawg dot com dot you under no I can't remember dot com today you slash blogged and we're gonna offer a discount code out we cannot that's right and the discount code is going to be a bootcamp fifteen like boot camp two thousand fifteen but just the fifteen part all capitals and that's for fifteen percent off is that correct and that's till the end of april thank you to the end of april two thousand fifteen so what I'm going to do is use some of these teo adjust the areas here my lighten action is just the same as going into levels your curves and adding a mask and then painting it on where you needed to pay said to speed things up it's going to do it globally so I'm gonna invert it with command I I'm going to invite the mask the mask is what selected there if the mask wasn't selected it would look like that so when hit command I take it off the image uh I'm gonna increase the size of my brush my paintbrush and I'm gonna paint it on at one hundred percent I just want to lift his face to match the rest of his body and it's sending it twenty six percent so if I was to increase that I could I don't want to though I can bring it down a swell if I need to darken that looks a lot better than and then what I'm gonna do is adjust skin reds so I can do that inhuman saturation by adjusting the reeds to channel or I can just you know play my lion skin reduction and that's already inverted so I can paint that on and depending on the area that you're painting you can you know bring the capacity of your brush down but this is a one hundred percent so I'm actually gonna paint it on because I know these feet really need a bit if it removed you can see when I turned that on enough we're really starting to bring those red turns up and then in the hands will bring you rapacity that brush down just a little bit that's learning to read like the different parts of your image so they all start to blend together and then the face has got a lot of red in it I've gone over the mouth so resume in we can actually change our our paintbrush to a black brush and we can take it off the lips but you gotta be careful when you do this you don't want to make it look like the baby's got red lipstick on and if it's not enough then you just play the action again so I would probably play it one more time on the feet area down here and can you tell us again with that particular action it's just my work flow action set all what it did yeah oh it's removing the skin reds light on the reds so now they're less obvious and we can just bring the rapacity I painted it one hundred percent bring their capacity down so the yellows in the body because he may have had a little bit of joined us sometimes that can be a little bit hard to get rid off you can go up into your selective colors or you can go into human saturation and select those yellows and then adjust the huge or you can just play the action creek the yellows so easy and then painting that onto the back area as well and around are there remember to stand here into this for him so what is going to do though if you paint it on too much it's actually going to turn those yellows toe blue so but we just want to subtly bring that yellow down radio so our background was really nice and smooth at this point if I needed teo I would paint over my background to give it a nice a nice look but I was shooting this at seventy mill a really beautiful focal length ah lot of people ask me why I use a zoom lens when I'm shooting babies this's why you know the best lens for a portrait photographers and just because I'm a baby photographer doesn't mean I'm a port doesn't mean I'm not a portrait photographer the best lower lens that I used when I was doing portrait was a seventy two two hundred mill and I would shoot at one hundred two hundred every time because it flattened the features beautifully and it gave me a beautiful depth of field so there's no difference to win on floating photographing newborns I'm still a portrait photographer treat them the exact same why would photograph for an older person and it's all about the face and it's all about the details but being I would've shooted it that seventy morpher focal length means that I get that incredible soft blur into the background when I'm wide open at two point um next thing I'm going to do is softened skin there's lots of skin softening actions out there I'm just gonna play the one I've created we'll paint it on just you don't need to paint it that over the entire baby just to soften any blotchy nous or anything that you don't necessarily need there so learning how to do all this to create the actions and speed up my own work flow if you've got something that you do creating actions for yourself is is lots of fun I used them in my first creative life and the only reason I seldom was because I had so many people emailed me after it saying to seventy seldom I'd love to buy them because they're easy to use and it takes a long time to learn howto to do all of this stuff so I never intended teo to actually produce them will create them for other people it was basically to speed up my own work flow so I'm not going over any of the eyelashes I mean the eyebrows or right up into that here but I am suffering around it and I painted on a one hundred percent because I can bring the capacity of that lay a dam was going to turn on my god so I can see where I've missed so it's nice and even in the face if I turn it off I'm not sure if you can see well there said before and after that's a one hundred percent you can see it there textures and a little bit more texture on my ski but I'm always going to bring that down to around sixty seventy percent because they still want to see texture I don't want it to look like a plastic fake baby like my crystal so yeah I reckon around that sixty because his skin was a little bit blotchy there already and now I'm going out of in yet you can see around the edges though that I've already got a slight lens in yet which is fine I kind of like that but um I might just smooth it out first with a light paintbrush thirty percent on a large brush and I'm going to select whenever you are painting over a background to make it nice and smooth and give it that blue always select the color around the hairline or around the hat or around an edge that's got some form off for or you know it goes into the background because when you start to erase erase it back if you're painting on a different color you're going to see it around the hairline around those soft soft edges like on bonnets and things like that so holding in the out kate I'm just going to select one of these turns in here I'm just gonna come in and give this a bit of a smooth look this is a great way to get rid of you know sort of any um shadows and things like that in the background where it's kind of bumped and it just makes it a little a little softer then you can use your race tool or you could add a mask and then use the black brush to take it off if you don't feel that term you can do the race but because this is just a once over make it nice and soft we can turn the background liar off make sure we've missed any nothing within getting toe a final image zooming in and sensing a line of paint that you've done all right so my vineyard action is is very basic you khun do it yourself manually by copy layer marquis tall selecting edge feathering it inverting it adding a mask and multiplying that information or sounds really easy you just press play and then it tells you to get the marcato and you just slipped inside the frame and you press play again and this is where it's gonna feather it it's going to invert it it's gonna add a mask and multiply that's it there if it creates um like a bit of a a blocky edge to it then and you want oh smoother you don't want it so heavy you just go up to filter blue gagosian blur I have run says it and blurred by two hundred fifty pixels so now if we go back a step before after so we're spreading that vignette into the image and when making we're making it softer we're not actually you know creating that heavy dark age that you sometimes hear and images that's quite distracting when I am when I do add a vignette though I've got to be careful I'm just bringing it back they rapacity back because I don't want it to be a feature in my image I just wanted to make your eye lead into the center of that image and lis is always more in the judging at the print awards I often say like a really lot off heavy dark then yet that it's so distracting that your eyes just continually led to them so if you are thinking about doing award printing or anything like that vignettes should should but the image and unless they're you know a main feature but yet they can sometimes they really distracting radio now I'm gonna add some contrast I'll dump that and I'll show you how I would do it manually because it's a really cool trick you go up tio your curves menu and a new lie asa command j command him I'll bring it over so we can still see our baby you've got a history graham over here so you've got your blacks and your whites and you can adjust this in any way that you want to but if you hold the key in and move your black slider now you can start to see we lose all that detail in the blacks with babies I don't tend to go over probably twelve ten to twelve I don't want to make those blacks too heavy because I want I wanted to have a little bit of pop but not I just don't want to dark shadows and then for goto our whites and he has dark skin so you don't want to push those highlights too much but I do want you know do you want to give his face just a little bit of pop with those highlights for hitting his cheek and his nose and his forward so we're gonna bring those highlights in you can see if I come all the way in that's where we start to overexpose those whites you let's bring it back and let's bring it in probably about there okay so return it later on and off you can say it's just going to give you image just that little bit of pop which looks good you can either leave that globally or you can add a mask and only paint that on to the area that you want to paint it on to um I do have actions like your soft warm washes off whitewash yourself pesto wash which will add like a color effect it's display a little bit of a hazy tone that goes over just to give it that that look and feel I have my own action that I use that I don't sell but that's that's mine and lately I've been popping my images into and alien skin and using a lot of their beautiful filters as well and they're really quick and easy that can cut down a lot of your time so if we go into there exposure seven so if we get of my favorites actually if we got all really quickly you can see these are all the different types off a fix that you've got in here you've got your color films you're black white films and then lots of different effects I have used some of these with some of my personal projects and this really fun because especially the cinema effects as well but if we got to my favorites where I've selected some of these and there's lots to choose from like for example that's going to color film these are all the different ones and you just have to hold your mouse over and I'll show you what it does to the image so it's just picking the ones that you like and then if you like any of those stars you can click on that star adds it to your favorites so forgot to my favorites I like some of the color fading ones and that give them those beautiful effects as well and then if I go into my color films I like the kurdish gold two hundred and I also like the four hundred but I do like it without the grain that I like a little bit of warmth so I could almost do the color the kodak gold and then I could add in also the the top one up here that color so I might do this one just to add a bit of warmth because I'll show you that that's pretty intense that for me it's a bit can't quite see it on this or wonder if you can from this angle you can't quite see how strong it is but the overall intensity for me is a bit too much much so I'm going to bring it back to around probably seventy sixty five seventy percent so we can see before and we've really wound that up and then we can go apply so many other things that you can do in there you can add your your vignettes you khun and different types of blue they've got textures you can do so much stuff in there it's incredible I still like to have full control in here but I love those different color color effects that are available so here's my before and after and I can still adjust the opacity and the beauty of it coming back in the form of a layer means that I can add a mask and I can take it off certain areas I can take it off the baby and leave it on the background I could take it off here the pants all of those things I am going to take it off the baby a little bit because he had that he's got that sort of yellow he turned to his skin and I don't want him to look yellow imprint semi paintbrushes about one percent would bring it up a bit and we'll make it a black brush because we're on a white mask take it off yeah that's what I've painted yeah that looks better and I might just come back into this back area where it was a little yellow and around that I so looking at your image you know as an entire image and all those different things and trying to even out the skin tones and everything it's gonna make a huge difference and you know when you are buying actions from different people like I love flora belle actions absolutely love them but it's important to understand that when you are using them they come with so many layers not every layer is going to be suitable for your image so you need to be able to work within those layers turn them off turn them on use the masks all of that stuff and where some people think that you know you play an action that's going to fix your image it's going to finish it quick and simple it's not so emerge those together I'm gonna soften the edges by blurring them a little bit command j again I mean used by mark ito there's an action he for this but I'll do it for you manually to show you because I've noticed in here and you'll notice in any image that's got less information in the background if you've painted or if it's super blurry if you add a vignette and you get that graduation of color tone you're going to create banding so to remove the banding I often use a little bit of noise and then I blow that but to really sort of push that banding before I can add that noise or blur it as well so I'll come down the bottom here is that I want to blow the foreground too much but I want to soften it I'm gonna come over the baby and around down front and I might just add a bit more up here all the shift key and right now I'm going tio cancel that I'm going to select in this and I'm gonna feather it I say two hundred fifty pixels I'm gonna blow it by two hundred fifty pixels and I'm gonna d select it so now I've softened the edge down here I do not want this to be a blurry blob I still want to see some information down there so if I want the background to remain really blurry but I want to take some ofthe foreground I'll just use my eraser probably about another thirty forty percent and take it off these corners to put some detail in it because it was already soft because I was shooting wide open and all merged together and then I'm going to add some noise so command j felt our noise at noise now the amounts going to be around the six to seven percent and I'm always gonna have it on gordon or goes on how you say it and I'm going to make it monochromatic and the reason I'm making it monochromatic is resumed ride in we look at the background here we can see that noise pretend it off we get all these colors in there we don't really want that so we want to keep it in the monochromatic you can bring the capacity of that dam you know I'm actually quite fund of noise and some of my marriages I don't mind the effect that it has especially in some of my black and whites but a lot of people don't like it scared of it but you know this some beautiful film um effects in alien skin that really resemble some of the films that I originally loan on loan photographer using so they have beautiful grain to them and I don't know I just personally like it but yeah it is a personal thing singing at a mask command I in the the white brush I'm gonna paint it on one hundred percent just to the background where I want it today terminate that banding painted don't paint over the baby or anything like that and if it's too much make you brush biggest so you're you're just softer and take it away from the baby and then we're going to paint on some blue teo to soften that you could go back up to vision blue and painted on a very low capacity soft background where there is so that's it forty percent zoom in see before after now we can increase the capacity of that where we really start teo to soften that noise in print you're not going to notice it but if you don't soften it enough you will notice it but we've removed some of that banding yeah the next thing I do with this image is probably come in with my patch tall and I'm not going to do the whole image but just to show you wait can use the patch tool like that or we can go into our spot healing brush tool which photo shop sisi has content aware so it makes it really easy to come in and remove a lot of these little blemish is it's a lot quicker than the patch tour but sometimes you need the patch tall when it's close to edges and things like that to keep it nice and straight so I would go through and I'll remove any sort of you know a little distracting blotches and then I would shop in the image and save it full the gallery in the print but if we go if we take a little snapshot here and I hardly recommend when you're learning to getyour flow or you're developing your own style taking a snap shots in the history means you can go back at any point because sometimes you always go too far but it only saves x amount of steps so we get out before and then we're going after so doesn't look he doesn't look different it just looks finished it's now as if is finished I love I love being out to show people before and afters because you often look at the first image in your did your sit down with our because we remembered here it looks beautiful but then when you see the final image that's something that you know it would be prey ended well and it would um it would go really nicely on a canvas or something like that right here so his little head looks a bit bigger there got to liquefy if when you're using the liquid fight all if I want to fix the head I'm not gonna push from back here because I may be moving a whole lot of pixels I don't need to push the trick with the local vital is to make sure that the area you want to move is in the center of your brush and its gradual and you work your way around head like that and you resize the brush to the area that you want to change but I would do the same for this image that I've done to the previous image I may just come in and fix those little wrinkles in the blanket at the back but that would be about it just touching base quickly on online sales versed in person sales there isn't like up in person sales work they work they really do if you could do them do them I couldn't do them so I came up with a way to package my product and my digital files in a way that I don't what I needed to earn from my sessions so I I used to do ah lockhart and I made it that way you had to purchase x amount of dollars worth of prince products before you could buy your digital files and then with my products with my packages everybody wants digital fall so they just became included it was the product itself that meant the price increase in those packages so now will they get there they mean like even if they choose my cheapest package it's still covering what I need to earn from that position which is incredible on we're gonna go over that further impressing but um being in online sales you can't just give him a gallery and expect them tio place in order you've got to make sure that you communicate with them regular you're communicating with him before the session during the session shin in after the session you know whether it's via email or on the telephone a tte the moment my online gallery means that they have to email me this election which is not ideal but it still means I've got that contact with them where is my new gallery I'm goingto have less contact with them during that ordering process but it just means that they're gonna have everything they're available to them so it makes the process easier but yeah it's a it's a massive debate everywhere whether you're going to do in person or online patino what set your packages up the way you want them to be and we'll go over the pricing soon and do what works best for you most clients that traveled to see me can't come back with a toddler in a one week old baby two weeks after our three weeks after or even four weeks after this ishan you're not going to do it they're not going to drive for one to two hours just to come back and order deads always gone back to work after the first two weeks so he can only usually come on weekends or after work and that's my time with my family and especially when my husband was working away there was no way I was going to cut into that time with my kids that's homework time it's dinner time my time I deserve tio have arrest but we're also going to go over that when we're going to talk about managing your business and making it work for you in your lifestyle
Class Materials
bonus material with purchase
Ratings and Reviews
user-b7116e
What an awesome class! I actually started watching this, not because I was interested in newborn photography, but because I thought I could pick up some good ideas for photography in general. Kelly is such an inspiring person and so professional and such a good communicator that she has a lot to offer any photographer. I actually have been inspired to try newborn photography and can't wait to implement the multiple ideas Kelly has so generously given. I think it is wonderful for the profession of photography that she has the spirit to freely share what she knows to help those who are seeking advice and knowledge. Thank you!
Jennifer Traylor
I cannot say enough to relay the feeling of gratitude and appreciation for this class. I was very fortunate to be chosen as a studio audience member for this course and what I have taken away from this class will never be forgotten. Kelly pours herself into this class both on the head knowledge of photography and the heart knowledge of building a business and making it work in your life. She is such an amazing soul and I will treasure this experience always. This class is so thorough and works amazingly both all on its own or as a supplement to her other classes. You will not be disappointed. Her knowledge, her demeanor, her care, is brilliant. She pulls you right in, and even as an online viewer/purchaser for the previous two classes, I was able to feel her connection with the audience. She is an amazing teacher!!!! Kelly rocks, Kelly amazes, Kelly loves! Buy it today!!!! You will not regret it!!!!!! And don't forget, purchases get TONS of amazing bonus materials including extra videos and PDF's and manuals. This class is a bargain!!!!!
user-a1ed27
I really have been so happy & blessed Kelly to learn from you! You are gentle and I love your spirit in which you share your "Art". I am a Nurse and worked Hospice for many years. Many of my co-workers and I recently lost our nursing positions due to department integration and have decided that my passion and love for taking photos of children and babies is something I would like to pursue. I am learning so much Kelly from the way you take the time to gently get the baby in position, follow the baby's lead and enjoy the parents and each moment of the creative process. I am not at all a professional and am just really learning, but am enjoying practicing on my friends children and babies and of course my 4 month and 4 year old grandchildren. Thank you for providing free classes as I would not be able to afford any classes at this time in my life. You have a beautiful gift. Thank you for sharing so eloquently! You have made a difference in my life. Patty from AZ
Student Work
Related Classes
Newborn Photography