Adobe Creative Cloud® Mobile Framework Overview
Lesson 6 from: Mobile Workflow with Adobe Creative CloudJared Platt
Adobe Creative Cloud® Mobile Framework Overview
Lesson 6 from: Mobile Workflow with Adobe Creative CloudJared Platt
Lesson Info
6. Adobe Creative Cloud® Mobile Framework Overview
Lessons
Class Introduction
08:53 2Camera Settings on Location
06:08 3Take Notes & Edit in Camera
05:58 4Mobile Gear Review
18:42 5Location Shooting Guidelines
03:51 6Adobe Creative Cloud® Mobile Framework Overview
24:46 7Adobe Creative Cloud® Tools
09:50 8Lightroom Mobile® Settings
16:26Use Collections for Your Photos
23:58 10Select & Organize in Lightroom Mobile®
15:23 11Edit in Lightroom Mobile®
23:30 12Dehaze Filters & HDR in Lightroom Mobile®
40:44 13Edit Images in Lightroom® on the Desktop
23:51 14Edit Images & Basic Searches in Lightroom® Web
13:14 15Create Panoramas in Lightroom®
07:01 16Edit Video in Lightroom®
12:00 17Questions on Lightroom® & Lightroom® Web
14:54 18Workflow: Working with Clients on Location
12:48 19The Mobile Master Workflow Part 1
23:08 20Workflow: Outsource for Professional Photographers
20:36 21The Mobile Master Workflow: Part 2
32:35 22Questions on Mobile Master Workflow
16:29 23Use Feedback & Share Collections in Lightroom Mobile®
03:39 24Comment & Favorite Images
14:18 25Share in Portfolio & BeHance
11:46 26Editing Tips In Lightroom®
18:08 27Workflow: Traveling Photographer Using Geotags
19:38 28Use Easy Trails For Non-Geo Locations
15:03 29Clean up, Organize & Archive your Mobile Photos
38:45 30Collect Images for Sharing
04:45 31Tell Stories with Animoto®
08:17 32Working With Adobe Sparks Post®
10:07 33Using Adobe Sparks Page®
15:38 34Create a Slideshow with Adobe Premiere Clip®
34:27Lesson Info
Adobe Creative Cloud® Mobile Framework Overview
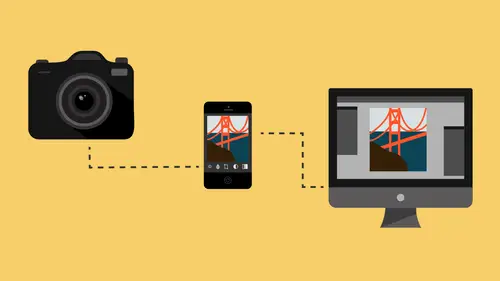
So we're back in the studio now, and remember I had everything on this iPad right? That was my computer in Paris. I just put it on this. Now I didn't do anything between now and then except for plug this in, plug that in, plug, I just plugged stuff in right? So now we are back at the studio and I want to go directly to my computer. So we're gonna look at the computer screen. And voila. The images are there. The other thing that you should notice about those images is that when I filter them, you see that? I've got three three star images. And I didn't have to do anything because, where did I flag those? In your camera. In my camera. I flagged 'em in my camera but I also while I was on my way down from the rooftop to down here I was playing with the iPad, and I starred a couple more. So if I do one star and above you can see I grabbed a couple more. Because I can make better decisions on the iPad then I can on the phone. So I kinda scrolled through and looked at the images and I was...
flagging 'em, now remember, all these images were shot, they were delivered through this. So this was the delivery mechanism to get them into my iPad. Once they were in the iPad they were immediately delivered to the Cloud. So it was just uploading as quickly as it could. And then any work that I did inside of my iPad, while I was walking down the stairs, while I was hanging out here, was being delivered again to the Cloud and all of that delivered down. So, probably by the time I was working on these images, there were already images in my laptop. They were already downloaded. And then as I starred here, the stars appear here. So it just keeps moving back and forth. So the brilliance of the system, is that things can independently move back and forth based on whatever you're doing at the moment, but the images themselves don't have to. Once the image goes from the iPad, up to the Cloud, and then from the Cloud down to the computer, once that transfer of image takes place, now it's just a matter of sending one little bit of information. Turn the star on. Turn the star on. Turn the star off. Turn the star off. And it goes (fingers snapping) like that. Same thing with adjustments. So if I take, let's just go back to our three star images here. So I've filtered by three stars. And I think I like this one the best. You know? That just really looks nice. So I'm going to give that four stars. Now that information is immediately being synced up to the Cloud. And as it syncs up to the Cloud, it syncs back down to here, and so I'm going to go on to here, and I'm going to, so now I'm on the iPad. And I'm gonna click on this little top area here and I'm gonna say I just want to see, let's see three star images but see how that one has a four star on it already? So now if I click on that image and I want to do a little adjustment, we'll talk more about this later on in a couple lessons down the road. We'll talk about adjusting and working on images and stuff like that, but let's just say that I wanted to go to a preset here, and I wanted to do a black and white preset, and do a portrait black and white. There we go. Okay. So I like the way that looks. Probably needs to be toned down just a little bit so let's take the exposure down just a little bit. Just a tad. There we go. Good. Alright. So if that's the way I want this portrait to look, when I come back over to here, to the computer. So, right now it thinks I'm still working on it. And you can see right up here in the top area, there's a little plus on the Cloud. You see that? Right over here. See that red dot? Oh yeah. So there's a plus right there on that Cloud? That tells you that, oops. The plus tells you that there's changes, but it's not gonna send them yet, because it doesn't think you're done. And there's no reason for it to send it until you're done. So you have two options. You can either, go away from this photo. So I if I swipe away from the photo it'll say oh he's done and it'll send it up. Or I can just push that cloud, and i can say force the synchronization. And once I tell it to force the, there we go. Force the synchronization, see how those little dots move? So it's sending all those changes I just made and they're already in the Cloud now. So then when I come over to my computer, so here is the photo. And it's synchronizing, oh there it is. So now it's black and white. So all the changes that I make here are now done here. Alright? So let's talk, let's look at this little schematic that I have created. Alright? So, here's the schematic. This is the process. Ah, oo right? So, this is the process by which you get images through your mobile pipeline. Alright? Mobile pipeline. Now I'm gonna use my finger here and just kind of, can everybody see the arrow okay? Okay. So this is you and you have a camera. So, all your images originate here, and they're raw images. If you're shooting anything other than raw, it's a whole different conversation that needs to be had. So, the raw image is the best possible file type. It's the most editable file type. So there's your raw image. In this schematic, I have represented two different kinds of images. The first kind of image is this raw image right here. So let me just kinda, I can do this. See that? See how it's full? It's a full raw. But if you go over here I've represented this in a dotted fashion. That is a smart preview. Which is a small tiny raw image, but it doesn't take much space. It is a very good image. It's better than working on a JPEG. 'Cause it's raw. But it's just smaller. A little more compressed. I have done tests by the way with a smart preview. The preview that's sitting up on the Cloud. The preview that is on my phone, if I put something in here, that little preview, if for some reason you lots all of your pictures, someone stole your laptop, someone stole your computer hard drive, someone stole the camera card. Everything was gone but you had that smart preview up in the Cloud. Do you know how big you could print from that little thing in the Cloud? I've printed a 30 by 40 print. And it holds up. It's not perfect. But at the proper viewing distance, it looks fine. So, you can do an 8 by 10 of an 11 by 14 no problem, from those smart previews. Okay? And we'll talk more about those smart previews in a minute. Alright. So I just want you to see the difference. I represent those two images because you need to see what's in where? Where is your photos? What do they? 'Cause there's different types of copies. Okay. So we start here with our image. What happens is we take our raw image and it goes into this pipeline through our SD card. So this is the SD card. It goes into either, it goes into our Lightroom inside of our mobile applications. So it's either Lightroom mobile on a phone, or it's on an iPad. And then once from there it's gonna take that image and notice it goes up to the Cloud. But it doesn't stay in the Cloud as a full raw image. The Cloud never holds onto a full raw image. What it does is it deposits a smart preview in the Cloud, but it delivers the full raw down to your computer. So, if this is a 20 megabyte file, that's going up to the Cloud from you're iPad, it goes up to the Cloud, it delivers that back down so it just kinda logs it through the Cloud, and it comes down to your computer as a 20 megabyte image. The full raw gets transferred. But what left behind in the Cloud is the smart preview. So it's a small raw. And that small raw up in the Cloud is then what gets utilized and sent out to your phone. 'Cause now if you go to my iPhone, all the photos are there too. But now, the iPad has the original raw. 20 megabytes. The computer has the original raw. 20 megabytes. The iPhone, has a smart preview. A very small raw file, maybe it's a megabyte. Maybe it's two. Sometimes it can be like a kilobyte. Alright not a kilobyte but like within the kilobyte. It's not less than a megabyte depending on what the subject matter is. But this now has all these little tiny smart previews in it. Alright? Okay. So, the reason that the smart preview is what the Cloud wants to hang on to, is because it's easier for it to transfer the data really fast over cellular connections or over wifi, if you're using a very small raw image 'cause it can transfer it over. 'Cause right now on this phone, if I click on an image it's not, I'm just looking at tiny little representations of it. It actually hasn't even pulled the raw down. It hasn't pulled the smart preview down. It's just looking at a very small version of it. If I click on one of those images, now that little circle that you saw real quick, that was pulling down the smart preview from the web. That's how quickly it just went (buzzing) pulled it down. 'Cause now I want to look at it. And if I go to the next one, it just builds them as I'm needing them. Right? And then if I double click on it, see I've still got really great detail on it, but it's a small raw because it can operate quickly and that's why we keep small raw in the Cloud instead of the full resolution. But it is delivering the full resolution from the iPad to the Cloud, drops off a small smart preview, smart, sorry, smart preview in the Cloud and then it sends the original raw down to rest in my computer. So when we look at this file, let me go back here. When we look at the file, where are we? Down here, there we go. So, do you see how this one, remember I, the collection that I was putting the images of our model in, was called DSLR Imports. And that's what's picking those up inside of here. So any collection that I make inside of Lightroom on my mobile application automatically gets created inside of my catalog here, and then all the images get put into that particular collection. Alright? So, back to our schematic then. Oh, wait I was gonna show you this, so if i hit the info button on this, you can see, let's see. I'm gonna have to change my info. By the way if you ever want to change info, go to the view menu. Then go to view options. And inside the view options you can change what gets shown when you hit the eye button. It allows you to see the info. And I'm going to on top, I'm gonna tell it give me a file name there. So that you can see what it is. See how it's an image 946.CR2. And we had a question from like, Big Easy or what was his name? (Man laughs) I think it was King Bingo. King Bingo there we go. (Man laughs) Big Easy, King Bingo, it's the same thing right? Just. So King Bingo asked about those file names but you notice that my file name didn't change on the way in. So it has to be something with his import settings inside of like preferences and we can maybe look at that later but. So, you can see that this is a CR2. The image size if the same as the one that came out of the camera. It is a raw file. So, alright. Let's go back to our schematic. Inside of our schematic now this original file gets into the computer. Now here's where I need to talk to you about where files should be placed on your computer. Now, how many of you travel with a laptop? You work on a laptop. Like everything's on a laptop type of situation. While traveling? While, but you have a computer at home too? Okay, how many of you switch between computers? Quite a few, right? So you have a desktop and a laptop. Okay. That's what this is for. This is the Lightroom catalog. It rests on here. Not on here. So we are independent of computers. This right here has everything I need to work on these photos. So if I go to your house and open up Lightroom and plug this in I can open my catalog, and work from your computer. I don't need this computer. That means when I get back to my studio, instead of going through the hassle of trying to port images over and back and forth and whatever, it's just a little brief case. That's all this is. This is my brief case of all of my work. And I take this, plug it into my studio computer, and now I'm working on the same catalog that we're looking at here. So I just, this is what moves. Okay? Even if you're on a laptop and I know it's super like tempting to have your laptop have you catalog on it 'cause then you can just set it on your lap and work right? And on the plane and whatever. So I have a friend, but he has Velcro right here, and then he has Velcro on there and he just stick it on like that. It's brilliant. Then he can just work on his laptop, just the normal, but his little drive is right there. Brilliant. That's a great way to do it. But it just looks ugly. Right? So, this is the laptop. Now let me tell you about this drive because this is important. If you are traveling and moving this thing around, you're gonna shake it. And if you shake a drive that has a spinning disc in it, you're gonna damage it. And if you damage it, it's gonna cost you thousands of dollars to get it repaired. Actually they don't repair it. They just pull the discs out, try to read the information and then they give you a new disc for a couple thousand dollars. You don't want that to happen. The other thing is, every time you close Lightroom, a little message pops up and says do you want to back this up? The answer is to that question is yes. I do thank you very much. And you back it up every time you shut down your catalog. And then you tell the backup to go somewhere other than this disc. And my backup goes to a folder that is backed up by Google Drive. So as soon as the backup hits the folder, that's on my computer, then Google Drive sucks it up. So within seconds of backing this up the whole catalog gets backed up to the Google Drive. Alright? Now, this doesn't contain any photos on it. The original photos are not here. This is just the catalog with all the smarts previews. Now what did I tell you about smart previews? They're pretty good. I can print up to a 30 by 40 on a smart preview, but I've got, how many do I have in here? Let's see. Okay this catalog has 47,000 images in it. Okay? And it fits on this. And it's a solid state drive. Which is smaller. It's a one terabyte solid state drive. So now I can go like this and it's not scaring me. Right? I could probably drop it and be fine. So, keep that in mind. Solid state drives are what you want to travel around with. There are also things called flash drives that are even smaller than a solid state drive, and they're super expensive but they're even smaller. You can get 'em like the size of about that. They look like a little lighter of something. They're tiny. You could even put it on a USB 3. drive if you want. But make it solid state. If you're gonna travel around, make it a solid state drive. They're not all that expensive anymore. These sizes are not expensive at all. And this little case ade by CRU. You just slide whatever solid state you bought into it and then it connects by USB3. Alright? So that's important. So, everything, all the smart previews, all of that goes into here. The catalog is in here, all the information, all the stars, the flags, all that is in here. Now the photos are in their own drive. And when I travel I travel with this. It's a little, basically it's got two drives in it. See those two drives? Okay. So the two drives, drives one and two are the same. It's a raid one system. Raid one basically gives you a copy of everything instantaneously. So if I put photos on that raid one drive, they're instantly copied to the other drive. So now I have two copies of it. And then if I swap the bottom copy out, I have three copies of it. So it's a way of copying all of my original photos. Alright? So, a raid one system protects you against one of the drives failing, and if you constantly swap that third drive out and take the other drive, the third drive home from the studio or put it in a fire proof safe or wherever. Take it to your grandmothers house or wherever you want to put it, then you have an off site copy on a rotating basis. I do it everyday. I go home from the studio and I have a little pelican case this big that holds my third copy and I just go home with it. So my studio has a raid one system with two copies of every photo that I'm shooting, and then I have the third copy at home. So at night if someone came in and took everything, I would still have all of my work, in full high resolution raw imagery. Alright? And where would my catalog be? If this went home with me it'd be here. But if it didn't and they stole this too, or it burned down, it would be up in the Cloud. All I'd have to do is take this drive, plug it into the new computer that I purchased with the good insurance that I have, and then download that from Google Drive and I'd be back up and running. Clear? Yeah. Okay. Good. Alright so now when we look at the schematic, hopefully this'll make more sense. You see here's the computer, here's the catalog. Right? That's where all the Lightroom data is, but do you see this? This is my raid one system here that holds all the photos. This doesn't have to travel with you. This is actually literally a closet full of photos. The only thing that has to travel with you is the catalog. The catalog is the only thing you ever really need to work on your photos. The only time you have to plug in that drive, so this drive. The only time I have to plug it in, is when I want to print a huge print. I don't even have to plug in the drive to print like a 8 by 10. I don't have to plug in the drive to send out social media. Because the smart previews will do all that for me. Okay? Alright. So now, just so that you can see here. So you also have the option of, and we'll talk about this tomorrow. We're gonna go through a bunch of use cases tomorrow, and show you like if I were a wedding photographer, which I am, this is what I would do. If I were just taking pictures and, I'll do this. If I was, we'll show you four different use cases tomorrow. But you can also take your SD cards, and either through wifi or through a card reader, you can put them into the hard drive where they're gonna go. So if I get home from a wedding, I just put 'em there they go into the computer here, and they go up to the Cloud as well. Here's the difference. If you're, see how if your, if your iPad sends it to the Cloud, it knows you're not at home. And so it's going to send the full raw up and down to your computer. If your computer sends something up to the Cloud what's it gonna send? Not the full raw. Smart preview? Smart preview. Because it only needs the smart preview in the Cloud, so there's no point in wasting the effort to get it up there. So it's actually faster to send it from your computer than it is to send it from your iPad 'cause your iPad has to send the whole thing. Your computer just send the smart preview. So if I'm a wedding photographer and I'm gonna plug all that stuff in to my computer but I want it available everywhere it'll quickly send all of the smart previews up to the Cloud and then they'll download into your computer, or into your mobile applications. Okay? So once they're in there then at that point you have a lot of options as to where to go with things. So you have the ability to go onto your iPad or onto your iPhone or even onto the web, to look at the images. Now, people out there on the internet are able to right now log in to that link that we sent them and show or look at the images on the web because they're sitting on the web. But you also have the ability to go into that area as well. So for instance if I go to my web right now. So you can see right now this is what everybody's looking at. All those images are on the web. But, this is my view of it. So I can come here and now look at this. If I click and right now this is lightroom.adobe.com, and then I'm logging in under my credentials. And all of my stuff that's in the Cloud, right now I have 3,481 photos on the Cloud. I've just toggled it on. I want to see these mobiley. If I click on that, you can see here's all of my collections, and here's the collection we were working on. It's all in the Cloud. So now if I want to look at a photo, and let's see. Let's just say, this one. So I can go in and edit a photo on the Cloud. So I'm looking at a raw image. If I click the edit button, here's all my options for editing. So it has to load the tools and I will just go through and edit, and adjust thing on the Cloud. So now I have most of the controls. Not all of the controls but some of the controls that I have on Lightroom. And it's just Lightroom controls. So, that's another option for us and we'll get into that a little bit more in the future but you can see how I can connect to this anywhere I want. I can connect on my iPad, on my iPhone, or even on the web from some random ugly PC at like some little french coffee shop.
Class Materials
Free Download
Bonus Materials with Purchase
Ratings and Reviews
JIll C.
I was able to participate in the live taping of this course in the CL San Francisco studios, and it was a great experience. Jared is an enthusiastic, entertaining and very knowledgeable trainer as well as an accomplished photographer. He not only understood every aspect of the Lightroom mobile technology, but was able to advise us on how to adapt it to our needs and develop an efficient workflow to leverage the capabilities of this emerging technology. There are complexities of the interface between your mobile devices, the LR Mobile Cloud, and your primary computer that would be challenging to figure out on your own, and I highly recommend this course as a way to provide a clear picture and help you develop a path to adopt this very useful technology. Whether you're a high volume professional photographer or an avid hobbyist, you will find ways to incorporate LR mobile into your workflow as a result of this very informative course.
Tracey Lee
Great course for those who are new to Adobe mobile products or for those who want to understand how to implement an organised and efficient Adobe Mobile Lightroom Workflow. I was in the live audience and over two days Jared covers everything from beginner to advanced in a logical sequence with clear demonstrations, excellent supporting visual materials, detailed Q and A and a fun and engaging delivery. I'm really excited about what is possible! Definitely worth buying and watching from start to finish.
Rick
This class is ESSENTIAL for anyone in photography. Jared's teaching style, humor and sheer knowledge have me so excited about everything I can do with Lightroom Mobile and all the FREE Adobe CC for products that go along with it. I am currently reorganizing my entire LR catalog in order to utilize these tools for my past, current and future work. I cannot emphasize enough the amazing value of this class. I was lucky enough to be in the audience for this class and had such a fun time. So many aha moments. He really knows how to make a seemingly complex subject simple and easy to use.