Three Ways to Get Longer Shutter Speeds
Lesson 4 from: Mastering Long Exposure PhotographyMatt Kloskowski
Three Ways to Get Longer Shutter Speeds
Lesson 4 from: Mastering Long Exposure PhotographyMatt Kloskowski
Lesson Info
4. Three Ways to Get Longer Shutter Speeds
Lessons
Why Long Exposure Photography?
21:06 2Long Exposure Photography Gear
26:05 3Camera Settings and ND Filters Long Exposure Photography
25:26 4Three Ways to Get Longer Shutter Speeds
07:48 5Field Demo: Smoothing Water with Neutral Density Filters
14:36 6Post-Processing Long Exposure Smoothing Water Shots
31:03 7In the Field Demo: Long Exposures on the Beach
19:17 8Post-Processing Long Exposures on the Beach
14:00Lesson Info
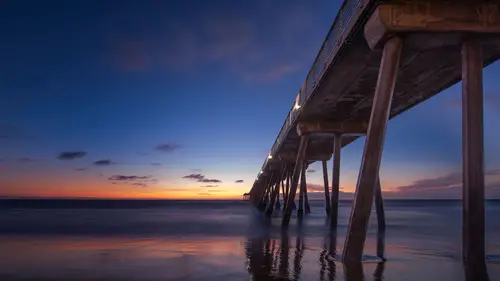
Three Ways to Get Longer Shutter Speeds
one of the things we we need to talk about before before we get out into the field, even though really going out into the field. But one of things we need to talk about is longer shutter speeds. So how do we get longer shutter speeds? What I wanted to give you is kind of a formula. A little bit of a checklist that you can you can kind of keep in mind when when you're doing this stuff. So how do we get those longer shutter speeds? There's essentially three ways your first way is gonna be I s O All right, So you're out there shooting. You want to make sure your eso is gonna be at whatever its lowest native settings gonna be on your camera because at the end of the day, I think I think what we really want to do is is we want to use less gear. I know we buy these filters and everything. That's great, but at the same time, if I don't have to use them, if I don't have to introduce more gear into everything, then that's a good thing to me. I want to use less gear So the first the first thing ...
on my checklist is I'm gonna make sure my I s o is down. Um, it sounds silly. And I'm hoping I'm not the only one that that this has happened to, but how many times you, you, you, you go grab a shot inside at a birthday party or whatever it happens to be in your crank up your I S O has anybody else gotten out there and started shooting and you're shooting this nice landscape at 6400? I s o okay, good. So none of you have done it now. I think I think that's probably happen to just about everybody. You know, I know I would love setting on my camera that, like, when I turn it on, just resets it toe all these settings. You just let me. Because if somebody could, somebody suggested that Well, there's a menu option you can do your little my menus. That said, And that requires if I could remember to click over to the my menu setting from my landscape photography that I would remember to turn my I s o down one that has done so. I have a problem with that. So I just love it. When I started my camera, it started with these settings all the time. If I want to change, it will change him. But it's not like that Anyway. We want our eyes so down. And that's the reason why you want to make sure you're out there shooting like, why can't I get a fast shutter speed? You weren't in the day before taking a picture of somebody's birthday party and you're on I s 0 Your next thing is aperture. So we want to weigh, Want? Remember, we want a longer shutter speed. So essentially, we want to reduce the amount of light that is going to come into our camera. So what's the other way that we can do? It would get her shutter speed down with I S O s. So that's step one. We do that, we take a picture. We're still not getting the shutter speed that we want. If on that F eight well, that's gonna give me a faster shutter speed. So what can I do? Go WTO F 11 go the F 16. A lot of times, I just go. If I'm if I know my shutter speed way too fast, I'd go right up the F 22. Okay, The the higher the f stop number, the smaller the aperture is going to get and the less like the camera's gonna let in. So remember, we are on. I'm always going to start on aperture priority mode. I pretty much live an aperture priority mood. I'm gonna choose the aperture. I'm gonna let the camera choose the shutter speed. So we're an aperture priority mode. I put my aperture to F 22 the cameras automatically. It's got to figure out how to get a good exposure. So the only way you can do it I Assoc locked down apertures locked down. The only way it can get a good exposure at that point make a longer shutter speed. So that's step two. That's the second thing I'm going to try when I'm out there. If that doesn't work and I can't get a long enough shutter speed at that point, then I'm gonna go to a filter. So So what? What type of filter? That's That's kind of usually the next logical question is, what filter am I gonna put on. And how do I know? Um, I'm generally going to to start off. I have. It just comes from I guess it just comes from from doing it enough times. I kind of know that if I'm shooting anywhere, like pre sunrise or right after sunset, so think of that twilight time. But I'm shooting anywhere in in that time. Either I don't need a filter or I'm probably gonna grab for, like, the three or four stop filter. Okay. Umm I generally I'm generally never going to use a one stop filter. It's just not it doesn't. It doesn't make enough difference that to stop doesn't even come out that much. I'm usually going to grab for the three or four stop. Ah usually grab for just the darker one right off the bat, But so if it's any time pre sunrise or post sunset, where there's still a lot of light around its twilight, there's still a lot of reflective light going on. Then I just want to slow my shutter speeds. I just want to make it a little bit darker, as as I get out of that time. And now the sun's up and starts starting to come up. And now I'm out there and brighter daylight. I'm pretty much always gonna go straight to the 10 Stop Andy. And then as you get post sunrise or pre sunset, like in 1/2 hour hour before sunset, half hour, hour after sunrise, that's a good time for something in the middle of the four, the six stop or something like that. I actually put that into the little field guide that you can download with the class. It's basically feel that you can put it the way that I created it was you put it on your phone, put it on your phone so that it's just it's like a 10 step guide. Do this first, then do this, then do this, then do this so that when the first time you're out there doing that, you don't have to start to remember everything. So but those air Ah, that's generally what I'm looking for when I'm doing these things is is what filter that I'm going to use the other thing that you can do. You're going to see you're going to see the app that we're gonna use in a second here so you can pre visualize with the app because the way the way that these long exposure calculator APS work is that you tell it. So I'm sitting here and I've got my camera set to, Let's say, F 16 F 22. Okay, I'm on aperture priority mode F 22 and I look at the scene. The camera gives me a shutter speed. Let's say it's 1/15 of a second. Okay, well, what you do, the way the apse work is you then go into the APP. You plug in 15th of a second and you tell it what neutral density filter you're using. It gives you a new shutter speed to get that same exposure, because that's what's where. That's what we're after. We wanted to calculate we want the exposure before the app, which the camera told us what that is to be the same after the neutral density filter. So we just plug in the neutral density filter that we're using. It gives us a new shutter speed, so you can in some ways pre visualize this a little bit. You can you can look at, um, I'm sitting here. It's after my time at set of 22. 15th of a second. Not long enough and let me play. Let me see what kind of shutter speeds I got. I know I have a three stop filter. I know. I have a six. Stop. I know I have a 10 stuff, so you plug it into the app three. And it says two seconds. No, that's not gonna be enough. Six. And it says 15 seconds picking numbers. 10. And it says three minutes. So that can help you figure out because you'll know if you put the three stop on and it says three seconds, that's not gonna be long enough for for what you might want to do. So you can pre visualize that a little bit.
Class Materials
Bonus Materials with Purchase
Ratings and Reviews
Photoracer
I always enjoy the opportunity to learn something new from one of my favorite teachers, and Matt rarely disappoints. The material that he covers in this class on long exposures will give the viewers enough tools and techniques to get them on their way to creating quality captures. He gives many tips how to overcome some of the most commonly found issues and pitfalls that long exposures can include. If there was any disappointment in what I received, it would be the duplication of the "bonus" material (except for the 'cheat sheet') from the class I had purchased the day before. I might add that "Photoshop and Lightroom for Landscape Photographers" is a great companion to this class and is also worthy of purchase. The second disappointment, at least for me, was Matt's not including long exposures that involve capturing the night sky... stars, Milky Way, Moon, etc. THAT would be a perfect opportunity for CreativeLive to jump in and put a class together. I would be willing to bet that it would be HUGELY popular. Just a thought! Again, a big 'thank you' to Matt for another solid presentation. I'll be tuning in to his next presentation.
D Kelly
Excellent class! Great for beginners who want to learn LE photography. I started experimenting with LE last Fall and this course totally reinforced everything I learned. I loved the "hands on" demonstrations in the field and how each frame he shot was explained. His excellent explanations of how to use the filters was very good. An easy going instructor who made what is often a confusing subject very easy to grasp.
Karen Witter
I have loved all of the classes I've taken from Matt, and this class was no exception. Matt explains everything so clearly and then beautifully illustrates what he means. I learned a ton from this class. I love how practical he is, as well as his engaging manner of teaching. I highly recommend this class if you're interested in taking pictures where you want to convey motion which, as he explains, is how our eyes really see.