In the Field Demo: Long Exposures on the Beach
Lesson 7 from: Mastering Long Exposure PhotographyMatt Kloskowski
In the Field Demo: Long Exposures on the Beach
Lesson 7 from: Mastering Long Exposure PhotographyMatt Kloskowski
Lesson Info
7. In the Field Demo: Long Exposures on the Beach
Lessons
Why Long Exposure Photography?
21:06 2Long Exposure Photography Gear
26:05 3Camera Settings and ND Filters Long Exposure Photography
25:26 4Three Ways to Get Longer Shutter Speeds
07:48 5Field Demo: Smoothing Water with Neutral Density Filters
14:36 6Post-Processing Long Exposure Smoothing Water Shots
31:03 7In the Field Demo: Long Exposures on the Beach
19:17 8Post-Processing Long Exposures on the Beach
14:00Lesson Info
In the Field Demo: Long Exposures on the Beach
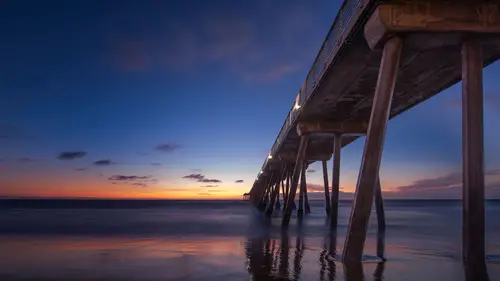
talk a little bit about waves. Somebody had asked the question before the break, and as I thought more about it, they said, You know, is there is there shutter speeds that are best for certain circumstances? And I kind of left it open ended and said, You know, yeah, figure it out or whatever, but as as I thought about it and especially considering the next segment that comes up there is definitely, I think, a kind of an area that you'll fit in for certain shots. So when we had the shot that we looked at this morning, where we had just the Ripley water, I think that's a longer exposure. You need 2030 seconds, 40 50 60 seconds even to smooth that out so that you get rid of all those ripples there which, by the way, it's still killing me that I didn't shoot that shot wider. But anyway, here I gotta show because we kind of cropped in and we zoom, we cropped in in a different spot, and, um so don't go to my computer just yet, But eventually we dropped into a different spot. It here it is, y...
ou know, noted, look how, like reflective that gets and that got lost on the wider shot. So, like, I really am killing myself that I didn't put my longer lens on because it really does. It makes it look like a reflection, and it was nowhere near there. But anyway, that happens. 30 40 50 60 seconds. That's how long it takes the wavy stuff that we're about to see. Now that's like a second, maybe two seconds, like I don't want super super long exposures. For that. We're gonna talk about it, but I don't want to refer back to that question because as I thought about it, I'm like there kind of is a sweet spot for each type of scenario there. So all that said our next are next in the field video that's coming up here. So this is where we're Alki Beach and and it's got a little bit of waves and you kind of see like how how we work with that. It's a lot of the same of what you just saw. But then I kind of see what the different type of photo that you could get theirs. Now we're at a little bit of a different area. It's Ah, beachy area. Um, we got some waves moving, and it is by no means ah, high surf advisory here, sort. But the water is moving a lot more than it was at our last location at our last location. All we wanted to do was really was make the water look almost still on by using a longer exposure. We were able to do that at a location like this, where you have moving water, you want to capture that movement. And that's really what long exposure could do. There's a lot of pattern. There's a lot of texture to moving water. We want to start to work with it, so the process is gonna be the same. All right, I'm gonna try not to use a lot of gear. So I'm gonna always start off without using any year. Just take a look at my settings here. I have f 11. My I s o is 400. I'll take a photo. It's not pretty. Okay, um, water is basically frozen at that point. So what can I do to slow my shutter speed down and we'll put our I s o down. So I put my I s o down as low as it goes in this camp. Alright, I'll take the same exact photo. My shutter speed is 125th of a second. That's still gonna almost freeze all of the water so that we're not getting a great looking shot because we're just freezing the water. We took our eye eso down. What do we do next? We can raise weaken, increase the f stop number. So we're at F 11. I could make my aperture smaller. I'll go right up to F 22. Okay, now I'm at 25th of a second, so it's a little bit slower. I can pretty much say it's not gonna be slow enough. We're still gonna pretty much freeze the water. Yeah, I mean, we're capturing just a hair of movement in this, but we're not really capturing any of the movement that we see here. So now it's time to go to the filter. Um, in this case, you know, if you remember from our earlier lesson, we're out in the field. We used the three stop filter. I kind of knew right off the bat it wasn't going to be enough. That's probably gonna be the sweet spot here. We're gonna move up, but we're gonna put the three stop on, because what we want to do here is just get a long enough shutter speed to show some motion in the water. We don't necessarily want it so long that we take all the motion away. But a three stop is going to give us a lot of motion so I can still focus. I get still meter. I could still do everything with the three stop filter on, so I'm gonna go and take a photo. Now we're getting somewhere. All right. Now we're getting to some motion in the water at this point waken experiment a little bit. If I wanted to make the shutter speed longer or shorter, what kinds of things could I do? Well, if I wanted to make the shutter speed a little bit shorter, I could always just change my appetite. All right, remember on that F 22 now, if I go down to F 16 now, my shutter speed will be a little bit faster. All right? That looks cool to me. I kind of liked it a little bit longer. Gonna put it back here to F 22 will take another photo. All right. We could see motion. I'm about 1/4 of a second. All right, so I've really slowed my shutters. Be down considerably from where we started. I remember we were at 125th of a second. So now I'm a lot slower than that. Um, some tips for you when you're at this point, becomes about timing. All right. You've kind of got you'll see that you'll get your getting the motion in the water. But now it becomes about the timing. What I look for is when a wave crashes. I don't necessarily want that moment. I want the moment right after crashes, and you see the water kind of move up the beach. That's where you're gonna see a lot of pattern. You're gonna see a lot of texture in the water. A lot of times got luck. Oh, it's luck. All right, You get your cable release going and just be ready and just fire away. You know, I'll take a lot of different photos to get some different looks from the water. I'm just looking at the shots that I have here. You know, the difference from when? Just before a wave crashes to like, if I take one That was the perfect time. The wave was moving up and you can see all that texture you could still with lines in the water. It looks really good. All right, so we know that works, I'll tell you that for me. That's the sweet spot. I probably wouldn't I would stop here. Okay, This is where I would try to get my composition. This is where I would play with the wave patterns a little bit, but I want to show you what happens if we go up a notch. I'm going to put the 10 stop filter on, All right? Remember how this works? Alright. We set everything up before we ever put the filter in. So get your composition, right. Your settings down before you ever put the filter in. So I'm not gonna move anything. Um, Matt F 22. It's given me about 1/40 of a second. All right, so I'm gonna then put my camera over onto manual focus because remember, Want to get that filter on? It's not gonna be able to focus but my camera on manual focus. And then I just need to find out what my new shutter speeds gonna be. So type in 1/40 of a second using a 10 stop filter, and it tells me that my new shutter speed is going to be 26 seconds. So to get the same exposure as I had without the filter, I need to have be open for 26 seconds. But the filter in, switch over to manual mode 22 aperture stays the same. So stays the same. All we change is the shutter. Speed said 26 seconds. close enough for me. I don't even need the cable released for that. If it's under 30 seconds, remember, we don't have to change the bulb mode. I'm just going to set it to 25 seconds. And you thought I was gonna forget to close the eyepiece, But I'm not. I want the light leak that I got the first time so close. The eyepiece lit a fire. Okay. And there's our shop very, very different from what we had before. If you look at the water, you could tell it's almost ghosted. It's got a very ghostly, almost misty type of a field to So it's a different style photo. It's a personal taste. It really depends with you. Like for me. I like the texture in the water. I like to see some of those pattern. So I'm not going to go with the shutter speed quite as long as this. But it really is a personal taste. You could do a lot of neat stuff with that ghosted feel, especially if you have some rocks in the foreground. Some pilings, anything that was solid in the foreground. What you'd see is these waves crash against their You'd see almost this mist. Okay, so it is a different look, but definitely something that you can experiment with. And it is much simpler. Look, right when you take all the pattern, all the texture away, all you have is a nice, smooth, simple type of a look too. Don't overthink it. Alright. Ah, Matt, F 22. Now, if I wanted to play around with the shutter speed a little bit, I could maybe go down to F 16. That just means I don't need as long of a shutter speed, so I necessarily wouldn't even take the filter often. Redo. It was at 25 seconds. I tried one a 20 one of 15 seconds. See the different types of water patterns and water movements that you get with it and you'll start to get a better feel for what's types of photos you like when it comes to this stuff. But hopefully you can see it's a little bit different from what we did before. Before, we were just trying to smooth it out and take some of the the patterns and the water away from it. With this type of the shop, we're actually trying to bring that back in and trying to capture the movement of the water and actually make that part of the photo. All right, so, uh, that was our incredibly wavy wavy beach. Um, before ah, before I jump into into questions, what I wanted to do was kind of have some photo set here. I want to show you some different ideas in just different conditions off what you can do with what we just did here. Same exact features, same exact filters, same exact everything, but just different conditions. And you'll kind of get an eye. Ford. So here's a Here's a shot. This is, um uh, this is abandoned Beach. I should talk about the app again for everybody out there in case you're just tuning in. But we'll go over these first this abandoned beach, and you can kind of see a little bit of a longer center speed, capturing some movement over there. Okay. Um, there you go. So much longer. Shutter speed. This is probably four or five seconds, Really? Capturing the streaks as that water comes up. Same thing here. Yeah, I love I love the way that this turned out. You know, it's just especially when it gets a curve to it, and it just kind of curves you and takes you right into the photo. Same thing. Get used to dodging water. Okay, you're not used to it. Get used to dodging water and getting wet, because when when you try to do this stuff where we were, you're not dodging water. There's really no, there's not much going on, Although I do. I understand that a different time a year, like it gets really like they're crashing over the wall and everything but, um but yeah, In order to get these types of photos, you're gonna be sitting there and you will be shooting and shooting your like the last second you have to jump out of the jump out of the scene. Um, also be careful that once the water comes up and if it ever does come up and kind of goes over your tripod legs as it recedes, your tripod will sink, starts sinking into the sand. And so if you're open, then you're doing an exposure. Is that happens? You're going to get a blurry photo, so just be aware of that. When you're out there, there's another one. Got the streaky stuff going on up in the front of the photo. There's another one. I think I got really wet on this one because there is no way I got out of there in time. So this this is what I wanted to get to very, very different type of a photo sane, same filters, same everything of what we just did there. When I put the big stopper on, um, this is when I first started shooting, and some people, some people like this, I can just all I can tell you that my style like I'm not a big ghosted water fan, but I know it looks cool. It definitely has, Ah, very dramatic type of a feel to it. This is when I first started shooting with with the big stopper in the dark filters and I would use it everywhere. What I started to learn is when you have a really long exposure and this is probably 60 seconds, Um, and you have the water coming up going back, coming up, going back and doing that throughout the exposure. What you get is that ghosted. See the misty type of look. I was trying to talk about that a little bit with what we had there and what we didn't have quite a dramatic of a wave there. But you see, the you see the look that it gives you, and that's because what's happened is water has gone up over those rocks. And then waters receded from it, and it's gone up over, and it's receded from, which is why they look like they have this mist over them. Um, just a different, different type of a look, But be aware of it be with you? It took me a long time to figure out the difference between all this stuff. So hopefully I can save you guys from some of that stuff. When you go out there, you'll be able to better fine tune exactly what you're looking for. When I left this location, I remember seeing this and I remember thinking I wish I had used some lighter density filters to capture some of the pattern instead of the water as it goes through the rocks and it comes up, maybe take a shot just a second or two, right after crashes, rather than just be open for 60 or 90 seconds here and just not getting any of that pattern and texture. So I remember thinking this hopefully, hopefully I can save you from that. But that's the type of look that you're going to see from those things. Um, again, back here, You know, I actually kind of like the ghost to look for this. All right, we really lost. This is this is water up and back and opened back. And that's why it looks and has that type of style to its lost all texture. It's lost all detail, but I like it for this to me that it helps simplify that scene. Same thing here. This was remember, this was this was at least a ah, 60 to 92nd exposure. OK, but you can see a lot of that just smooths out, and it becomes almost ghosted. All right, So, uh, we're do a little bit of, ah, little bit of post processing, but I know I'm kind of just went over a bunch of stuff here, so I'll stop really quick for questions if anybody's got anything. Yes. The first question is, let's say that you go out to this shoot, you have one filter, and it's the big daddy, you know, 10. And you're getting the results that that you have there. So you want to dial it back? Can you talk about how you approach it? First you hit ice OD hit your aperture. These just go home. How would you make adjustments? I go home. Forget it. Um um, No. So Okay, so you get out there and all you have is a really dark filter, and so it's just giving you super long shutter speeds. What can you do Yeah, almost going reverse of what I was doing out there. So what kinds of things could I do? I could open up my aperture more so if I was at F 22 F F 11 f a anything lower than that. And if you're shooting landscapes, you're probably run into some depth of field issues where everything in back is going to start getting soft. But yeah, So I dialled back my aperture first, Um, I s o start cranking up your eyes so make that should be faster. In fact, if I was really happy with my aperture, I'd probably go toe I s o first. If I was, you know, I've settled in a, like at 16 is a shot. So I want everything in focus. I'd probably go toe I s o first and start cranking that up. Remember, it's you know, it will get it would start to get noisy, but people don't really care. Photographers, right. Rest of the world doesn't care. You know, it's not they're not going to see especially noise. Smooths out a lot when we print. So I think we stress out we talked a little bit about that yesterday. But we stress out ah, lot over noisy stuff. But when the final image the prince, you're never really going to see a lot of that noise. So you crank up your I S o. Uh, those tooth. I think between those two things, you can you can definitely get your shutter speeds down. Anybody, uh, be out here Good. Anybody on the larry wants to know on the video you mentioned moving to manual focus before putting the filter on so that the camera doesn't try to auto focus. Can you use back a button, focus and get the same results you could use? You could use back button focus any time you want. The trick is going to be You still have to do it before you put the filter on. I say any time you want before you put the filter on. So you still have Teoh do that? Because once you put that filter over the lens, your auto focus systems not gonna work, even if you're using back, back button focus, it's not gonna work. That filter kills everything. All living things gone
Class Materials
Bonus Materials with Purchase
Ratings and Reviews
Photoracer
I always enjoy the opportunity to learn something new from one of my favorite teachers, and Matt rarely disappoints. The material that he covers in this class on long exposures will give the viewers enough tools and techniques to get them on their way to creating quality captures. He gives many tips how to overcome some of the most commonly found issues and pitfalls that long exposures can include. If there was any disappointment in what I received, it would be the duplication of the "bonus" material (except for the 'cheat sheet') from the class I had purchased the day before. I might add that "Photoshop and Lightroom for Landscape Photographers" is a great companion to this class and is also worthy of purchase. The second disappointment, at least for me, was Matt's not including long exposures that involve capturing the night sky... stars, Milky Way, Moon, etc. THAT would be a perfect opportunity for CreativeLive to jump in and put a class together. I would be willing to bet that it would be HUGELY popular. Just a thought! Again, a big 'thank you' to Matt for another solid presentation. I'll be tuning in to his next presentation.
D Kelly
Excellent class! Great for beginners who want to learn LE photography. I started experimenting with LE last Fall and this course totally reinforced everything I learned. I loved the "hands on" demonstrations in the field and how each frame he shot was explained. His excellent explanations of how to use the filters was very good. An easy going instructor who made what is often a confusing subject very easy to grasp.
Karen Witter
I have loved all of the classes I've taken from Matt, and this class was no exception. Matt explains everything so clearly and then beautifully illustrates what he means. I learned a ton from this class. I love how practical he is, as well as his engaging manner of teaching. I highly recommend this class if you're interested in taking pictures where you want to convey motion which, as he explains, is how our eyes really see.