How to Get Streaky Clouds in Long Exposure Photography
Lesson 9 from: Mastering Long Exposure PhotographyMatt Kloskowski
How to Get Streaky Clouds in Long Exposure Photography
Lesson 9 from: Mastering Long Exposure PhotographyMatt Kloskowski
Lesson Info
9. How to Get Streaky Clouds in Long Exposure Photography
Lessons
Why Long Exposure Photography?
21:06 2Long Exposure Photography Gear
26:05 3Camera Settings and ND Filters Long Exposure Photography
25:26 4Three Ways to Get Longer Shutter Speeds
07:48 5Field Demo: Smoothing Water with Neutral Density Filters
14:36 6Post-Processing Long Exposure Smoothing Water Shots
31:03 7In the Field Demo: Long Exposures on the Beach
19:17 8Post-Processing Long Exposures on the Beach
14:00Lesson Info
How to Get Streaky Clouds in Long Exposure Photography
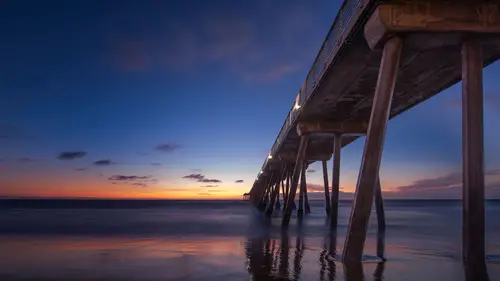
This was the demonstration that was supposed to do out in the field where I was gonna take a long exposure of streaky clouds. And it just so happens that there has not been a cloud in the sky since I've been here in Seattle. So it's a little hard to go out there and take take, take long exposure photos of clouds when there's no class. So I figured the next thing that I can do is kind of just share with you. Ah, a little bit of a little bit of what I look for for And I kind of alluded to it earlier today. So we want clouds that are that are moving one clouds that have that streaky look to it and and if you recall from earlier today, I'll pull up the photo. Um, if you recall from earlier one of those photos waas right here. I remember that one. So that was about a 62nd exposure where I'm able to capture the cloud streaking on that building there. So it's about a 62nd exposure and it had and that was midday. So I had the big stopper on in order to get up to 60 seconds. Part of this is in ...
the biggest part. That's what I wanted to demonstrate when we're out there. Part of it is, is just it depends how fast the clouds are moving. If it's a really volatile, windy day and the clouds or just cruising across the sky, you could probably get some pretty neat cloud textures and movement out of 10 to 15 seconds. They were moving pretty good here, so you know, 60 seconds. You got some nice blur in that 60 seconds. But if it's a day where they're not moving really fast seriously, you may get to the point where you just ditch, even trying. Teoh work with a long exposure for that because you're not going to see it. So it just depends on the weather. There's been times I'm shooting, and they're just They're barely moving. Sometimes they're so far off in the distance. It's not really going to help you, but that's a lot of what I look for. There is, I want if I look up and I see the clouds moving, that's kind of the wool checklist. That's alright. We might be able to do something here Um, the next thing is is generally I don't want to say all the time. Generally, I'm looking for the clouds to be doing something like that again. We talked about that earlier today, but I'm looking for I like the clouds to becoming at me, going away from me. That brings it into the photo more. If the clouds are just going across the sky. It has a streaky look to it, but it doesn't have a great look to it. It doesn't. It's not bringing you into the photo because they're kind of just separating and cutting the photo. Often a lot of what that does when you do a long exposure, a cloud streak across the sky Is it almost put the line up at the top. So I'm usually I usually try to be to be careful with that when I see those types of clouds. Now, what we're gonna do here. So that was gonna be my video Out in the field was toe go take a streaky cloud photo and see what we could do with it. But you just You heard just about everything. I was really gonna talk about out there. What I will do is I want to show you, um I want to show you what we can do. And so this photo here So that actually was not a streaky cloud photo. And honestly, I kind of like the clouds in it. So I don't necessarily know that I would do this all the time to all the photos, but it kind of makes for a good example to to see what we can do is so if you if you get home after the fact and the clouds weren't moving fast enough for you were unable to do this. You get home after the fact there is Cem Photoshopped. Funny work that we can do to kind of make this happen. So let's go at it. The photo and photo shop and what it revolves around is we need to we need to make a selection of the sky. So what we'll do is, well, this user quick selection tool. Remember when I used the quick selection tool? If it's selects too much, just hold down your option or all key, and it goes into minus mood, and then I could get those areas. Okay, so I have the sky selected maybe a little bit too much over here. There we go. The next thing I do is I'm gonna press commander controlled J and that punches that area up onto its own layer. All right, so now I have to separate. I got just the sky and I got the foreground. So the trick is, is if I go and I blur this if I do any kind of a filter to this, I'm just going to do a let's go toe filter blur, do a radio blur. I'm gonna come back here. So I'm gonna run through this pretty quick cause I just want to show you what happens if I blur this, and I I let it happen. Now what happens is number one. Of course it looks like crap, but nowhere to is it. It blurs into everything here. So why is it doing that? It's doing that because I blurt it. It goes beyond the boundaries of what was there because I was blurring something. So we're gonna undo Come back over here. Oh, ago. Will, center spot there? Hold on. I got to fix it. Even though we're gonna blur the crap out of it in a second, I had to make it go away. Uh So what we're gonna do here is if you hold down your commander control key and you click on that layer, it puts a selection around it. When you put a selection around it, you've now told Photoshopped, this is your boundary. Don't go outside of here. Everything outside of their is protected. Don't go outside. So now I can come back up here to the filter menu. I could go. We're gonna trying to try both ways and want to show you I could go to radio Blur you. First off, you want this spin method you don't want zoom because that's what this is what it will look like. Okay, So you don't want zoom. You want spin? I want a pretty high spin somewhere around 50 or 60. And then here's the key is you can't you've got you can move this around and control where emanates from That center point is where it emanates from. And if I put the center point too high, what happens is you get the effect like there's a vortex like it's a wormhole or something and you could see it looks like Grey's a late and whatever. That's because I put the spin method up here or the little bottle anchor inside of there. So what we're gonna do instead, it is Drop it down here because I want everything to go out. I don't want anything to go down, So drop it down there and now I get the streak. You look if it's ever not you kind of like words going, but it's too much. You could go to edit, uh, go down here to fade. You can only do that. This is like this. Like the little secret handshake. You'd never know it. It's like never. It's not written anywhere. It's like in a little buried somewhere under something. But the fade only works if it's the first thing you do. If you do anything else, you can't fade. So you go edit fade, Radio Blur. See, I can kind of feed the to it. Okay, so that's the radio blur way to me. The more fun way is I go under the filter menu here and I go to the Blur Gallery. I could go to path blur and what path Blair is is I can actually control the direction. Let me increase the speed cause you'll really start to see the texture so I could make him gets tricky that way I wanted, But what we're gonna dio Because we're going to do this one. Okay, put that way, and then we're gonna click. We're gonna add another one and put it that way. We'll click. You can even add another one. Put it that way. You get even crazy. You want to see something really crazy? I can do this. I could click in the middle. So if you want to get, like, a real fine art with it, then make your clouds curve and spell something. Hello. So you can move these things around. We're gonna come back to that later. Thanks to see you to see a neat trick that you can do with it. But basically, your speed is you know, that's how much blur the taper, the taper. What the tape will do is at the edges. It'll kind of instead of feathering everything out at the edges, it will taper back in. So the blur happens in the middle, but not on the outer boundaries. of it. Endpoint speed again is almost kind of like it will stop here, or it will kind of keep fading out. You can even see the little arrow. As for endpoints being okay, and that to me, the way I think of it is, is how this is almost like how fast for the clouds moving. When it's low, you'll see a lot of little texture and everything inside of there. But when it's high, it's almost like it made. The clouds move faster and they got streak year. So that's an option for for your for your blurring. So there's two of them. Let's go click OK here under the filter menu radio and there's your radio. And then there's Your Blur gallery, and that's the path Blur got a couple different ways. The nice part about it, though, is when you look at it, notice it didn't bleed over into the rock. It's a very hard edge, okay? And that's because I put a selection around it, Harry. So that is, that was our little that was, or what started out to be a lesson on clouds and out in the field. Let's and hung clouds. But became are in the classroom lesson on clouds. So look at my outline to give you a kind of a recap. What we have left is is we're gonna go into the streaky light stuff. All right? So I was going to stop here really quick just to see if you guys have any. Any questions on anything? Anything we just did here. But we'll go into this tricky light stuff, and then we'll take a look at those photos and be starting to wrap up you guys. Um and this is again not quite as technical, but just from your experience, is there a benefit of doing a long exposure at sunset time where there's gonna be just some portion but not all of the exposure that will have a son in it, and then it drops. But you'll still get the benefit of the color sort of almost hdr, but without needing the computer to do it. So the sun, this where you're saying like I did like a 92nd exposure and the sun actually drops during that exposure. So what? What you're going to get is you're gonna get like you're going to get a blurred someone assume it's either clouds or to what? The sun's hitting? Right? So let's say you had some color in the sky from the sun. What's gonna happen is that color is gonna, like graduate a little bit more, you know, because I'm as as that sun moves. You know, you've all seen the clouds and have the color changes. So that color is going to start to graduate a little bit more private. Look pretty cool. I can't think of a photo I have, where I've done it, but it probably looks pretty neat. The other thing would be is what The sun is hitting, and what you're going to see is you're going to see kind of a warm transition of how the how the light hits that rather than it will. It will change. So it be interesting. Be fun to try. I don't think I have ever done it, but I have to try. We have one question from Andrew. Um, to this point, you have not mentioned using polarizer filter on any of these beach shots. Uh, what would you have gained her loss by using a polarizer filter on these shots? The polarizing filter only thing I would gain this reduction of glare. So I typically don't use my polarizer to really tweak the sky too much talked about this in our our landscape class yesterday if I wanted to eat this guy, it's easy enough toe to boost the saturation or contrast in the sky. And so I don't typically is my polarizer for that. But there is no substitute for a polarizer when it comes to the glare. I use it a lot with water. Use a lot with leaves and foliage and different things like that. You know, everybody's got polarized sunglasses, go outside and look at a tree and kind of like look funny. But turn, turn your head side to side and what the polarisation does is it reduces glare. That's really the benefit of the polarizer. So on these shots here, it would have reduced a little bit of glare on maybe the water or the rocks or something like that. But it's about it
Class Materials
Bonus Materials with Purchase
Ratings and Reviews
Photoracer
I always enjoy the opportunity to learn something new from one of my favorite teachers, and Matt rarely disappoints. The material that he covers in this class on long exposures will give the viewers enough tools and techniques to get them on their way to creating quality captures. He gives many tips how to overcome some of the most commonly found issues and pitfalls that long exposures can include. If there was any disappointment in what I received, it would be the duplication of the "bonus" material (except for the 'cheat sheet') from the class I had purchased the day before. I might add that "Photoshop and Lightroom for Landscape Photographers" is a great companion to this class and is also worthy of purchase. The second disappointment, at least for me, was Matt's not including long exposures that involve capturing the night sky... stars, Milky Way, Moon, etc. THAT would be a perfect opportunity for CreativeLive to jump in and put a class together. I would be willing to bet that it would be HUGELY popular. Just a thought! Again, a big 'thank you' to Matt for another solid presentation. I'll be tuning in to his next presentation.
D Kelly
Excellent class! Great for beginners who want to learn LE photography. I started experimenting with LE last Fall and this course totally reinforced everything I learned. I loved the "hands on" demonstrations in the field and how each frame he shot was explained. His excellent explanations of how to use the filters was very good. An easy going instructor who made what is often a confusing subject very easy to grasp.
Karen Witter
I have loved all of the classes I've taken from Matt, and this class was no exception. Matt explains everything so clearly and then beautifully illustrates what he means. I learned a ton from this class. I love how practical he is, as well as his engaging manner of teaching. I highly recommend this class if you're interested in taking pictures where you want to convey motion which, as he explains, is how our eyes really see.