Lessons
Lesson Info
Using Filters on Masks
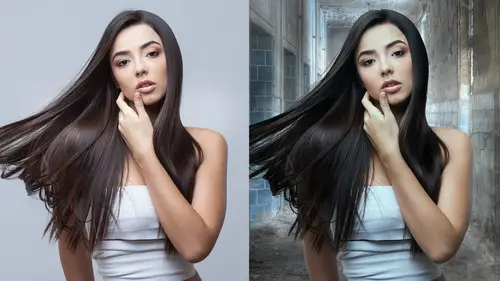
The next technique I want to talk to you about is filters. So what's the first filter I would like to give you? Okay, first of all, actually no, I want to show you an old school trick. A really old school trick. So, you know that a mask is a selection right? This is in the channels, And remember we just pulled those channels? So every one of those channels is a selection. Well that means that the mask itself is a selection. So if you take your finger and hold it down on the command key and click on the icon for the mask either in the channel or over here it's gonna load its own selection. So I've now just loaded that mask up. Now, what is available to me. What is available to me is the white part, but I wanna choke the mask, so I wanna the opposite. I want the background to be available to me. So I need to inverse my selection. There's a lot of inversing and inverting in this conversation. Inversing the mask Command + Shift + I or Inverse and now the outside is selected. So I'm gonna z...
oom in here I'm gonna Command H this so you can see this. If I fill this with black, fill this selection, I've got a selection active, right? It's the background, right? If I fill it with the color black, which I have set as my background color, it is gonna fill a half pixel. And sometimes that is all you need. I'm gonna Command Z that. So I have a selection active, it's the background. If I fill with the color black, look ahead, look at me, look at me. And I fill it, I am filling it with a half pixel. So sometimes you know when you mask, and you just have that tiny, tiny, little fringe? Just inverse the mask on itself and fill with black. It takes two seconds. So, that is a really great technique and it's very, very, very quick. That's Select, Select this channel or the mask. Excuse me, inverse it and fill it with black. All right, I'm gonna show you another one. All right, I'm gonna go back to the history 'cause I need to keep unconstricting this. So we did the paintbrush on overlay or soft light. We did the Burn Dodge tool, now we did select inverse, Now what I want to do is another filter 'cause I love me some filters. Now without selecting anything. Without selecting anything, but being on the mask my cursor, do you guys see this? I want to be really clear. You're on the pixel layer here. You're on the mask here. Do you see what the channels are doing? This I'm on the pixel layer. I'm clicking to the right. I'm on the mask. The channels tell you where you are. So you might while you're working, wanna have your channels palette. This is a big mistake people make. How many of you have done that? You know you have. You've been on your pixel layer, and you're painting black for the mask and you realize you can't get out whatever actually you really needed? But you were painting with black as your background, so you didn't see it until you saved the document like five times? I've never done that I don't know what you're talking about. All right, So I'm gonna do a very odd thing, Filter + Other + Minimum. Filter + Other + Minimum. And I just like to say it that way. This is a really awesome little filter. I keep it on Roundness, It defaults to Squareness, And it will allow you, I'm gonna go too far, just so you can see it, It will allow you to constrict your, Oh, maybe I showed the preview that time. It will allow you to constrict your mask, but by the tiniest little bit, like .5. It will give you a little half pixel, or a pixel, on her hair. This is not great, right now. I will tell you on sweaters, shirts, if you've doing a catalog job, Ohhh baby this is the best. 'Cause it will allow you to blend in. The other thing that it doesn't, I'm going to hit okay. and I'm actually gonna make it a little heavier than it should be. 'Cause I wanna show you the effect it does. This is great on catalog jobs. It does this weird hexagony-thing. But what ends up happening is that little thing That little thing let's images meld in especially lower res images. It helps them meld into the background. And what I might do is, I might rather than do this Filter + Other + Minimum on the whole piece, let me go back to my history for a second. Maybe what I do, definitely pay attention here, I'm gonna show you guys something good. I might select her body, if that's all I wanted to have that minimum on, let's say I want a hand to her hair, 'cause her hair's a little more delicate and harder to do, Please pay attention to this okay? I've made up a loosey-goosey selection, I'm gonna go Selection + Modify + Feather. Selection + Modify + Feather. And now what it's gonna do is it's gonna make my selection soft feathered, I haven't done anything, I just made a Selection + Feathered. And now I'm gonna zoom in here and now I'm gonna go to Filter + Other + Minimum. I just did Maximum, sorry. Filter + Other + Minimum. And now I can do it just on the body. Or conversely, you can do it just on the hair. So what did I do? I made a loosey-goosey selection, I feathered the selection, I feathered the selection, and then I ran a filter on it. So did you guys notice I did two different methods to make the mask? I did a path, and then I did a channel poll. Often on the refinements section, I will do a different refinement for different areas. I'm gonna show you one other quick filter. It's awesome on sweaters, not awesome on this job that I don't wanna open 17 files. Stylized diffused + Filter + Stylized Diffused This is great for sweaters. And what its gonna do, it's gonna put a little bump on it, and then afterwards, you blur it a little bit, .5. And then what you'll have again, imagine she's wearing a fuzzy sweater. Let me see if I can get a side where it might look better, Ah, well you may just have to use your imagination. This is great for fuzzy pets. 'cause you know how many times you cut out a sweater, like mine's pretty tight, um well, you get the idea. So if I have a sweater on, and you pass it out, which you should, but it's gonna look a little (crunching sound). And if the channel poll won't work. Just loosey-goosey Select + Feather + Modify. Select + Modify + Feather. So it's a nice gentle selection, and then do the diffused on it. You will have to blur after you're diffused. You just can't leave diffused hair product.
Class Materials
Bonus Materials with Purchase
Ratings and Reviews
Katie McLellan
Lisa is one of my favorite instructors on Creative Live. She is smart, fast, funny, and packs more great info in each class than anyone else I have seen. Admittedly, I watch her classes multiple times and often do a little side-by-side practice with her support here, but I have learned so so much. Highly recommend her courses.
JennMercille
Wow! I am so glad I bought the studio pass because I am going to have to re-watch that several times before I can pack all of that info into my brain! These masking techniques are so applicable in so many different situations. Lisa does a great job explaining as she goes, the how, what, when and why you would use different techniques for different situations and different subjects. What a great class!
user-c916bc
I really enjoyed this class. It is fast paced though, and probably not for a beginner. But I really appreciate how much information is jam-packed in this short course. For anyone familiar with photoshop who wants to improve their masking skills fast, this is a great class. I would highly recommend this and any other class taught by Lisa Carney for advanced photoshop techniques.