Lessons
Lesson Info
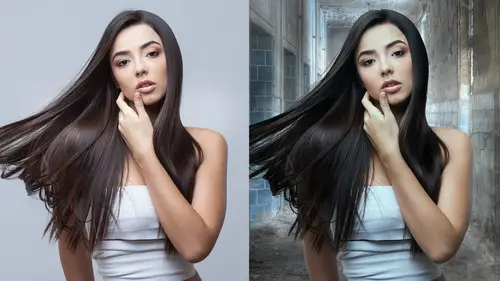
Backfill Hair Screening
This is pretty exciting stuff, I think. It's gonna be a little fast and furious, but I think you guys are feeling a little more confident. All right, let's say we did this mask. Right, we did the mask. It's what we just did, just a different version of it. A really handy-dandy, fun trick to do is what's called a Back Fill. Back fill? Yes, take a look at this. What is a back fill? I'm gonna do it two different ways. The first way is, if she was not shot with a really great rim light, but she is shot with a really great rim light. What you do. Do you remember we chocked the mask by loading selection on itself? So what you do is command-click on your mask, command-click on your mask, make a new layer underneath her, white fill, make sure you have the color white in your foreground or background. So, I have white. So, I've just back filled her. That's her back fill. Now, I only want it for her hair, so I'm gonna put a black mask on this, I'm gonna turn her back on, and I'm gonna paint with...
white. Oh, when you do a demo and you turn your pen to soft light or over light when you're painting, try to remember to turn your tools back. I'm gonna say that again. When you augment your tools to a setting that they are not normally at, the minute you are done, put it back to normal because you'll spend five minutes going, "Why is my computer not working?: And it's really embarrassing when you have 10 thousand people watching. It's just a little awkward. All right. So, I am painting on the mask and what it's doing, is it's back filling. And I'm gonna tell you, when you have a composite of five ladies and you need to put 'em in a scene and they need to look like they're filling in and they have a beautiful back rim, you don't want to hand go over each hair. This is so much easier to fill in. It's basically putting half a pixel of light around her. If your mask initially is a little to broad, oh, look there's some bits over there, you may to consider masking out some of her--- Look up here, I don't want you to miss this. I'm actually masking out some of her original hair and just letting the back fill show. That's a little too much. This is how you get rim light when you weren't given rim light by your photographer. This is a way, that's a little rough. Masked out hair and let the back fill show. Okay. That's that. I'm gonna show you two other techniques pretty quickly. That's back fill, now I'm gonna do back screen. What? It gets so exciting. I hope you're excited, I hope you guys like this, I think it's fun, but I'm a fetish up geek. I just want to make sure my mask... Let's go back. Sorry, I just want to go back to the demo. Hang with me. We'll go back to open. A back screen, I'm gonna throw that one away, and let's talk about the back screen. Because she was shot so beautifully and she has hair highlights, I can use what's already there. What I'm gonna do is take a copy of her. You can do this when someone is shot with a rim light. I want to be really clear. I'm just gonna make a copy of her. Command, J. There she is. I'm gonna turn the original off just so we can see what we are doing. I'm gonna put that on screen. Now, when I put that screen, what's white will screen, what's black will disappear. We've got a small problem here and that is her background is not black, is it? Her background is gray. Never fear 'cause Lisa loves her levels. I'm gonna hold the option key down and pick up this levels. I'm gonna make sure it clips with the previous layer. I, then, am gonna take that black eye dropper again and say, "Hey photoshop, will you make that background black?" And now that background's virtually disappeared. There's a little bit over here to the side, so I'm gonna do it again. I'm still on that black eye dropper, right? I know you see what's goin' on, girl. And then what we do is, we just move that underneath her and turn her back on. Look at that. It's beautiful. And you can still, once again, paint out some of the extra hair. This works for a car, this works for a house, this works for a tree, this works for anything of these things. Okay, I know this is really basic stuff, but I swear to Guda it works for everything. Screen and then back fill, but that was back fill white. What if we want to do something different, like a back fill black? I'm gonna guarantee you do not want to do a back fill black on someone who is shot with a white rim light. This is not for a rim light situation, this is for another one. I've got a gal. I've got a gal, I'm gonna sing. Let's put a 50% gray background behind her. Where I did a basic mask, how I would do that is path her around and pull a channel. We've already done this same technique and then, just like with Felicity, I'm gonna command-click on her mask, and I'm gonna fill a layer with black with that. Just like the white only it's black this time and you do not want it all over her, you only want it where her hair is. Why is that? Because if you don't, you'll get a black rim around her body and you do no want a black rim around her body. It's usually a half a pixel. You want only on her hair. This works for red heads, brunettes, you just fill with the proper color, okay? Now, if we look at her and we have her fill and we've got a back fill, her hair looks ghosty on the side because she was shot with gray. So, another technique is, oh my God, you guessed it, like a levels or a curved move. I'm going to add a curve, let's say, to her. I should've held the option key, I apologize. I'm gonna option click on the line in-between her and the color adjustment and I'm just gonna darken her hair. I'm darken the whole thing. I'm gonna fill the mask with black, by inverting it, command-I and then I'm gonna paint. Checking my time here. I'm gonna paint with white on the mask for the curve and just darken her hair edges. And what this will do, I'm gonna take this gray off. This is gonna have her start melding in. What have we done? We've done a black fill in the background and then I'm just darkening her hair edges up a bit because she's shot with all this bounce light and she looks a little funky chicken. This is another thing about compositing or masking for compositing. No one talks about the color corrections you need to do on top they just say, "Oh, make a mask." So, what do I mean by that? If I hire you to mask for me and you do this, you mask her out, you ask me what color I'm putting her on, you know it's gonna be dark, you know we're gonna do a black fill, but you see her hair edges look light, you should put that curve over the top of it without me having to tell you, okay? This is pretty, it's basic stuff, but it's stuff people don't know and it makes me crazy.
Class Materials
Bonus Materials with Purchase
Ratings and Reviews
Katie McLellan
Lisa is one of my favorite instructors on Creative Live. She is smart, fast, funny, and packs more great info in each class than anyone else I have seen. Admittedly, I watch her classes multiple times and often do a little side-by-side practice with her support here, but I have learned so so much. Highly recommend her courses.
JennMercille
Wow! I am so glad I bought the studio pass because I am going to have to re-watch that several times before I can pack all of that info into my brain! These masking techniques are so applicable in so many different situations. Lisa does a great job explaining as she goes, the how, what, when and why you would use different techniques for different situations and different subjects. What a great class!
user-c916bc
I really enjoyed this class. It is fast paced though, and probably not for a beginner. But I really appreciate how much information is jam-packed in this short course. For anyone familiar with photoshop who wants to improve their masking skills fast, this is a great class. I would highly recommend this and any other class taught by Lisa Carney for advanced photoshop techniques.