Lesson Info
5. An Overview of the Interface
Lessons
Class Overview
05:48 2What Is Lightroom Classic?
03:18 3Lightroom Classic vs. Lightroom vs. Photoshop
07:34 4Shortcut Keys
08:33 5An Overview of the Interface
11:48 6The Catalog System
09:34 7A Look Under the Hood
11:04 8Workflow and Presets
02:42Library Module Overview
07:44 10Library Module: Importing
50:13 11Library Module: Organizing Your Images
27:57 12Library Module: Picking Winners
20:18 13Collections and Collection Sets
23:52 14Develop Module Overview
11:14 15Develop Module: Global Changes
34:36 16Develop Module: Local Changes
42:37 17Virtual Copies
14:19 18Building A Develop Preset
14:38 19Exporting and Export Presets
32:32 20Creating a Watermark
17:53 21Creating an Import Preset
10:28 22Photoshop/Lightroom Integration
32:30 23Catalog vs Lightroom Preferences
21:35 24Managing Catalogs
30:08 25Tethered Shooting
14:37 26Publish Services
13:52 27The Map Module
12:32 28The Book Module
15:38 29The Slideshow Module
25:50 30The Print Module
20:15 31The Web Module
11:03 32Creative Cloud Integration
11:03 33Class Wrap Up
01:13Lesson Info
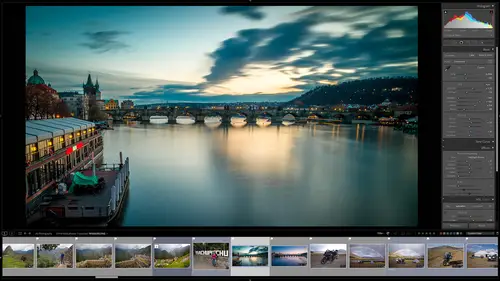
An Overview of the Interface
I love the interface of light room Classic because it's just easy to use. One of the things that will help you understand. The interface is the difference between a module and a panel. So let's take a look at the differences in how these work. So over here on the computer we have at the very top of the screen way up here, we have the modules. So these control very specific behavior. The library module is for sorting and filtering, picking winners, rating and basically organizing all of our images to help us work with them. We can find images. It's all of the light table stuff. The next module is the develop module. The develop module is built for developing changing tonality and color and all that stuff. It's it's our dark room. So we have the second module, the map module is for looking and seeing where did I take a picture and organizing things geographically. So that's what this is. The book module is for creating books. And so if you want to have a little book here, you can create ...
that book and send it out to a publisher. The slideshow module is built for creating slide shows and so I will show you how to do that. So getting that on screen, playing music, all kinds of really cool stuff. The print module is for printing things and so you might want to have, I don't know, a fine art matt of this image here and then the web module is forgetting things out on the web to build web galleries specifically. The important thing to understand is that modules are for specific jobs, there are specific areas of work. Think of it as the house, you have, the kitchen module for cooking food in the living room module for relaxing and the bedroom module for sleeping, light room classic is built sort of in the same way. Now these modules are built in a way that will help us with our workflow. So, if we look at the order of these modules, you'll see that we have the library that's bringing in and sorting to develop. So getting things ready and then sending them out to the world, the book, slide show and print. And so they are made to be worked in a specific process. Start to finish, bring an end, develop it, get it out to the world. Now, the panels and the interface in each of those modules behaves very similarly. So let's go into the library module and you can see that the way that these panels are organized is consistent between the modules. So we have on the left hand side over here, this is how we have things organized in other words. Where do we find things where our images? How are they catalog? This is for finding things. This over here is for finding our images. The middle part right here is for working. This is what we're working on and on the right hand side, this is what we're doing to whatever we're working on. So we choose things from this side, we see them in the center and we work on them over here. If I go to the develop module, you'll see over here, it's very similar on the left hand side. We have we don't find things over here, but we have presets, which I'll explain later. Um so this is how we can get two things very, very quickly. We have the center screen, that's what we're working on. Things are what we see what we're working on and over here, these are the adjustments that we're making. So in the Library module, you'll see on the right hand side, we make adjustments over here, on the right, in the develop module, you'll see we make adjustments over on the right and we'll go over here to the slideshow module and you'll see over on the right. This is where we make adjustments, always making adjustments over here on the right and on the left, we have either templates or presets or navigation. It's something that's specific to that module and so that's very, very consistent. So, just remember on the right hand side, it's all where the adjustments are on the left hand side, it's either finding stuff or getting quickly to the tools that you need. It's really cool. Let's talk about the top and bottom, what are those for? So at the top of the screen we have, this is this takes us between the different modules. It also sometimes will show us the status of things, like if there's address look up or face detection. If there's a job processing, you'll see that up here in the upper left hand corner. Um but for me, I almost always turn off the top bar because I'm using shortcut keys to jump between the modules, I really don't need it. So what I normally do is if I'm in the interface, I have that shut off. Now, here's another thing we need to talk about these little triangles here. You can sort of see that that little triangle there. It's called a disclosure triangle. If I click it once it hides, if I click it again, it expands. If we go over here, you'll see on the left hand side there's another little triangle. Notice if I click that it hides that thing. If they click it again, it brings it out. You'll see these little disclosure triangles all over the place. So notice there's of them. I click over there, it hides that panel. If I click this, it expands the panel. You see one right here by the hist. A gram click and click. And so disclosure triangles are everywhere in Light room, Classic and Photoshop and light room and all the adobe applications. It just sort of takes the interface and makes it clean. If you see one of those little triangles, click it, see what happens. You'll probably find a new panel or a pop out or something that shows up all kinds of hidden tools in light room. Classic. Hidden behind those triangles. The other thing we need to talk about is this bottom area here. This is called the film strip. Now the filmstrip looks very similar to the grid up here. In fact, they are almost identical. So why would you have a film strip and a grid? Well, because sometimes you'll need this middle area here to work on things. So for example, let's say we have this image and I want to increase the thumbnail size or something. Um, maybe I'm doing something on this. Maybe I'm in the develop module and I have this image. What if I want to go to a different image and I don't want to have to go back to the library module. Well, I can just keep this filmstrip here and say I want to go to this picture book and I can click on that and it brings it in here. I want to go to this picture and I can do that. The other thing about the film strip down here is that it has all kinds of options. And so you can filter what's in the filmstrip, you can rate, you can do all kinds of stuff with the filmstrip. We're gonna get into that later as we go through. The other thing you can do with the filmstrip is you can use this triangle to turn it off and to turn it on. I almost always have it turned off unless I need it. And so for me, the way that I use the interface almost always is I turn off the top and bottom by hitting shift tab. And then I opened up the side panels and I only use these when I need them. And a lot of times I'll even just kick out the left panel and only use the right one because I want all the real estate. I can get. The other thing you can do is if you want one of these panels you don't have to click the triangle and permanently pop them out. You can just go and hover on the left hand side. It just pops out. That's what that little triangle with the shaded areas. So if I go over there it pops out, you notice the bottom one doesn't do that. So on the left I go over here, it pops this out on the bottom, it does not. So if you see the solid one here, you need to uh pop that out so it comes in and then pop that back off or use the shortcut key that we used before. That is how that works. The other thing we want to look at are a couple of other sort of sneaky areas in light room Classic. One of them is the toolbar. This toolbar is context sensitive. In other words it changes based on what you're doing and it might not be on your screen right now, if you're looking at your Light room Classic interface, because it can be hidden. If it is hidden, you can get in a lot of trouble. So let me show you exactly what I'm talking about. So down here this is the toolbar this area right here. Now, for me this thing takes up space and I don't like to have it on all the time. Specifically, if I have all of my panels kicked out and I'm working on something, I don't necessarily want to see that. I don't want to have this there. So what I can do is I can hit T and it turns the toolbar off if I had T. Again it shows the toolbar. So what can happen is if you're in a different module and you're working on something and that toolbar is shut off by hitting T. You might have hidden a tool or you might have an option selected that you're not aware of. You can do some things accidentally by hiding that toolbar. So just be aware of that, I'll call that out as we're going through um when you need to make sure you have the toolbar on and when it's okay just to hit t to turn that toolbar off. Okay, so the other thing about this toolbar, so once again it's down here is it changes based on what you're doing. So if I'm have this double click, I'm seeing this, I can change how I'm sorting images, I can do it before and after. I can do different things. But if I'm in the develop module and I have the toolbar it's totally different. And if I click on a tool it changes again, turn on this tool it changes again. So based on what I'm doing, this toolbar will change. The toolbar is context sensitive. So just remember that's very, very important. The other thing that you'll see occasionally at the top is another bar. So if I hit G to go to the grid, notice now that at the very top we have text and attribute and metadata and none. So if I click on that, you'll see that more stuff pops out. So this is a filter to help us filter what we're looking at. So that will show up if we're in the grid. But if we open an image by just clicking on it to see what it is, notice that goes away because we don't need to filter, we found what we're looking for. But down here we have those same filters. So you'll see things that will show up down here or it might show up again up here, it will be very, very clear to you as we go forward forward that it works and it works really, really great. Okay. Now that we sort of have a feel for panels and modules, the disclosure triangle, all those different things that pop up that can be turned on and turned off. It's ready for its time for us to learn a little bit more about the catalog system. What that is because it's a really important part of Light Room Classic. And it's a big difference between Light Room Classic and an image browser and Light room because Light rooms cloud based Light Room Classic is file based. So what is that? And what does it mean? We're gonna take a look at that next
Class Materials
Bonus Materials with Purchase
Ratings and Reviews
Karen Sessions
Great class - excellent content, excellent presentation. Thank you Mark, through this class, I finally understand the difference between Adobe Lightroom Classic, Lightroom and how they work together. And how excellent, there is so much more available to learn - photography essentials, lighting, Adobe products.
user-d55dc6
This is an excellent class to learn about Lightroom Classic. Since it's not the same as Photoshop, I found Lightroom Classic to be confusing and difficult to intuitively figure out. Mark Wallace is an expert and exceptional teacher for the program and I learned so much today in this free class presentation that I am planning to purchase the program so I can continue to have a solid understanding of Lightroom Classic basics. Thanks, Mark, for inspiring me to get back into computer photo editing with LR Classic!