Lessons
Chapter 1 Introduction
01:26 2Why Just One On-Camera Flash
04:22 35 Reasons to Use Flash
10:37 4Common Flash Myths
06:51 5What Makes Flash Challenging?
04:56 6Chapter 2 Introduction
01:36 7Flash-Strobe vs. Ambient-Constant Light
08:19 8Flash vs. Ambient Light Exposure
03:07Flash vs. Ambient Demo
06:42 10Flash and Ambient Balancing for Natural Effect
07:11 11Flash and Ambient Balancing for Dramatic Effect
04:19 12Flash and Ambient Balancing for Creative Effect
07:10 13Understanding Flash Duration
08:37 14Chapter 3 Introduction
01:34 155 Common Key Light Patterns
08:38 165 Common Key Light Patterns w/ Diffusion & Fill
07:42 175 Common Secondary Light Patterns
08:28 183 Primary Subject Patterns
05:27 19Light Qualities
09:56 20The Inverse Square Law
07:50 21Inverse Square Law in Practice
08:21 22Corrective White Balance
10:02 23Creative White Balance
05:47 24Chapter 4 Introduction
01:58 25On Board vs. Hot Shoe Flash
05:57 26Full Feature vs. Manual Flashes
08:59 27TTL vs. Manual Control
08:12 28TTL vs. Manual Recycle Times
04:43 29Flash Power & Zoom
09:18 30HHS vs. ND Filters
12:29 31FCS vs. RCS
07:11 32Chapter 5 Introduction
01:38 334 Tips When You Must Use Direct Flash
06:00 34Bare Bulbing Done Right
11:42 35Grid Snoot + Direct Flash
06:43 36Mini Beauty + Direct Flash
06:08 37Ring + Direct Flash
07:52 38Understanding Modifiers
09:24 39Direct Flash + Shutter Flash
09:07 40Chapter 6 Introduction
01:55 41Ambient vs. Direct Flash vs. Bounce Flash
14:27 42Silver Bounce
14:27 43More Light Silver
11:02 44Soft White Bounce
15:41 45Overhead Bounce
11:39 46Overhead Bounce + Fill
09:42 47Event Bounce
12:42 48Chapter 7 Introduction
01:38 49Natural vs. Dramatic Light
17:43 50Filling and Refining Existing Light
08:44 51Coloring Light for Corrective Effect
13:33 52Coloring Light for Creative Effect
10:27 53Chapter 8 Introduction
00:43 54Case Study 1 - Dramatic Sunset
09:45 55Case Study 2 - Desert Sunset
10:04 56Case Study 3 - Sinister Headshot
09:40 57Case Study 4 - Family Portrait
08:21 58Case Study 5 - Athlete Portraits
11:19 59Case Study 6 - Working Angles
07:22 60Case Study 7 - Drag + Composite
08:09 61Case Study 8 - Less is More
07:16 62The Good Karma Jar
01:41 63Favorite Feature Flashes
05:52 64Favorite Manual Flashes
21:35 65Favorite On Camera Flash Modifiers
21:21Lesson Info
Silver Bounce
from a V flat. We're now moving into a silver bounce. So in just looking at this modifier, what kind of like quality can we predict from this kind of modifier? Well, we know that it's gonna be fairly large in relation to the distance from the subject. Okay, so if we have a close, its large, if we have a further way, it's gonna be smaller, which is going to determine whether it's software, whether it's hard. But one thing that we know for certain is that this is going to create a more speculator light amore. Contrast it with brighter highlights and darker shadows than a white or a mat service. Because this is reflective, it's silver, which is going to be fantastic for certain types of effects or when we simply need a stronger and more powerful light. So this will send back more light than a white, and that light that it sends back is gonna be more speculator. Okay, let's show you exactly the type of situations that are awesome to use a silver in. Well, the first situation is fitness. We...
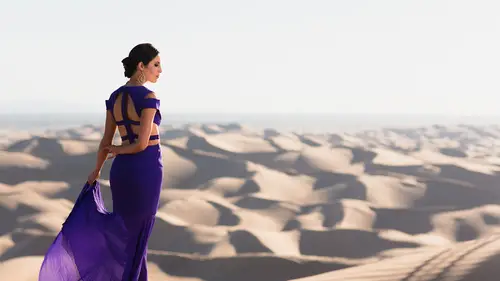
did a set of Finnish shots, one with Brandon. We did another set with Jeremiah and Levi, which will be showing you later on for those type of shots we want that harder edge wanted. War defined Look, and you're going to see as we go on, we shape that light. It works incredibly well with fitness because you're trying to create and really exaggerate muscle definition. So that edge that hard look is fantastic when you're going for a very dramatic type shot Scene number two is the silver is fantastic for an outdoor scene like this, where, when we're shooting Yoko, we're trying to get color in the sky. We're trying to make a this guy under exposed a little bit, so we have detail there. Otherwise, if we expose for just skin, everything kind of blows out, we lose that. So when we simply need to create a lot of light in situations like where we're outdoors and we need to overpower the sun a little bit, that's where silver is again. Gonna come in handy now, In the last video, we were basically bouncing our flash directly into a large V flat. For that you're gonna control basically the size of of how much light goes into the B flat with simply your zoom, Okay, because generally going to be close to that. Zooms are close to that V flag. So if I want to use the entire V flat, I would simply just zoom out to, like, say, 24 millimeters in that way that the flash is gonna open up wide and hit the entire V flattened and go back on the subject. If I wanted to use less of that V flat, they don't end up zooming in. Okay, to, say 105 millimeters or whatever amount in between that you find appropriate. Once again, you're using that little testing button on your camera to basically give you a sort of modeling. Like to see where that light is hitting on the reflector as well as on your model. OK, but what if now we're bouncing off of smaller services and now I need to control my life just a little bit more? Well, rumor in the previous chapter when we wanted to pin the light, we want to focus the light in one area. What do we use? We use either grid or a snoot generally in this type of tutorial in this with bouncing off of Ah, on camera flash off reflector. We're not gonna bounce so far that we would need a snoot. Okay, if you're bouncing that far, it becomes very difficult to use This as a technique usually are, bounce is at most 5 to 10 feet away from the camera. And for that we can use simply a grid. So if I want to prevent light from spilling and from hitting other things in my background, like for example, if I have the silver right here, But then there's a white wall behind it. But I don't want to use that. Why? Well, I don't want any light hitting that I put a grid on. I'd use my zoom, put the grid on and now my life becomes very focused on whatever area that I'm shooting, OK? And even from the camera, When you guys look at this, you probably aren't seeing nearly as much light spilling towards you as you were just a minute ago when I didn't have the great on. So now we're using grids and we're using snoops to control light direction into the types of bounces, the types of modifiers that we're using all right. So with the gear list we use, any one of these is totally fine again. You don't need to have all this gear. Just have something from there. So we use both Westcott and the photo Dio. The Westcott five and 1 40 40 inch version is going to be 40 bucks. The photo Dio by 65 1 is 30 and the photo deal 48 by 725 and one is 60 again if you buy it with the stand. I think it's like 80 bucks, and it comes with the Reflector to, So it's a good deal if you get it if you need a stand. If not, you can go with either or I kind of like to have both, just depending on. You know, the use and everything that kind of just modify a little bit differently. So they're nice and they're cheap. Reflectors air so cheap and you can always use them. They're great. So with the nd filter for this bottom shot because we are shooting outdoors and it's noonday sun and we're shooting at a fairly low Um, after we're actually using the 24 million of Prime for the bottom shots. So we're shooting F 1.4. If we didn't have this on, then we'd be somewhere around 1 4000 of a second to get down to our to get the background dark enough, which means that we have to use high speed sick. Which means that I'm gonna have to use I s o in conjunction with my shutter speed, which means I'm gonna reduce image quality color detail. And I'm gonna run into that shutter speed limit within one stop because my camera can only go upto 1 of a second. So again, we're using a five stop neutral density filter. Ah, five stop is just that ideal amount of cutting down to be able to shoot outdoors and midday sun at low apertures. You don't need to go to 10 stop. A 10 stop is more for special effects for basically doing shutter drags in the middle of the day. Five stop is just right for sinking. Okay, when it comes to the neutral density filter again our favorite in the ones that we use or the singer a filters, they have fantastic quality. But don't get me wrong. There's a lot of great quality filters at different price points. Ah, good budget filter at 82 millimeters is the three stop tiffen. It's 35 bucks, and at least it'll get you practicing this techniques. It's a decent filter, a great mid level filter for a five stop filter. 82 millimeters is The Hoya Hoya five stop. It's about 100 bucks and again, another good brand of filters, which sometimes you need Teoh get like droppin inserts for them is Lee filters. Lee. Filters are fantastic. Sing raise fantastic for kind of the score on filters and so forth. What I would avoid getting is a variable, and the filter Variable nd filters air basically nd filters that allow you to adjust from one stop to a stops they used to pieces of glass. And because of it, even the nicest variable Andy filter is going to reduce image quality quite a bit because you're going through now two layers of glass instead of just one. So keep it simple. Just get a five stop nd filter based on your budget, you can choose what you want to invest in if you can, and you know it's going to some of that. You use a lot, I would say Just jump to the sing right, investing that you'll use it forever. And by the way, just get the 82 millimeter, uh, filter, because you can always get stepped down. Rings stepped on. Rings are super cheap that allow you to adapt this to smaller lenses. Basically. Okay. So stepped on ring rather than having multiple filters for different lens sizes. Just get 1 82 and then you're good to go. Okay, Let's go ahead and move into this first little shot right here. Well, on the top. Left shot. This is our ambient light shot. This is on a 24 70. This same lens right here. The 2070 mark two were at 70 millimeters at 1 100 of a second F 28 and I so 3200. This is no flash. Ambient light. Only again. Look at the muscle definition. Everything is kind of It's not really showing all that well. Everything looks very flat. The light quality is from the same video. Lights were not getting good detail. Not good color. Everything. Number two, this looks straight up like a mug shot. Looks like Brandon is going to prison and we have to get a shot with him before he goes behind bars. This is the same 24 70 at 100. A second F 28 and I So 200. This time we're using direct flash at T T l. It's gonna be if you're not using TL for your own manual with direct flash in this distance is probably around 1 32nd toe, 1 64th power because it's direct flash. And were I so 202.8, we don't really need a lot of light there. Okay, Next we have our top right shot. This is that first super dramatic bounce shot. And this is split lit right down the center to create a very dramatic image. We get good muscle definition. You can see kind of how we have detail on those veins and kind of we Seymour abs. And we see that definition in the chest in the core. This is with the silver bounce, whereas 70 millimeters on our 24 70 same set up 1 200 a second, F 28 200. This time All we did was turned this into the bounce where you can either run a t t l or because we're bouncing were at around 1/8 to 1/16 power. So you're losing light with that balance, which you can see from this direct light shot where we're at 1 32nd 1 64th We're losing around two stops of light even more, depending on where the bounce is placed in relation to the subject. But we have a much better quality image right here. We have an image, the actual great, it looks dramatic. And later on, we're going to show you how to fill other side. So you get really cool shots where it looks like there's two or three light setups. This is just a single one. I said if they want to start out with this bottom shot, we're on the 24 millimeter prime. Okay? The 20 familiar prime is ah, interesting lens because it creates a look that's very distinct because you can basically shoot wide at 1.4. So but you can get a very similar look to this with a 24 70 with whatever at 24 milliners s a F 2.8 Sigma supposedly has a 24 70 coming out, too, which I'm so excited because signal comes out with fantastic stuff going to new art lands, and they're generally much, much less expensive than some of the other branding lenses. All right, so the bottom left one is that 1 200 of second at F 1.4 I so 50 with the five stop neutral density filters. That's why we're at 1.4 where I so 50 and we can keep it at a second. This is the shot that I took based on where I want my ambient light exposure to be. But when you look at her, you're like, Oh my gosh, she's She's completely pitch black shoes. She's There's no detail there. Okay, so I made a little adjustment. I took her up about five stops ish. I went to 100 seconds F 1.4 and I so 400. So we went toe from eso 50 to 102 100 then 400. That's actually three stops. And then I think we actually brighten this up a little bit in post as well because it wasn't as I think we did a little bit of post brining to to get it exposed correctly for skin. So we're probably around four stops above where we're at here. 3 to 4 stops at that point, all of the background you can see, like all the detail in the sky and everything is gone. The richness in this brush like that rich gold tone is kind of gone. The highlights air blown. We just see a little bit of gold around the outside. And this shot is okay. That's why I have a check mark next to this. This one is ext out these air extra because he's just don't look good. But this shots actually, OK, if if what you want is that natural light look and you want to back to be blown out and stuff, that's a that's a style in and of itself. So that's totally acceptable. So if I want that more dramatic look, I simply bring my exposure back to the first image we go back to. The first image were at 1 200 a second F 1.4 eyes. So 50 with our five stop neutral density filter. I power up to full power on my flash, and then I'm simply bouncing directly into a silver that's off to camera left and that goes directly into her face. Now again, depending on the distance of that silver, you may choose to use a snoot, or you may just simply leave it bearable. Now, generally, for this type of shot, I don't need to use a grid because I'm not too worried about it splashing anywhere else. It can hit other areas, and it's not gonna come back and interfere with my shot. Whereas if I'm indoors in a studio, I don't want to bounce anywhere but my but my light modifiers, because otherwise it's gonna affect my shop. So what I would probably do is a zoom into 105 millimeters on this. Go 1/1 balance right into that reflector, The reflector, Right into her. And we get this shot right here. We have this beautiful, dramatic looking shot where we have all the colors in the background. We haven't had anything blown out except for the son of the very top of the frame, which looks really nice. And we get our beautiful model. You'll go there from there. We took a few different shots and all of them really dug. We did some sitting, some standing and so forth, and we'll talk about those more later on Number one. Tip number one is to use that silver for a stronger and more speculum light as well as a harder edge. So when you need it for stylistic purposes or when you need it for simply more light, this is stylistic. This is just because we need lots of light. Okay, Number two the largely reflected, the more light you have and the easier it is to bounce. So, for example, we talk about using the Westcott 40 Inch five and won. The photo Dio is a 40 by 60 which one held kind of in that tall portrait aspect ratio type vertically. Basically, it gives you a little more room to work with, which means if you can catch more light from the flash, it's also reflecting a little more light. Okay, number three. When indoors, Amy Reflector of the Light via the flash test button, which we covered, and number four. When outdoors, aim your reflector at the light by imagining it's a mirror again with the V flat. These things were very simple. We don't have to worry about that. That's why we started with a V flat. When you're with a reflector, it gets a little bit difficult to kind of put those things into place Once you get used to it, it's actually pretty simple. But when you put that reflector in place, the easiest thing to remember is, let's say your assistance holding reflector and the model is right there in front of you and reflectors off the side. All you need to remember is to imagine the reflector is a mere okay and you look towards a reflector. And if you can imagine seeing the reflection of that person in this mirror, then it's angled correctly. If you look at the reflector and the reflectors pointing straight at you, well, if that was a mirror, all you'd see is yourself. So when you bounce into that is just gonna come straight back at you. If it's pointed away and you look at the reflector and it's kind of like off to the side, then you know it's not getting the model. So that's the easiest way to remember is just a room. Imagine it's a mirror and look straight through that to see. Can you see the model based on that angle? Okay, you'll get very used to this once you do it a couple times to just give it a try. So that's it for this silver bounce video. Rimmer In general, a silver bounces fantastic when you want a more contrast in speculator type of light for stylistic purposes or when you simply just need more light in general.
Class Materials
Bonus Materials with Purchase
Ratings and Reviews
Sid
The best class for understanding light and lighting there is bar none. Pye is an excellent teacher and the quality of the material provides for a rich and very informative experience. Pye breaks down the fundamentals in easy to digest packets and then elaborates as needed. If there is one class that you watch this is it! Worth purchasing and saving for future use. I would also HIGHLY recommend downloading the saving the PDF of slides that accompany the videos. Again, and can't say it enough, this is THE BEST video to lighting on Creative Live. A must watch for the novice and the expert.
Petra
Great course, I highly recommend it if you want to become a more confident flash user. Pye is a wonderful instructor and just such a nice guy, it's a pleasure to listen to him
Simon Metselaar
This is the best thing that happened to me since I've been into photography. What a lifesaver. Unfortunately I already payed for some courses that are not Pye, but Pye just nails it. Amazing, and kind of a life hack. Thanks again :)