Lessons
Chapter 1 Introduction
01:26 2Why Just One On-Camera Flash
04:22 35 Reasons to Use Flash
10:37 4Common Flash Myths
06:51 5What Makes Flash Challenging?
04:56 6Chapter 2 Introduction
01:36 7Flash-Strobe vs. Ambient-Constant Light
08:19 8Flash vs. Ambient Light Exposure
03:07Flash vs. Ambient Demo
06:42 10Flash and Ambient Balancing for Natural Effect
07:11 11Flash and Ambient Balancing for Dramatic Effect
04:19 12Flash and Ambient Balancing for Creative Effect
07:10 13Understanding Flash Duration
08:37 14Chapter 3 Introduction
01:34 155 Common Key Light Patterns
08:38 165 Common Key Light Patterns w/ Diffusion & Fill
07:42 175 Common Secondary Light Patterns
08:28 183 Primary Subject Patterns
05:27 19Light Qualities
09:56 20The Inverse Square Law
07:50 21Inverse Square Law in Practice
08:21 22Corrective White Balance
10:02 23Creative White Balance
05:47 24Chapter 4 Introduction
01:58 25On Board vs. Hot Shoe Flash
05:57 26Full Feature vs. Manual Flashes
08:59 27TTL vs. Manual Control
08:12 28TTL vs. Manual Recycle Times
04:43 29Flash Power & Zoom
09:18 30HHS vs. ND Filters
12:29 31FCS vs. RCS
07:11 32Chapter 5 Introduction
01:38 334 Tips When You Must Use Direct Flash
06:00 34Bare Bulbing Done Right
11:42 35Grid Snoot + Direct Flash
06:43 36Mini Beauty + Direct Flash
06:08 37Ring + Direct Flash
07:52 38Understanding Modifiers
09:24 39Direct Flash + Shutter Flash
09:07 40Chapter 6 Introduction
01:55 41Ambient vs. Direct Flash vs. Bounce Flash
14:27 42Silver Bounce
14:27 43More Light Silver
11:02 44Soft White Bounce
15:41 45Overhead Bounce
11:39 46Overhead Bounce + Fill
09:42 47Event Bounce
12:42 48Chapter 7 Introduction
01:38 49Natural vs. Dramatic Light
17:43 50Filling and Refining Existing Light
08:44 51Coloring Light for Corrective Effect
13:33 52Coloring Light for Creative Effect
10:27 53Chapter 8 Introduction
00:43 54Case Study 1 - Dramatic Sunset
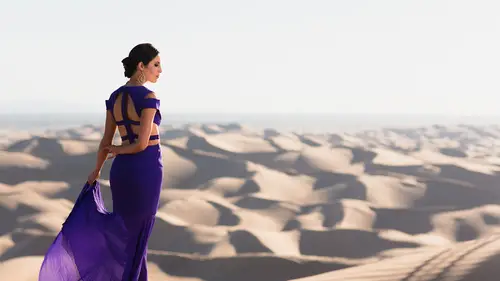
09:45 55Case Study 2 - Desert Sunset
10:04 56Case Study 3 - Sinister Headshot
09:40 57Case Study 4 - Family Portrait
08:21 58Case Study 5 - Athlete Portraits
11:19 59Case Study 6 - Working Angles
07:22 60Case Study 7 - Drag + Composite
08:09 61Case Study 8 - Less is More
07:16 62The Good Karma Jar
01:41 63Favorite Feature Flashes
05:52 64Favorite Manual Flashes
21:35 65Favorite On Camera Flash Modifiers
21:21Lesson Info
Natural vs. Dramatic Light
Dramatic versus natural effect were to come full circle. We talked about this far earlier in the workshop, but now that you've seen so much, I feel like it's important that we jump back to this topic and show you these images again show you different setups and talk about this one more time, because now that you know what you know, at this point in the workshop is going to make so much more sense. Let's start first with the primary tips, and then we're gonna work through each individual shot. Now number one dramatic is essentially the formula. The four dramatic is equal to the key light your primary light that you're lighting your subject with as being kind of the dominant light source it's greater than the ambient light okay, that's going to give you a dramatic look? Natural looks generally comes when the key light is kind of less powerful. It takes a back seat to that ambien effect and refining or corrective type adjustments is general, when you're simply adding key light, you're add...
ing additional light to the immune effects. So we say key light plus and ian light that's where we go for that refinement, that corrective kind of look alright. Lastly, I want to say that I want you always, always, always, always start with what you want this scene to look like. As far as the background goes as far as everything goes in the shop with the exception of maybe the subject or whatever's in shadow and then add light as you see fit. Okay, so always start from that basic don't try and just add light and try and create something that that you know just off your first shot is not gonna happen. I have a lot of experience doing this and still I always start with what I want with a background like okay, what I want my main light now to look like ok, what do I need a ce faras phil's now what I need as faras additional lights you always start simple and build on top of it start with one life and go to two and then three and so forth so I feel like this is a very somber video why myself summer you always do this no it's exciting people let's have fun with it. Okay let's talk through each of these different shots because each going to require kind of a slightly different set of gear and what I want to do first is before we even get to these top shots, these air kind of individual case studies that I want to talk through of how we live and how we kind of approached each one these scenes but let's talk about this bottom set of images right here because this is that whole point that I'm trying to get across of dramatic versus natural and about using your shutter speed to control the amount of phil that's being added to the scene so what we have on the left side right here, let's look at the camera settings the bottom left we're on a fifty millimeter lens this's the cannon fifty mil at one point to l so we're at one hundred second we're at f one point two and so fifty, okay, so again, I always choose my aperture based on the compositional effect that I wantto have and for this, I want an incredibly shallow that the field and just crushed okay? And I want this tree to kind of create this nice v that kind of leads into her this is after the sun has set actually, so we're in a pretty dark kind of environment right now, so I don't really need a nd filter that's what I'm dropping so fifty because that was enough to get me down to get this look here from there, all we're doing is let's see it's dusk, we have a white over silver and we're bouncing at around one quarter toe one eight power now the point I'm trying to illustrate is that this look is going to change dramatically simply based on the amount of fill light that we allow in if I were to use an indie filter unless I were to cut the amount of ambulance down even further and feature more flash it haven't even more dramatic effect but look what we do I leave everything everything stays identical through all three these shots with the exception of the shutter speed. Okay, so from here we dropped to one one hundred of a second and the third shot the shot we goto one fifth of a second so this is one stop brighter than this shot in it's ambient light in the shutter speed this is two stops brighter in this job the flash exposure stayed identical throughout all these shots. What we end up getting well here we have a more dramatic image because we see more of the blue tones we see more of like all the tones in the background, the shadows and being darker so everything is more dramatic because we're pulling the background down further here it brightens up it'll look a little shadows over here on the left side of address see how it opens up opens up a bit because we added one stop of shadow phil by simply slowing down the shutter by letting more and delighted so the tree is no longer as dark the background we don't have as much blue in the back we go up another stop now the sky is almost blown out everywhere we have a lot more detail in the shadows in the tree, we have almost completely filled the shadow underneath the chin on the left side of her body. This is exactly I'm talking about as far as ambient versus flash balancing and it's exactly what I'm talking about when I'm time refinement these small adjustment thies small decisions are going to make massive impacts on the type of image that you want to come up with there's no right or wrong between the three of the shots, you can't say that any of them are right or wrong, they simply have a different look, if you want more natural, you'll out more amyloid to come in if you want more dramatic, you allow less and you like to come in. One of the interesting note that I want to add here is we added, phil like tour, basically by just allowing more ambient light in on lee do that when your fill light matches the color temperature of your flash. Okay, we're out in daylight right now, I'm using daylight balance flash, we're getting roughly daylight, I'm okay to balance those two things, but if you're allowing yellow ambient light to balance over blue flash, then you're getting mixed lighting, okay, and that's not going to look good it's gonna compromise the overall image quality. The other thing I want to mention is one thing you need to keep in mind is that the flash power the brightness of her skin on this right side okay on the left side the brightness of her skin in the shadow area it's simply the ambient exposure meaning that not a lot of the flash is actually covering the side the dress so the brightness on the left side of her body is primarily due to ambient light so when we slow down the shutter the brightness of that dress area it brightens significantly because we're allowing more light over that area but the brightness of areas where flash is touching the right side of her face the right side of her body that brightness is determined by ambient light plus flash so as you slow down the shutter notice that we're also adding a little bit of brightness to the face and two that right side of the body okay it's just one thing to keep in mind it's not that your flashes getting any more powerful the flash isn't we already know that we know that when the flash fires it fires so quickly that doesn't matter how long the shutters actually open the only difference in that brightness is from ambien exposure now now that we know that let's go ahead and take a look at each of these images on top for this first shot we talked about this a little bit earlier, I want to briefly talk through it again and kind of talk through the overall thought process in this I love that the sun was directly above this tree and kind of just giving a back light nor entire set. I wanted this to look like we had a multiple light set up even though we only have one on camera flash, so I put her back to it that way the sun is acting like a backlight on the entire scene, it's giving her a rim light hair light it's giving the grass a little backlight, that's giving the tree a little bit of it back like I like natural light effects, but I also love the fact that we're getting the sunlight coming through this dress, and it kind of highlights her form a little bit, so we don't want to do I want to expose so that we can see that sunlight coming through so we can see some of the details in the color of the sky and so that the dress isn't simply blown out. How'd I exposed for just her skin tones? The dress me blown out everywhere, maybe blown out almost in every single spot, even over the front of her would be blown for the most part, so I set the ammunition closure were on the point familiar prime f one for l too the cannon version where one hundred second f one point four is a one hundred were using a five stop neutral density filter. Ok, the same sing great five stop filter. We're bouncing with a silver because it's kind of a little bit off to the side a bit where we need to overpower the sun. We need as much light as we can get, so we're using just a straight silver. I'm bouncing at one over one and I'm not using any grids or anything like that because I'm basically looking at the light one o five zoom and I take a flash, I take a shot just looking at the reflector just to make sure that I fill the entire reflector with light. I want to make sure that I fill the entire reflector and not just a small part of reflector it's just a small part of reflected catches light it's a small modifier if the entire reflector fills up with light without letting too much light spill around the outside, then we're maximizing the amount of size of that reflectors. We're gonna get a softer, larger light source and we're using up more of it, so we're basically get a stronger light sources well, because we're not allowing it to spill over the edge. So use your zoom to control that and depending on where that modifiers place you're going to zoom in and out to make sure all of your flash all of that light is right on the reflector and it's not spilling over the edge nor is that too tight and hitting just a small part of the reflector when that light comes back we get a beautiful looking kind of dimension or directional light coming on to her what is that directional like kind of lighting like it's basically loop lighting okay it's coming directly it's not so directional that is rembrandt but it's a little bit directional always when you're lighting you're going to find this trick out always when you're lighting light top down the light should always be coming from at least slightly above your subject okay, so the light right here is being held just a little bit above the heads so that way it's coming down a little bit light will always look more natural when it's coming down on the subject versus when it's going up it's going up it looks unnatural increased something off about the image it just doesn't look quite right we're going for something natural we always like top down if you're going for that scary ghost effect yeah sure like top light bottom up that usage of light does have a purpose it's just not for this type of a look so that's how we got to the shop let's talk about the shot of a vet in the desert now we're in the desert are light is setting extremely quickly and I noticed that we have this beautiful lines going back on the sand and I'd say that you go sit down in front that very quickly in this situation it's kind of funny because we we had off camera lights with us and this was part we're shooting for lighting one on one and lighting to one but I didn't even have the off camera lights set up ready to go yet so I just said, look grab ah silver reflector grabbed whatever you got and just come over run over I need my assistant to stand right next to me I have no intention of shooting this with just a reflektor it's just that's the tool that was reading available before the sunset we had literally five minutes before this entire area was covered in shadows and it would've taken me ten, fifteen minutes to set up the lighting, so in that situation, these techniques and I'm talking about these bounced techniques you might think, well, pi if you have off camera lights, why would you ever do you know this type of stuff? Because sometimes you're in a pinch and you're in a bind and you need to get this shot just to get the shot and for that situation I'm using these techniques that I know I can go to and they're quick and easy tio and we're shooting at one one hundred of a second f too and I saw one hundred we have the five stop neutral density filter I think I'm just at this point like I didn't even bother doing a step down drink I'm holding the filter just over the lens, okay? We're using a silver reflector and I'm bouncing very closely so I have this have I'm pretty damn close to you that right now and I'm simply bouncing right off to the left of this reflector right there again I have a reflector held up a little bit higher so that way it's coming top down so look, the shadows are traveling down into the right it looks more natural that way, but look at the background once again we're going for dramatic effect we've under exposed the background and then we brighten up the subject dramatic effect ok, all these examples are dramatic effect all right? I always take my first shot my first shot is just without flash to get my exposure I got my exposure down. The second shot is with flash here's a rule of thumb if your outdoor if you're outdoors urine bright sunlight, you are using an nd filter a five stop filter you want to get as much light as possible in general, you're going to be shooting at one over one power on your flash in general ok, if you want if you ever trying to overpower the sun with just one of these on camera flash modifiers are just one of these on camera flashes and general, you're always going to be at one over one. Okay, sometimes it's one half power, but typically it's one of one. So that's a good starting point. Just a good rule of thumb to use. If you're trying to overpower the sun, just start at one over one. All right, we wait for the a little bit of wind to kick in. We get this beautiful shot and that's what we got there? All right. Going into the third shot top right. This is the twenty four seventy mark to same ones I have on right now worth approximately thirty nine millimeters one, two hundred a second f to eight and two hundred. Once again I approach the scene. I decided my aperture based on the composition, I get my shutter speed and my eyes. So based on essentially synchronize sink speed and overall image quality what I'd do first decide what I want the background look like I wanted the background to be a little bit brighter. I want to show this little highlight in the ocean behind her but I wanted to still be dramatic enough where against these dark rocks you can see the back like kissing the dark rocks but you can't really see the detail in the shadow I want her to be her to be the detail the shadow in the shot I have her lean back and arch over the rock bring your hand up to the hare and I'm kind of adjusting things I go just to kind of get it right I let that other hand relax and I think I can't see her but I think it's going kind of relaxing going over the tummy can you guess how we let it so here we did loop this is basically loop somewhat close to rembrandt this is for sure here overhead I have a reflector being held just above her body and I'm shooting kind of at her same angle and I'm just bouncing up into this reflector that's directly above her and coming down right on her okay so we get this beautiful top down light that really accentuates her and her features there's one thing I want to show you to I actually added a fill the bottom of this just to show you what it would look like I just want to show you her arm basically with the phil and without the film in many situations phil is not going to do what you wanted to do the reason why is for this shot we want shadows. We want you actually notice that we're actually lighting this shot. Short lit. Right. All these shots. This is symmetrical. This one is broad lit, but guess what? She has a pretty narrow face and we're shooting free. Far away's, let's totally find this shot is short lived and she has a slightly wider face. But I wanted to look a little more narrow, so we're short lighting the broadside. The face falls in the shadows. Fantastic. The arm falls in the shadows. Fantastic. If I don't let the arm fall in the shadows if I had a filter that it actually makes the arm look so much larger than it actually is. Okay, so remember that shadows air good thing they conceal and flatter in a lot of situations. You don't want to always open up the shadows. Used the shadows to your benefit. They will make your subject look more flattering in camera when you're using it to kind of narrow and slim and to do those have to things allowed to do that don't always fill the shadows so that's how we got to this shot again. What was the flash power setting? Again we have I think this one was there three or five stop neutral density filter I wrote three there I might have been using the three stop I have a singer a three stop too if it wasn't you know super dark but again this is silver overhead cause we need a lot of power and I could tell you on the top of my head that if we're using silver overhead and we wanted to be roughly the same brightness as the background we're gonna need to be around one over one or one half power so I think that's what I have here too it's about one half power tow one of one power just in general whenever you're balancing and you want to get overpowering type effects, you need to be a full power okay that's just a rule of thumb granted, the light is quite close to her so if we've got it just right where we fill up that reflect with light we hid it perfectly. We could probably around one half to one quarter but just a good rule of thumb remember overpowered the sun one over one and it rhymes I love it when my rules right overpower the sun one over one sweetness so the whole point of this video is I want you guys to really understand the refinement because these small decisions that you guys make in terms of ambien, exposure versus flash exposure will completely control the type of image that you get, so take a shot. Look at the light, look at the way the shadows they're falling. Slow things down, always tell all of our staff. Slow it down. You don't need to shoot at a blazing speed of light and get five hundred shots that are just average. Get fifty shots that are fantastic, that I would much rather have fifty fantastic shots than five hundred everyone's. Slow down, look at your light, analyze and then modify and refined that's it for this video has head on to the next one now.
Class Materials
Bonus Materials with Purchase
Ratings and Reviews
Sid
The best class for understanding light and lighting there is bar none. Pye is an excellent teacher and the quality of the material provides for a rich and very informative experience. Pye breaks down the fundamentals in easy to digest packets and then elaborates as needed. If there is one class that you watch this is it! Worth purchasing and saving for future use. I would also HIGHLY recommend downloading the saving the PDF of slides that accompany the videos. Again, and can't say it enough, this is THE BEST video to lighting on Creative Live. A must watch for the novice and the expert.
Petra
Great course, I highly recommend it if you want to become a more confident flash user. Pye is a wonderful instructor and just such a nice guy, it's a pleasure to listen to him
Simon Metselaar
This is the best thing that happened to me since I've been into photography. What a lifesaver. Unfortunately I already payed for some courses that are not Pye, but Pye just nails it. Amazing, and kind of a life hack. Thanks again :)