When to Use Different Light
Lesson 3 from: Light Shaping Tools for Professional PhotographersTony Corbell
When to Use Different Light
Lesson 3 from: Light Shaping Tools for Professional PhotographersTony Corbell
Lessons
Class Introduction
05:22 2Categories of Light Shaping Tools
07:59 3When to Use Different Light
10:50 4Softbox and Octabox Overview
25:55 5Beauty Dish, Reflectors & Collapsible Reflectors Overview
27:55 6Pros & Cons of Small Light Sources
08:10 7Shoot using One Reflector
12:24 8Shooting with Two Standard Reflectors
08:53Shoot Using Grids with Reflectors
14:37 10How to Use Beauty Dishes
28:24 11Pros & Cons of Softboxes
12:30 12Common Uses of Softboxes
21:24 13Subtle Elements of Controlling Softboxes
20:33 14Different Techniques with Softboxes
29:32 15Pros & Cons of Umbrellas
07:25 16How to Control an Umbrella
12:25 17Uses of Umbrellas
08:27 18Different Techniques with Umbrellas
19:55 19Group Shot with Umbrellas
19:37 20Differences Between Collapsible Reflectors
25:36 21Shooting with Black & White Collapsible Reflectors
15:07 22Shooting with Silver & Gold Collapsible Reflectors
13:49 23When to Use the White Translucent Collapsible Reflector
33:18 24How to Use the Large Octa Softbox
20:50 25Shooting with a Large White Deep XL Umbrella
18:59 26Shooting with a Large Silver Deep L Umbrella
07:19 27Shooting with a 4x6 Softbox
17:05 28When to Use Specialty Light Shaping
04:40 29Shooting with a Hard Box
15:29 30Shoot to Incorporate a Fresnel Light
09:32 31Shoot Using Ring Flash
10:23 32Studio Lighting Photo Critique of Student Work
1:05:41Lesson Info
When to Use Different Light
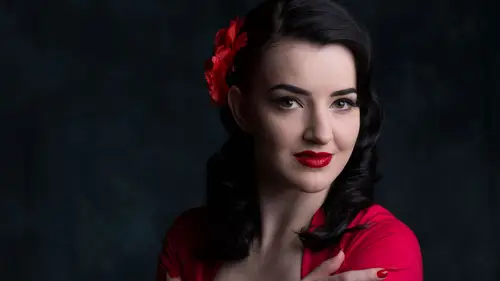
For me, the first thing we have to understand is that it's an interesting discussion if you go back and look at the old painters certainly in the Italian Renaissance, some of the early French painters, the Dutch masters, all of the great painters understood light and shadow fairly well. And, what's great about that is that we can study and look at their work and learn from what they did and kinda figure out how they did it by looking at the light and shadow. da Vinci was noted as saying when you want to produce depth in a painting, you have to have these three brightness levels. You have to have the true tonality of your subject and you have to have two tonalities that aren't true at all. One that's brighter and one that's darker. And of those three tonalities, I get to be in charge of two of 'em. I'm in charge of the highlight and the shadow. I'm not in charge of the true tonality. You're in charge of your skin tone. I've got to record it properly, but subjectively, I can't mess aroun...
d with that. I've gotta make you look like you look. But the shadow and the highlight, those are mine. That's my playground. I can do anything I want with the shadows and the highlights. I can make the shadows as dark as I want. I can make the highlight as bright as I want. Does that compute okay? I'm in charge of those two things. And that's when it just gets fun. That's when it gets really, really fun. So, if you think about it, the highlights and shadows have to exist. When da Vinci made that statement about you have to have those other two brightnesses, basically he's saying you have to have he's found a way in 1505 to say you have to have off-camera flash. Your light has to be directional. If the light is not directional, then it's flat. The face is flat. And, clearly, flat is not great. Flat's okay. And if you have to have flash on your camera and you're shooting a wedding reception and that's what you got, then that's what you get. That's fine. But, if it matters and if it's not a found moment but a made moment, take the time and make the photograph with highlights, with shadows, placed in such a way that it's comfortable for you. And for the client. And is appropriate for whatever the use is of the image. And I think that's the key for me is what's the appropriate thing to do for this subject based on how this will be used. If I'm photographing a chef for one of the hotel chains, how I photograph that chef, if it's gonna go on an easel in the lobby of a hotel, how I photograph and light that chef has a lot to do with the feel of the guests walking into the lobby of the hotel. Do I want it to be light and airy? Do I want it to be deep and serious? Does he need to be scowling and look like the chef from you know where on the TV show? Or is it light and fun and airy. This is the place I want to come and have dinner. It's all about mostly how I light it. Let's just see here. Now let's talk real quickly. There is, this is Headly, by the way. Headly. His full name is Headly P. Delwood and he got this name, it's a really funny story. I'll be fast. My first studio was in a shopping mall called Delwood Mall in Midland, Texas. And, so he's Headly because I think Headly's just a funny word and he's a head. And I think everybody should have P for a middle initial. I just think it sounds good. Headly P. Delwood. So that's who this is. Now, on the left over there is one of the four main light patterns that most portrait people are taught. It is a small source as identified by the sharp-edge shadow by the nose, but the name of it, the loop shadow, is basically that. You can see that the shadow makes a little bit of a loop, projected from the nose onto the lip and the cheek. On the right screen is the exact same position of the light, nothing changed except that I put a soft box over the light source to soften it. So, I wanted you to see what it looked like in practice. But it's still the same loop positioning, loop shadow position. Now, one of the most popular light patterns on the face is the Rembrandt light. And everybody talks about the Rembrandt light. And Rembrandt used this a lot. It's also know as the closed loop or modified loop. So if you'll notice the loop shadow on the left screen basically is closed. The shadow goes all the way around and reaches into the other shadow, resulting in a little triangle of light on the cheek. So, then we put that inside a larger soft box, leave the light in the same position and that's what you see on the right. You can still see on the right cheek, the left cheek on the right side of the screen. You can see that little triangle, but it's not as specifically called out or identified as it is on the left side. Now here's what's fun. I have a friend that, he and his wife are traveling right now and they're in Amsterdam. And they went to Rembrandt's studio. And they just did pictures. I thought I put 'em in here, I guess I don't have them in here. They've got these pictures that they just did of themselves in the studio and you can see clearly why he's gotten that directional light because he took these big windows and he basically closed off the lower two-thirds of the window. So the light is coming in at a 45 up pretty high. And it's interesting about most portrait folks learn about 45 degree lighting. da Vinci wrote "In order to have the perfect light quality "for painting, the shadow on the ground of your subject "should be as long as your subject is tall." And that was the way he explained 45 degree lighting. I'm telling you. What a guy. We don't know anything. These guys, these old painters, these guys were so talented. So talented. John Singer Sargent, look at some of the work that Sargent did. Look at Caravaggio. If you study these great artists, these great painters, you will see things you won't believe. There's so much great work that was being done in those days. And, it's all out there for us to study and look at it. I've got a great friend in Dallas named David Edmonson who is recreating all of these fabulous, fabulous masterpiece images by great artists. I was fortunate to be used as a model in one of these recent studies of his and it's just a remarkable thing what's he's doing, the recreation that he's doing. And it's just great. So, next from the Rembrandt is the split shadow. The split light. And this is a light that's exactly as it sounds. It is lighting half of the face basically with the light and then you can fill in the shadow to suit your own taste with a reflector or however you wish to do that. It's not a light that you use a lot or will use a lot, but occasionally, there's just the right subject. There's a portrait of Tom Cruise on a People Magazine cover a while back that was split, that they used split lighting and it was absolutely perfect. It was not just perfect, but it was absolutely appropriate for that cover shot. And, it just fit great with what he was wearing, with the scenario, the background, the mood, the feel, and it was perfect. And I thought, now there's a good use for split lighting. So, it's something to keep in your, in the back of your mind, keep it in your tool bag, if you will. And, finally, the one that also is very, very popular and important and this is where the fashion glamour guys use this type of light all the time and it's known as the butterfly light or paramount light. And if you'll notice, on the left screen, where it's sharp, where the shadow's sharp, look how sharp the shadow is under the chin and onto the neck. And then look at the shadow under the nose and it gets it name because that shadow sort of resembles butterfly wings. A little wing of a butterfly, so it's called a butterfly light. And it's a really good light for a few things. It's really good at smoothing out the texture in the skin. It's really good for introducing cheek bones. If you've got someone with really great cheek bones, this is the right choice of lighting for you because you'll really enhance the cheek bones 'cause the light will kiss the tops of the rounded cheeks and then fall into the shadow just below and that adds additional dimension without you having to do anything. So it's kind of a nice way to look. The one on the right is the same thing, but it's just softened inside a two-by-three soft box that's fairly close to the head. To Headly. But look how much softer the shadow is under the nose and under the chin and yet it's in the same position. The butterfly and paramount light is best utilized when the light is directly above the nose at a 45 degree. Sometimes, some people say well, you have to have it right at camera. Not necessarily at camera because you might have your subject's face turned away from camera. So it's more not so much with the camera but to the nose. Just find the nose and if you put the light up at a coming down above their nose, you got yourself a pretty decent light. Okay? Any questions about that? They're not hard, fast rules that you have to live and die by. But they are a great foundation, they're a great place to start, and it's good to know this information and put in your back pocket. Because it really will, you know that that Rembrandt light, for example, that kind of depth, form, shape, texture, dimension is all brought forth with that light. And that's why it's still used and that's why Rembrandt did it so often. The Dutch masters basically didn't use large, soft, mushy light. They used hard, cutting edge, traditionally smaller source of light. And so their paintings from all the Dutch masters is a lot more contrasty looking work as a result. Now, I don't know if it's right or if it's wrong, I'm just saying what it is. You'll have to find what you know and what you like. Everybody I know loves Vermeer's Girl with a Pearl Earring. It's such a beautiful portrait. Do ya'll know this piece of work? It's a beautiful painting. And it's a pretty soft light quality. And so photographers all over the country have reproduced that. I mean, I know 10 photographers that have shot that and it looks just like the original. They really copy that one.
Class Materials
Bonus Materials with Purchase
Ratings and Reviews
Stefan Legacy
Bought this class on sale for 19$ and it was a great buy considering it was my first class I purchased on CL. Tony is an excellent teacher and demonstrates extensive knowledge on lighting and different uses of modifiers. Overall this is an excellent course for any one who is interested in learning studio lighting, this will give you a great detail of information.
a Creativelive Student
Important information if you want to be a photographer. Great teacher, good pace!!
a Creativelive Student
This is my first time watching Tony Corbell teach and work he was great! I am a natural light photographer and this class made me think about picking up some lights and umbrellas! You can tell he absolutely loves what he does. Thank you for sharing your knowledge!