Shoot to Incorporate a Fresnel Light
Lesson 30 from: Light Shaping Tools for Professional PhotographersTony Corbell
Shoot to Incorporate a Fresnel Light
Lesson 30 from: Light Shaping Tools for Professional PhotographersTony Corbell
Lessons
Class Introduction
05:22 2Categories of Light Shaping Tools
07:59 3When to Use Different Light
10:50 4Softbox and Octabox Overview
25:55 5Beauty Dish, Reflectors & Collapsible Reflectors Overview
27:55 6Pros & Cons of Small Light Sources
08:10 7Shoot using One Reflector
12:24 8Shooting with Two Standard Reflectors
08:53Shoot Using Grids with Reflectors
14:37 10How to Use Beauty Dishes
28:24 11Pros & Cons of Softboxes
12:30 12Common Uses of Softboxes
21:24 13Subtle Elements of Controlling Softboxes
20:33 14Different Techniques with Softboxes
29:32 15Pros & Cons of Umbrellas
07:25 16How to Control an Umbrella
12:25 17Uses of Umbrellas
08:27 18Different Techniques with Umbrellas
19:55 19Group Shot with Umbrellas
19:37 20Differences Between Collapsible Reflectors
25:36 21Shooting with Black & White Collapsible Reflectors
15:07 22Shooting with Silver & Gold Collapsible Reflectors
13:49 23When to Use the White Translucent Collapsible Reflector
33:18 24How to Use the Large Octa Softbox
20:50 25Shooting with a Large White Deep XL Umbrella
18:59 26Shooting with a Large Silver Deep L Umbrella
07:19 27Shooting with a 4x6 Softbox
17:05 28When to Use Specialty Light Shaping
04:40 29Shooting with a Hard Box
15:29 30Shoot to Incorporate a Fresnel Light
09:32 31Shoot Using Ring Flash
10:23 32Studio Lighting Photo Critique of Student Work
1:05:41Lesson Info
Shoot to Incorporate a Fresnel Light
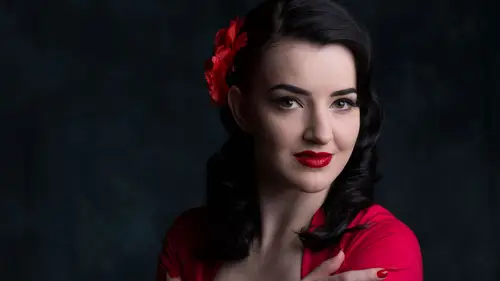
Let's go ahead and swap that out and let's put the Fresnel up. You know the Fresnel, the Fresnel is, it's a pretty useful light for a lot of things. It's great for creating that old Hollywood look, it's great for, you can sharpen and soften it usually by zooming the head in and out, or some of 'em will have a rotating dial so you can dial in the sharpness or dial out the sharpness with the Fresnel. The one that, this one, this particular one, they make two, this is a larger one. This one doesn't have a controllable focus, but the head moves in and out and that changes the relative focus. So, that's kinda cool. Let me let you sit right here, and I'm gonna keep you up here kinda close to this background for now. (person speaking away from microphone) What, what? (person speaking away from microphone) (laughing) Anyway, right now the head is in all the way, and you can see it's kinda flooded out. Hang on one second. Can we turn off these two lights on my left up there? (laughing) Yeah...
, like that. Come on, can you guys be quicker than that? Now we can see the shadows a little better. Now, show 'em again. Flooded. So, there's flooded. And there's focused. And all I'm doing that is just by sliding the head closer or away from the lens in there. And we're gonna shoot both. I'm gonna turn this light off for a second so you can look at the front and see it's a big Fresnel lens like you would have on a lighthouse. They go a long way. A Fresnel, I can throw Fresnel from here. If I've got a model against that far back wall, I can light 'em from back here with a Fresnel. It sends light. This'll be, we'll have to power down this power pack 'cause the Fresnel focuses that light. And it sends light a long way. Yeah, I think read F45 when we tested this. Yeah, but they're just great sources and they're fun because they do things that you can't do any other way. They literally focus the light. So, it's really kind of a neat thing to do. Okay, you ready? Yeah, work the power down a bit. Let me dump it first. 16 and a half. 16 and a half, okay. So, you are pushed in about half way now, or? Halfway, I'm half flooded. Okay, so, let me back up a little bit. and you were 16 and change? 16.6. Okay, that's pretty much F20, to me. Good, right there. This thing, I'm interested in seeing what the shadow looks like at this position with the head. Okay, so it's a little bit soft. She looks not very happy. I wouldn't be very happy either if I had to sit in here with all these knuckleheads all day long. (laughing) Look right up here, dear, right there, good. Good, good, good. Okay, so now let's just mess around with the head. And let's just move it forward. Let's flood it, and then we'll back it up and hit it with a spot. So, right here it is flooded, and you'll notice a little bit of difference on this one. Good, set your eyes right here, good. Good, I'm a do one more just because, good. How's the exposure on that? I'm sorry? How's the exposure on that? First one was great. So, we lost, did we lose a little? Nah, it's not finished rendering. There we go. Yeah, it's fine, yeah. So, if we look at the difference on the shadow from this one to this one, it's just a little difference in the shadow edge. Here, it's just a little bit sharper. The umbra and the penumbra. The umbra and the penumbra. Okay, so now pull it back and let's zoom it all the way, and let's take a look at it. And it shouldn't really affect the exposure because it seems like it's still gathering the same amount of light and sending the same light through the Fresnel. There you go. You got it right on her face this time? There we go, good. Totally different look this time. And, again, as you're being able to zoom this in and out, you can see that it just changes the effectiveness of, look at her eyes even. It's such a pinpoint source when it's zoomed this far. And then, as we back up, in fact, let's move her away from the background. Let's move you, let me back up here. There you go, right about like that. And now, let's move you back about that same distance. There you go, there you go. And so, go ahead and turn it toward your left a bit, John. Right there. So, look at the background, and you can see the light back there in the back. Good. Now, watch this, now let's barn door the bottom up. Up, up, up, up, up, up, up, up, up, up, up, up, up, up, up, there you go. And the top down just a little bit. There you go, that's good, go back up a little bit. That's it, that's it. In fact, let me do that. That may be too much on the bottom up, sorry. Pull down a bit, that's it, okay. Good, good, good, good. Again, all I'm trying to show you is that we have the ability to put that light right where we want it. And, as we do that, it sometimes gets a little subtle, but you can sort of start to see that you can, it's almost like sculpting with light. You can kind of sculpt the light. And it's pretty cool. Go ahead and close this side, this barn door on this side. Yeah, you might get on the inside. There you go. Sorry about that. No, I was staring at it too long. (laughing) It is hard to look at. And go ahead and close the other side, too. Let's just pinch it off a little bit more. All I'm doing is just pinching, I'm just pinching down the light. I'm just gonna try to light the mask of the face. And it's really difficult to do with any other kind of light source. You can do it, but, boy, it's a challenge and requires a lot of testing. Okay, here we go, good, good, good, woohoo. Go ahead and push that one up a little bit, that's it, right there, good, right there, nice. So, if you'll notice, this is the kinda light source that you would wanna do like one of the Hollywood glamour shots with. If you notice, see their eyelashes, you can start to see we can get shadows from these eyelashes straight down. So, all we would need to do is take this light source, tip it down, take it higher, and make it a lot more dramatic, and, boy, you're creating Hollywood glamour, you know. Maybe a little bit further even. Further down? Yeah, yeah, yeah, yeah, yeah. And then, we'll go even higher. And, when you do this, of course, you're gonna lose catch lights sometimes, and that's okay. If it's a specialty shot and it's a dramatic thing, you can probably get away with it. Can add 'em in in retouchings. They did in Hollywood. You can add 'em in in retouching. There you go, and now push it forward about a foot. Let me lock it down first. More, more, more, more, more, more, more, more. There you go. And now just give it a spin around. There you go. Do this for me, kiddo, let's turn your shoulders that way and bring your head back around, and let your eyes come over here. And then, close your eyes for just one second. That's not gonna work, go ahead and open your eyes, but I want you looking like right in here, yeah, here we go, so I can see your eyelashes. There we go. There was a great, great Hollywood glamour photographer named George Hurrell, and some of you know the name, and some of you have done some research on him. Man, he was good at this stuff, gol-ly, and he had a daughter that he raised to be one of the country's leading retouch artists. And they used to etch black and white negatives, meaning they would remove emulsion with a razor blade in certain areas of the image to get porcelain skin. It was called etching. It was great, what they did. Yeah, so here we've got that, we're kinda creating those shadows from the eyelashes. So, it's a fun look. It's just something, it's just another tool. It's kind of a specialty tool, and something that has, you know, go through and look through some of the catalogs, Google it, go to YouTube and find some videos about it, but you'll see people doing really unusual things with the Fresnel. And certainly a lot of commercial guys use them, Fresnels. And the ones with the movable focus, you can really focus down. Like, I can have a product being photographed and the shadow back there, with a perfect hard edge shadow. Yeah, those are called ellipsoidal spots. They're similar to the light you'd use in a theater, and the lenses move back and forth to focus. And they also can drop gobos into 'em. So, like the one I have, I think, is a 50-inch circle at 10 feet. If I need something smaller, I can drop in a cookie that's a smaller circle, or you can put shapes into 'em. You can project window shapes and things like that on a background-- There's all sorts of gobo sets, they call 'em gobo sets-- They also call 'em cookies, or cucoloris- cookies, yeah. So, you can put patterns in it so it looks like light coming through trees and things like that. Excellent.
Class Materials
Bonus Materials with Purchase
Ratings and Reviews
Stefan Legacy
Bought this class on sale for 19$ and it was a great buy considering it was my first class I purchased on CL. Tony is an excellent teacher and demonstrates extensive knowledge on lighting and different uses of modifiers. Overall this is an excellent course for any one who is interested in learning studio lighting, this will give you a great detail of information.
a Creativelive Student
Important information if you want to be a photographer. Great teacher, good pace!!
a Creativelive Student
This is my first time watching Tony Corbell teach and work he was great! I am a natural light photographer and this class made me think about picking up some lights and umbrellas! You can tell he absolutely loves what he does. Thank you for sharing your knowledge!