Beauty Dish, Reflectors & Collapsible Reflectors Overview
Lesson 5 from: Light Shaping Tools for Professional PhotographersTony Corbell
Beauty Dish, Reflectors & Collapsible Reflectors Overview
Lesson 5 from: Light Shaping Tools for Professional PhotographersTony Corbell
Lesson Info
5. Beauty Dish, Reflectors & Collapsible Reflectors Overview
Lessons
Class Introduction
05:22 2Categories of Light Shaping Tools
07:59 3When to Use Different Light
10:50 4Softbox and Octabox Overview
25:55 5Beauty Dish, Reflectors & Collapsible Reflectors Overview
27:55 6Pros & Cons of Small Light Sources
08:10 7Shoot using One Reflector
12:24 8Shooting with Two Standard Reflectors
08:53Shoot Using Grids with Reflectors
14:37 10How to Use Beauty Dishes
28:24 11Pros & Cons of Softboxes
12:30 12Common Uses of Softboxes
21:24 13Subtle Elements of Controlling Softboxes
20:33 14Different Techniques with Softboxes
29:32 15Pros & Cons of Umbrellas
07:25 16How to Control an Umbrella
12:25 17Uses of Umbrellas
08:27 18Different Techniques with Umbrellas
19:55 19Group Shot with Umbrellas
19:37 20Differences Between Collapsible Reflectors
25:36 21Shooting with Black & White Collapsible Reflectors
15:07 22Shooting with Silver & Gold Collapsible Reflectors
13:49 23When to Use the White Translucent Collapsible Reflector
33:18 24How to Use the Large Octa Softbox
20:50 25Shooting with a Large White Deep XL Umbrella
18:59 26Shooting with a Large Silver Deep L Umbrella
07:19 27Shooting with a 4x6 Softbox
17:05 28When to Use Specialty Light Shaping
04:40 29Shooting with a Hard Box
15:29 30Shoot to Incorporate a Fresnel Light
09:32 31Shoot Using Ring Flash
10:23 32Studio Lighting Photo Critique of Student Work
1:05:41Lesson Info
Beauty Dish, Reflectors & Collapsible Reflectors Overview
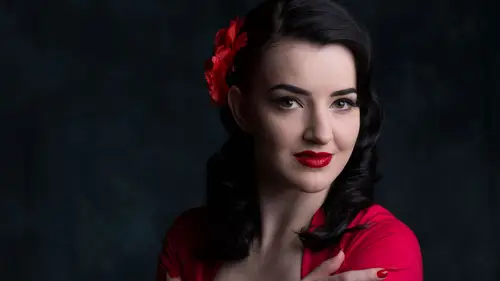
Now the beauty dish, let's talk about that. I think you are doing a lot of beauty dish work these days. Beauty dishes are fantastic if used within three or four feet of a really pretty face. You get a really average-looking guy, and you're using a beauty dish from five or six feet away, it's pretty ugly. Sorry to be the one to break it to ya. Beauty dish does not make everybody beautiful. That's not where the name comes from. Beauty dish is meant for beautiful people. If you've got a great face and great skin, a beauty dish is your best friend. And man you can create magic with a beauty dish. They are all different, but they are basically, they're all different sizes, but they're all basically the same shape, and there is a deflector in front, so there's a strobe tube that you can't see because of the angle of this, but inside there is a flash tube that when it fires, it comes out of that tube and it hits that deflector, which then bounces the light back into the round parabolic, the p...
arabola, of the beauty dish, and then it comes channeling out forward outta there, after it's mixed in this round thing, then it comes forward. And it is a cool light. But what's great about it, well I think what's great about it, is the thing that, what I find that most need to know is that there is a sweet spot where it works. So when I'm shooting, and I'm lining it up, if I'm photographing Carol, I've gotten this, I'm moving this beauty dish up and around, and I'm just watching her face and it's like, oh, oh, oh, right there. Bam, and tighten down the light stand right there 'cause that's the sweet spot. And everybody's got a different sweet spot. Some people have deep-set eyes, some people have a big nose, some people have small eyes, some people have different facial features where that sweet spot's gonna be a little bit different from person to person. So you kind of have to have your modeling light on. You have to be able to move it around until you can find that exact spot, and you'll know it when you see it. And you'll see what I'm talking about later. We'll do it. 'Cause when you hit it, oh, is it great. It's really great. But at close range it's really great. At far range, eh, it's another light. It's nothing spectacular, but up close it is spectacular. I think anyway. Tony, what's your take on putting a diffuser on front of a-- On a beauty dish? Beauty dish, yeah. Well, I'll tell you this, I do use, I use the hard grid on the beauty dish quite a bit. They have an available optional grid. I use that on it quite a bit. The sock, they call it the sock, the sock diffuser, usually with elastic that just stretches out over the front of the beauty dish. I think putting the sock over the beauty dish I lose the benefit of the beauty dish. I think I've become, I think it then becomes a round, soft, diffused source. It's not the same like quality that I get that's produced with the dish itself. I just think it's a different look. Not bad at all, but different, and I lose the uniqueness of the beauty dish. So, it usually comes free with the beauty dish, and so use it, try it, test it, and you might like it. And for some clients it might be the right thing. There are some specular highlight situations where the optimum highlight that you see might be around diffused source. It might be great for that. You know. But I have a real love for the beauty dish like it is. Especially, in like I say, in really, really close. So this is an example of the beauty dish with a grid on it. So you can see the light fall off toward her hands and toward the top of her hat and the top of the frame. That's because the grid is keeping that light from spreading and spilling anywhere. Now I can do all that in post-production. I can do all that in Photoshop and Lightroom, but why should I? If I can do it on-camera, I'm gonna do it on-camera. And that's what we talked about last night, right, Scott? Scott, right? Yep. That's what we talked about last night is I've gotta make sure that anything that I can do in front of my camera at the time of capture, that I can fix and do at that time, I'm gonna do it at that time. As opposed to trying to do it later in post. I can minimize my time, if I'm in post-production with any image more than two or three minutes at the most, I'm in trouble. 'Cause it means I screwed something up. So I try to fix everything I can before I ever pull the trigger. And that includes especially, it includes silly little subtle things like the stray hair. I'm gonna reach over and fix that little stray hair right there over you left eyebrow and just gonna, I gotta fix it because to fix it later, it's twenty minutes. It's a minute and a half to reach over there and fix it. Fix it! Fix the hair. Because if you don't, you're gonna go bam, oh I should have fixed that. And that's okay, oh turn your head this way, that's a nice smile, bam. That's pretty, I should have fixed the hair. Turn your head just a little, bam. And this little voice in your head's going, fix the hair, fix the hair. And you're not fixing it. So then when you get home, you move the files over, and you open it up and go, golly, I should have fixed the hair. Yeah, you should have fixed the hair. Fix it. Oh, I'd turn the necklace, you should have turned the necklace. There's a catch showing. Turn the necklace! All of that stuff. Color balance, exposure, don't miss your exposures. We'll talk about that in a minute. Don't miss the exposures. Don't miss your color. All that's easy to fix. I think Photoshop and Lightroom, I think any post-production editing should be defined as enhancing a really good picture. Not saving a really bad one. That's my take. Let's don't use it to fix bad things. Let's improve good things. But then again, I'm a very positive guy. (laughing) Beauty dish, beauty dish, beauty dish. Little Kaitlyn, Miss. Kaitlyn. About four feet away on that one of Kaitlyn, and a little bit directional. The big stuff, there's big stuff that we have control over too. And the large tools are out there. And some of you don't know anything about 'em, some of you would never use 'em, but there's some great tools that are big. This monster reflector, this thing is a monster beast that you attach your light to, and you have the ability to control the distance from your light to the center of this beast. And you can move it in and out and focus and de-focus that light as it reflects in there and comes forward out. The quality that you get from these kinda big, big sources is really phenomenal. They are very expensive. You can rent 'em, most rental houses have them. But what happens is they've got this whole family of these big, giant reflectors and there are all kinds of 'em. There's 15-footers, there's 10-foot ones, there's six-foot ones, there's five-foot ones. In this picture they all look and all do the same thing. And the light is reflectively bouncing in there and coming out. And what's good about it is, if I shoot a full-length fashion shot with that large one, that big one in the back row, if I did a full-length fashion shot, it is so big, and sends light so nicely, that if I was on a gray sweep, you would barely see a shadow from the model onto the ground. You would just barely even see it. And the light quality in her face would be spectacular. And that's what it's designed to do. Light big areas beautifully. There are nice, nice sources. We'll dig into those a little bit, but they're controllable, and you can see there at the position, it's not illuminating the entire center area, but just one segment of it. So as you test those and work with those, listen, these things rent for pretty reasonable. They're not very expensive, and at most rental houses, certainly the local ones here in Seattle, you can walk in there and rent something on a Friday for a one-day rental fee and take it back on Monday, and get to use it for the whole weekend. So, they know that. They know you're going to do it. So everything's out on the weekends, always. So reserve something early and get some rental stuff and do some testing. But they're pretty handy to have and they do some nice things. Now, we also have to talk about these hard reflectors. And this is gonna be the first thing we shoot with when we come back after our break. The hard reflectors are sometimes looked upon as the one that's overlooked. And what I mean by that is that the standard reflectors, here's one that's called the Magnum, which is a hard reflector head, and it's about that big around. And the Magnum's a great source for a lot of things. It's not a good catch-all for everything. The small, standard reflector heads that's around seven, eight inches around, those are really good for some things. They're really good. We're gonna talk about those, and we're gonna talk about the ability that we have to focus and de-focus our light. And increase or decrease the spread of those lights based on how we mount them on the Profoto heads. There is different degrees of coverage that are marked in clearly and there's a delineation of markings so you can see exactly, you want a 20-degree spread or a 100-degree spread? So you can adjust all of that. I think the beauty dish falls into the realm of a hard reflector. It's a hard source and there's a light reflecting into it and out of it. So I think it's great. Grids, small grids that plug into these little round lights, listen, all of this stuff, these things have a right to exist. They do great stuff, and we're gonna explore them quite a bit, in depth. Barn doors, little barn doors. Here's a better barn door shot. It's almost laughable in today's world. The new upcoming photographers would never use barn doors. Really? Well, let me tell you what they do. If you're on the beach, you're photographing a family of four and you've got that little reflector on the beach, that bottom barn door, you can feather that light off of the sand so you don't have to retouch and clone out all the stinkin' sand because you overlit it on their feet. Right? I can also keep that light from hitting the background by closing down the one on top. Just bending down that barn door. Or the one on the sides, I can open it up a little bit to make sure I don't miss the dog on the right side of the frame. I've got these controls that basically can vignette my light wherever I don't need it. If you think about it, I love blocking off light from where I don't need it because most people don't take the time to do that, they'll take the time to do it in post-production. I would rather do it at the time of the shooting. So I'll obviously I've preached that heavily and you guys have gotten that message. But there are times when you can't. And there are times when you have to use a gradient tool or a selective adjustment brush or whatever to paint in the effect that you need there. But man if I can do it at the head, I'm gonna do it. And this gives me the ability to do that with these kind of barn doors. I just think they're very, very helpful. And then I want to talk a little bit about these guys, these collapsible reflectors. These things, nobody ever talks about these reflectors. White, silver, gold, translucent, nobody ever talks about 'em. Everybody gets these, you buy the five-and-one, the six-and-ones, the seven-and-ones, the eight-and-ones for however you get yours or whatever brand. The ones I use are from Profoto because of the handles. They've got the best handles. And these things, you can hold 'em and really do some things with 'em. Everybody uses white reflectors. But we gotta learn that there's a great way to use 'em and a right way to use 'em, and then there's a wrong way to use 'em. Reflectors, a white reflector specifically, when used properly, it's not just an important tool, it's almost an invaluable tool. There's the white reflector with the handles. Now, one of the things that I've learned to use also, let me back this up. Silver, I don't like silver very much, very often on a face. I think it's a little bit too specular, I think it's a little bit too bright. And so I try to, I tend to stay away from it. But I do know that silver is really helpful for me in the hair, shoulders, arms, waist, hips, legs. I can separate my subject from the background if I'm behind the subject, edge lighting them with some silver. I find that that's very, very helpful. And the same with gold. If I put a little bit of gold, I can put a little hit of gold in the hair, and it almost looks like the sun is kissing their hair from through the trees in the background or something. The black, let's talk about the black. Nobody ever talks about subtractive lighting. Subtractive lighting, taking light away from where I don't need it, it almost goes back to the first joke I was ever told. How do you carve an elephant out of a giant piece of marble? Well, you get yourself a marble, you get yourself a chisel and a hammer, and you chip away everything that doesn't look like an elephant. That was the joke, was yeah, that was the funny part. (laughing) Well, with a black panel, with a black gobo, a black absorber, a black cutter some people call it, it takes light away from where I don't need it. Now that doesn't sound like it's very important in the overall scheme of things. It's enormously important in the overall scheme of things. And we'll talk about why, and I'll illustrate that this afternoon, or yeah I guess I'll illustrate that tomorrow. But it's really good. And then, and now let's talk about the other one, the last one that we haven't talked about yet. And that is the translucent. The diffuser. The what we call the transmission light tool. Meaning light has to go through it. If I can send light, think about, think about light on a bright sunny day. It's direct sunlight, Seattle, Washington. It's not raining. It's gonna be 82 degrees here today, by the way. If I photograph, let's say I'm photographing Jean, I've got myself a bright sunny day, basic daylight exposure, ISO 100, 125 f/16 kind of day. Right? But the light on her's pretty harsh from the sun. That shadow edge is pretty sharp, she's squinting because it's so bright. She's got a shiny spot on the tip of her nose, her chin is shiny, it's just not great. So we pop in one of those pop-up diffusers with translucent fabric, it's a 1 1/2 stop fabric that I use. 1 1/2 stop. So I place that between the sun and her face, right? Did I change the quality of the light on her face? You bet. What happened to it? Softer, it got softer. The highlight got softer, because it got bigger. The shadow edge certainly became softer. What about the quantity of light? Did I knock off the quantity of light? I knocked off a stop and a half, whatever the density is of the fabric, I lost a stop and a half of density, right? Okay, so now what just happened to my background? No the opposite. It just got lighter. It just got brighter by a stop and a half. Because as she lost light on her face, I open up my aperture for the loss on her, the background just shifted brighter. Right? So I just shifted the key of the photograph up. With the white reflector, if she's kinda backlit a little bit and I add the reflector into her face, I'm adding light to her face, closing down, and then my background will get darker. If I can control the key of my photograph based on what I do with my subject's face. Now with the translucent, let me show you one little trick. And this is kind of showing off a little bit. But there is the diffuser fabric. There's the way the handle looks. The good news about this, everybody always whines about these, but it's always windy here. Where I live, it's windy. Really, I've lived 25 years in San Diego on the beach, I know wind. So I know everybody's like, well an assistant can't hold on very well. Well, with these handles, they can hold on. And then when the wind takes them away, they can hold on and they won't fall. So, you know, you got that going for ya. Really, that's it, that's all I get? (laughing) Fine. Okay, so here's my picture. I got a nice, soft light, directional light, beautiful girl. I've got a little bit of light on the background. You can see a little highlight in her hair over on the left. See that nice little soft highlight? All of that was done with one light and one pop-up translucent diffuser. And here's the way I look. Here's the setup. There's my drawing. You see the light going through the panel that way. If I use a panel instead of a soft box, I have the ability to not only control the distance from the light to the fabric, but I can also control any spill going over the top of the panel or past the panel on one side or the other side. So here's what I'll do. In this picture here, all I did was I took my light, watch this, ready for it, and I pivoted. And when I turned it one way, now my light's going past it hitting the background and about half that light's going through and those dotted lines represent diffused light coming through the panel, lighting her face. Then there's also direct light going past the top of it and up high is a silver reflector bouncing back into her hair. So that one light because of that one little pop-up diffuser, now looks like three lights. Right, it's my background light, it's my main light, and it's my hair light. All at once. That's what I'm talking about when I talk about it's not the tools. It's the knowledge and understanding of the use of the tools that matter. That's why it matters. That's why we have to take time to test. That's why we have to work out these details and we gotta work out this kind of information. Make sense? Kind of? Okay, let's take some questions. Well, Tony, first of all, as we said earlier, it's always a pleasure to have you here on CreativeLive. We have a lot of Tony Corbell fans that are tuning in. Oh, good, good. Of course, and the way that you break down things and just the philosophy added behind getting into this foundation of what light is and what we're really doing is really, really awesome and appreciated. Good. By folks at home so. Good. Thank you for laying that foundation. Sure. The exciting thing is that we're gonna see so many, all of these things come to life in action as the class continues. So do you guys have any questions in the studio audience? Have a great one, think about it, let me know. A great one that had come in as we just got started from Chris Benacci who said, Tony, can you talk a little bit about visualization and what part, if it does, plays in your process? To elaborate, when you first see a subject, do you visualize and have a photo in mind before you start selecting the lights, the backdrop, all of that? I don't think before, I don't think I do before I start shooting but I do think that I do sort of sum up people pretty quickly. And I do know that there are certain faces, Christina, you've got such a great face for a butterfly light. You've got, your cheek bones are fabulous. And anybody that lights you any other way should be shot. Because your face is just gonna come to life. And you know, Julio's over here nodding. It is. And that's, and I, and you know that. It's like, I'm not sure what happened to this wonderful thick head of hair I've had all my life, but it's getting a little thinner and thinner and thinner on top. I'm the last guy you wanna put a hair light on. Why draw attention to that? So I don't want to choose a hair light for a guy that doesn't have a lot of hair. I think you have to use a lot of common sense. But I do think you have to do a little bit of a facial analysis, and look at someone's face and say okay, so their nose is kinda going this direction so I'm gonna light 'em, you want to light into the problem area not against it. And you start thinking through the challenges and what's gonna look great. And I think that's the way to do it. I don't have any preconceived notions. I learned that from a wonderful editorial guy named Jay Maisel in New York. Jay said, you know what, once I've got the job and once the client's hired me for this specific thing, he said, I try to go out empty. So I'm open to anything that comes in. And I think that I have a lot of tools at my disposal. You know when I go onto a set, I've got all my lighting tools, I've got all my gear, I've got all this knowledge, and I've got all these tools in my back pocket, okay, now here's the job, okay. Well, I'm gonna need this one, and I need that, and I need two of those, and I need that. Now I can go to work. But I can't really do that until I'm there. Until I've talked to the client, I see how it's gonna be used. What is the message that we're trying to send with this picture? Or is it a portrait of this wonderful couple and their baby on their wall? Then it's gotta have staying power and you don't want to make it too catchy, you don't want to make it too trendy. It needs to have a life span that doesn't look dated. So there's those considerations. And lighting that falls right into that too. So you have to really think it through a little bit and talk to your client. You have to do everything, you know? You have to shoot everything, and you have to understand how all this fits. Because I don't know what you're gonna do. If you're just gonna shoot cars, that's different. But most of us have to shoot other things, you know. So I'll tell you one thing, all my students at my week-long courses, I always go to their websites and look at their galleries. I always look at their pictures. And it freaks them out when I say, I looked at your gallery last night. And they're all like, I wanted to change those out. I know, there's nobody I know that doesn't want to update their website today. Everybody needs to update their website today. None of you did it yesterday. But everybody needs to update it today 'cause they've got pictures they really want to get rid of. Right? Here's what I would caution you. Don't do this one thing. Don't say, the creative works of Bob, and then have specializing in babies, families, children, head shots, executives, location, architectural, passport pictures. Don't give me 20 different genres that you excel at. Experts in creative genius at the following. No you're not. Pick one. Pick two. Pick three, but don't show me eight. And don't tell me how creative you are and put a baby in another white wicker basket. Can we have enough with the white wicker basket babies? We're done with that. Let's move on away from babies in a white wicker basket. Sorry I don't like white wicker baskets. (laughs) I'm just like, ah, that's enough. It's a little cheesy for me. But if that's what your clients want, and that's what you wanna shoot, then by all means, deliver all day long. Okay, any other questions? Well that's really great, the way you just laid that out in terms of what everyone at home is here is to have know that they're going to walk in and have that blank canvas, but you have mastered over the years, all those tools in your tool kit so you know what to analyze when you walk in the door and all those little-- Well you just can't get fooled. Things that you're gonna use. You don't wanna get fooled. But you don't know that when you're new, and you walk in and you're like, uh, wait, what am I looking for? What do I even have? What I wanted to point out to folks at home before we do go to the break is that you do have a series of bonus materials that are included in the class when you do purchase the class and one of them that I just was looking at and had pulled up is your corrective lighting techniques for portraiture where you actually go through, it's a PDF, and Tony goes through and says, okay, if you have a client that has a narrow chin, here's what you do. You tilt the chin upward, you face directly towards the lens, and lower the main light, and lower the camera. A narrow chin, baldness, angular nose, you know, all of these things, where you can just have that printed out so you know as you're getting into this. Tape it on the wall in your studio. Exactly. What to analyze and what to look for because when you're new, or even if you've been doing it for a long time and you walk in and you're like, okay I see that light on you that way but what am I really looking at, so fantastic bonus materials that are part of this class, Tony. Good, thanks. Any other final questions. We have a ton of questions but they're kind of specific to things that we're going to be covering as we continue the class. But go ahead. Sure. I hear that you travel a lot for your work so I'm curious if you take all of your equipment with you or if you rent in the location you're going to. Great question. I try to take most of my gear any time I go. I've learned rarely do I get a spur-of-the-minute job. It's usually scheduled out a little bit. Which means by the time you pay excess baggage on extra bags of gear, it basically comes out to be the same thing that you would pay to put it on FedEx. So FedEx or UPS, whichever you prefer, but those people at least are a little bit nicer and kinder and sweeter to your camera gear, your lighting gear, not your cameras, but your lighting gear especially than the gorillas at the airport. The gorillas at the airport have a rule in life. Let's try to break something today. And they usually do. I can't say enough about quality insurance. I'm a very proud member of an association called Professional Photographers of America, PP of A. With your membership, you receive, at no charge, $15,000 in equipment insurance. It just comes with it, it's great. So I think the insurance is important. I think you can't skimp on low-end camera bags and cases. Spend some money if you're going to travel a lot and take your gear with you and put your stuff in good quality cases that are well-padded and well cared for. And that goes a long way. Now, having said that, there are some shoots, if I'm going to a major city, if I'm shooting in L.A. or New York or Chicago or San Francisco, I know every dealer in the country that has a rental department. And I know which ones are really great. Seattle up here, you've got one of the best resellers in the world up here with probably the best rental housing in Glazer's photo up here, Glazer's Camera. These guys have everything, and in big quantity. And they rent it out all the time. They're pros at renting out gear. I probably could come to Seattle without bringing anything except my camera because it's all right here. And rental stuff is not very expensive. You can save a lot of money by renting when you travel and shoot. So you wanna be very specific and have a very specific list of what you need, but it's pretty good to be able to rent. Whenever you can. But there's some smaller cities, Toledo, Ohio, I'm not gonna be able to rent much. You know, so I gotta take it with me.
Class Materials
Bonus Materials with Purchase
Ratings and Reviews
Stefan Legacy
Bought this class on sale for 19$ and it was a great buy considering it was my first class I purchased on CL. Tony is an excellent teacher and demonstrates extensive knowledge on lighting and different uses of modifiers. Overall this is an excellent course for any one who is interested in learning studio lighting, this will give you a great detail of information.
a Creativelive Student
Important information if you want to be a photographer. Great teacher, good pace!!
a Creativelive Student
This is my first time watching Tony Corbell teach and work he was great! I am a natural light photographer and this class made me think about picking up some lights and umbrellas! You can tell he absolutely loves what he does. Thank you for sharing your knowledge!