Lessons
Class Introduction: What is Light Painting?
06:02 2Camera Considerations
29:54 3Camera Settings and Initial Exposures
22:09 4Light Painting Accessories
09:29 5The Color of Light
10:40 6Focusing in the Dark
24:38 7Light Painting Techniques
28:30 8Light Painting Techniques: On Location
24:42Lightroom: Basic Panel
29:29 10Lightroom: Presence Panel Adjustments
10:39 11Lightroom: Hue, Saturation, Luminance
07:47 12Lightroom: Local Adjustments
27:53 13From Lightroom to Photoshop
18:14 14Photoshop: Lighten Blending Mode
07:00 15Photoshop: Star Stacking
05:39 16Photoshop: Layer Opacity
05:50 17Photoshop: Selection and Masks
13:33 18Photoshop: Mask Adjustments
09:48 19What You Get With This Class
01:12Lesson Info
Class Introduction: What is Light Painting?
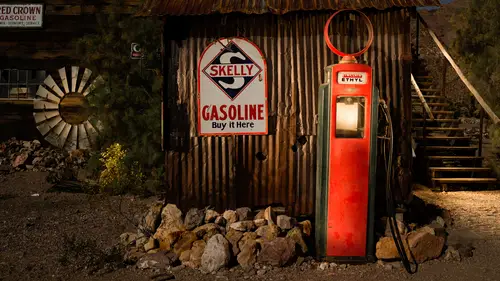
My name's Tim Cooper, I'm from National Parks at Night, and if you've been watching night photography week here at Creative Live, you've seen my friends go through their awesome night photography practices, and I'm here tonight to tell you about light painting. What we're gonna cover today is why you wanna light paint, how you're gonna light paint, we're gonna talk about things like photographing in the dark, setting up your camera, proper camera considerations, beam angle, beam width, flashlights everything from A to Z, ending, of course, with one of the most important parts, which is processing your images after the fact in both Lightroom and Photoshop. So, first question is what is light painting. What is light painting all about? Well, light painting in short, really you guys, is just taking a dark scene and adding light. So in a photograph like this, it was absolutely 100% pitch black, no light at all. So the only light that was brought to this scene was by me and my flashlight, a...
nd of course the stars. So what we're gonna do is we're gonna start off with a night scene, completely dark, could be outside, could be indoors, could be your bathroom, could be a national park, could be a garden. And come up with our initial ambient exposure and then simply learn how to add in light to the photograph. Light painting is, I think it's a pretty awesome technique. You get this sort of glow to your images, you get this look that you just can't get any other way. Now, you may look at this and say, oh gosh, this is gonna be really hard, but it really isn't that bad. It's really easy once you learn a few tricks, which of course we'll tell you about today. And of course practice, little bit of practice as well. So the really neat thing I think about this is that modern digital cameras really give us a big advantage. I started off doing this in film many years ago, and it was so much harder to learn this process. It was so much more trial and error and waiting for the results. But with modern digital cameras, we can see the stuff right away. So we're able to really advance much quicker than we were ever able to before. And it doesn't even have to be completely dark. You know, I mentioned we were shooting outside or shooting in the dark, but it doesn't even have to be. In this image right here, the truck, this one's actually shot before the sun went down on a cloudy day. And I light painted using a flash rather than a flashlight. So there's all kinds of techniques that we can employ, all kinds of different processes. And I'm really excited to share this with you guys today. So all in all, light painting is a fascinating mix of painting and photography. I think one of the things that I like about it most is that we're going beyond the realm of just normal photograph where we're seeing a subject or perhaps building a scene, and simply taking the picture. What we're doing here is we're truly creating the light. It's like a master studio photographer, but working outside. We bring the light, whether it be a flash, or whether it be a flashlight, and we're gonna start creating our masterpieces. So let's talk a little bit about why you would wanna paint with light. I personally love painting with light simply because of the results. They just glow. You can get a look to your photographs with one single flashlight that would be impossible to replicate with many different lights. Or at least very, very difficult. In this image, this was probably about a three minute exposure, and what I did here was I took my flash, and just one single flashlight, and literally wondered around the entire scene as I was exposing. So painted up the gas pump right here, I was walking up and down the stairs, painting in here, the building, this is all illuminated. The little silver item in the back there. And this is all built against a backdrop of a full moon night. And you can see some stars coming through here. So what we're trying to do is we're trying to create some depth or some drama to an image. You could take a photograph like this, which is really poorly lit inside this old train in Ryleg Ghost Town, and you can transform that again with one flashlight, into something that's got a lot more drama, a lot more color, and a lot more depth to your photograph. So how does this happen? Well, it happens because we're able to move our flashlight. Because we can actually move within the scene, because it's dark, and we'll come to that in a little bit, why we can move within the scene, but because it's dark, we can move through the scene and change our light angle, we can change our beam width, we can change the intensity of the light, all on the fly. So in an example like this, this is really super flat light. This might be something, let's say you had an on camera flash and you just took a picture. This is what you get, it's really super flat, very uninteresting. But wonder around that scene and illuminate it with one single flashlight, and things drastically change. You can see we're getting a lot more dimension, we're getting texture down here in the bottom, I'm able to illuminate just solely the chair. I'm able to diminish the light, or pull the light back down in the background so it's not so brilliant. Lots of control. So we're trying to get away from that sort of straight on flash look. Which is exactly what I've done here. Now look at the difference between this slide, first of all, notice the color, this is kinda white, white light rather. And then check out that. Just a little bit more depth, a little bit more intensity, a little bit more interest. So in the next lesson, what we're gonna do is we're gonna talk about basic camera considerations. How do you wanna set up your camera? Things to think about when you're going out in the field.
Class Materials
Bonus Materials with Purchase
Ratings and Reviews
DiDi Hendley
The BEST class ever! Learned so much--Tim is a great instructor. I highly recommend to the creative photog looking to expand his/her arsenal of tools, talents and products. Appreciated the patience and thoroughness that Tim offered students. Great pacing and information. I can see how I can very easily take his instruction out at night and produce something. I also appreciate that this session demonstrated images that weren't created in total darkness.
Gene Chamberlin
Tim is an outstanding teacher - I love his style, thorough and basic without being too elementary or condescending. I will be looking for other classes by Tim in the future. I'm am excited to apply the things I have learned from Tim and create my own style from the tools he has given. I never would have give much thought to light painting in the past. I have already notice a change in the way I scout my shots, now that I have added light painting into my tool box. Thanks for sharing your experience with the world Tim. Gene
Andrew Gow
Really enjoyable course. Clear instruction and surprisingly easy to put what I learnt into practice, which I did for the first time last night. This is also my first exposure to Photoshop, which initially put me off buying the course. However, Tim is a great instructor and explains his approach very clearly, so as well as an introduction to light painting it's a great introduction to what Photoshop can do.