Lessons
Lesson Info
Introduction
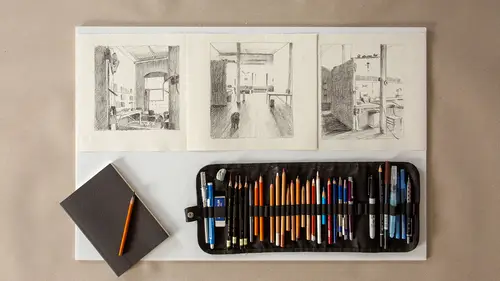
Hi, I'm Amy Wynne. And in this course, we're gonna learn how to draw interior spaces. I'm gonna be taking you through my old mill studio building. This was an old lace mill in Pawtucket, Rhode Island. And we're gonna get to practice simple ways of learning how to draw not only one point, but also two point perspective. These ideas can be daunting for people. But artists throughout history have done this for ages, drawing their interiors. For instance, here in this de Gaulle drawing, de Gaulle used to draw interiors with dancers in them. In this drawing here, this Schiele drawing, this drawing is chock-a-block full of tables with wine bottles and sort of reminds me a little bit of some of the industrial spaces that we're gonna be traveling to today. And then in this Toulouse-Lautrec drawing, this is more sort of like drawing everyday life. A cafe scene, a man and a woman are sitting across the table. There's a window in the distance. So I love looking at drawings from history for inspir...
ation and also for technique. So the reason I chose these particular drawings to show you is because they're all done in charcoal. And in terms of the medium or the materials that we're gonna use for this course, we're really gonna be using just a simple charcoal pencil. When we go out into the mill, I wanna talk a little bit about, there's a real difference between drawing in your kitchen, drawing in your living room, drawing at the office, for me drawing in the studio, versus suddenly going out the door and being out in public drawing. And that's what we'll be doing. We'll be going out my studio door and traveling through the building. So you don't necessarily wanna bring a giant drawing board. You wanna be portable. So we need to speak to that a little bit. A pencil is certainly portable. A sketch book like this size is great. You can just keep it in your bag and take it out any time you want to sketch in. And then also a portable way to organize your supplies because sometimes when you go on location, you know, you might think you're gonna be doing a graphite drawing but instead you suddenly say, wow the light and shadow would be so much better if I had my charcoal pencil. And if you left that behind then you're out of luck. So I love organizing my things. I can find it all. If you don't have a rig like this, you can certainly just put 'em in a Ziploc bag or a cigar box. That's a classic way of carting art supplies around. And then when you go out to draw, it's just a lot simpler. So when we go into the mill building, we're not only going to be looking at one and two point perspective, but we're also gonna be playing with ways to create depth, create atmosphere, create sort of spatial strategies for creating more dramatic drawings. When we talk about creating atmosphere, I've really chosen this charcoal with a purpose because I'm gonna show you a little bit about some of the potential of using charcoal. And if you then wanna, you know, create a series of drawings in charcoal, that'll give you some tips on how you might be able to use the material. I've sharpened the pencil nicely. I've got a nice long tip to it. And one of the things, regardless of the drawing tool that I'm using, I often warm up a little bit with a little bit of mark making. So I know that charcoal, just by looking at these drawings, I know that charcoal has the potential to be like really velvety dark, but also really subtle and smudgy. So I wanna show you a little bit of that. If I make a line on the paper, it can be almost like super super fine. But if I bare down with a little more pressure, it gets really luscious and dark. So sometimes I'll just experiment by pushing and pulling the line a little bit. I can use the side of the charcoal. And when we go on location, I'm also gonna talk a little bit about putting marks down with a hatching motion, where we're making just sort of straight lines. And also a bit of cross hatching as well. So that's something that charcoal does really beautifully. The other thing about charcoal is that it smudges. So you can smudge across a dark area, which is a little messy but that's part of drawing. If you prefer not to smudge your drawing, I'm also gonna show you ways to avoid that by putting a piece of paper between your hand and the drawing just to shield it from that. And the other thing we'll do on location, but I do wanna show it here a little bit more clearly, is creating a tonal gradient because at the end of this lesson, we're gonna graduate from the linear exploration of one and two point perspective to adding in tonality, to adding in lights and darks, and creating a mood. Creating atmosphere that way. So the first step to doing that, regardless of the material you're using, is to understand how dark and light your material can actually go to push the polarities of light and dark. And by doing that through a gradient that I'm gonna show you. Then the mid tones in between can have some variance. So we'll take a look at that. I'm just gonna do a five part tonal gradient. I'm gonna do a small one. I'm gonna put in a band like this. You can do this free-hand. You don't need a ruler. They don't have to be exact. And I'm just gonna divide it one, two, three, four, five. So we have one, two, three, four, five. My fifth zone is gonna be my darkest dark. So when we go downstairs and check out the two point perspective location, we're gonna talk a little bit about sort of finding those darkest darks and pushing them as dark as we can. As we see in some of these drawings, and you'll see, I really encourage you to look at a lot of artist drawings. And really look at how they're using the materials. Look at how they're making the marks. Even copying sections of them is a really nice way to sort of internalize that practice. So I've created this five as dark as I possibly can. I'm gonna leave the one just as the paper 'cause that's gonna be my brightest bright. And then I wanna build two as just a little bit darker than the one. Three is just a little darker still. And four gets a little darker, but not as dark as the five. So that they're stepping stones. There's not like a huge, huge jump between these sections. And again, we're trying to really establish this tonal range so that we can really imbue our drawings with beautiful light and shadow variations. That's what we really want. So when we move into this lesson, you'll be exploring some really cool industrial locations in this old building. Maybe sort of building your bravery to get out and try it for yourself, drawing on location. But you can also just start in your own kitchen. Make it accessible. You don't have to, you know, climb to the top of a mountain to create a drawing. You really need to fold it into your everyday life. And I'm trying to show you how, just within my own sort of workspace and the building that I go to everyday to make my art. I'm often inspired by the things I walk by everyday. And it's also this situation that drawing interiors that you occupy allows you to really experience them at a deeper level. And it builds memory and it builds connection. And to me that's really what drawing's all about.
Ratings and Reviews
Nora Masters
Inspiring and fresh. Amy does a wonderful job of teaching me information efficiently, showing the beginning of processes and the more finished process, as well as lots of alternative ways of approaching the practice. i love the student work shown as well to reinforce the lessons.
Muhamad Faizin
This course really inspires me! Thank you!
Marcus
A miraculous teacher, with very refreshing talk. But to me has not become clear completely as with the Perspex disc functions practically without achieving absolutely shaky results. Could one not have shown this still briefly?
Student Work
Related Classes
Illustration