Lessons
Lesson Info
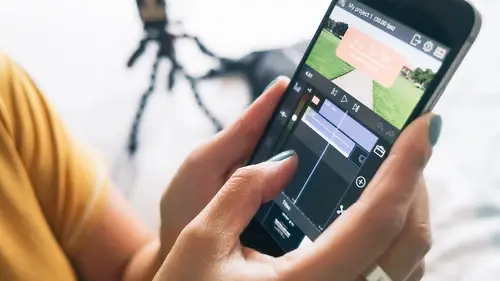
Preparing Your Footage
Alright, so now, next step is for us to actually create the rough cut. So, if you don't know what a rough cut is, it's just a first draft. You know, it's not the final. That's all it is, nothing fancy. Um, so let me walk you through the interface. So, we are going to be using Lumafusion today, and this is the interface. So, for those of you that said you have done some editing before, this probably, kinda looks familiar to you. Um, I'm not gonna go over every single thing. It'll make more sense once we're actually in the app, but, so the basic layout is the top left is your preview area, so that's where you're gonna see the media that you are going to bring in or that is actually in your timeline. And then the top right are your assets, that's where you're gonna see things like photos, music, anything that you're going to bring into your timeline. And then the most important part, where you're gonna spend a lot of your time in is the timeline area. So this is going to be where your thu...
mbs are gonna be playing. So this particular app lets you do several layers of video, and if that doesn't make sense yet, it will soon enough. But for those of you who have done editing before, you know how important that is. And then it can do three layers of audio, so that's actually super cool, and not many apps do that. That's why I like using Lumafusion because they're one of the few apps that can actually let you do that. Okay, so how do we create a rough cut? So first, we're going to find our clip. So we're gonna do this soon, right after the slide. And then we are going to roughly trim them before we bring them in, and we're gonna mark the in and out points, and if you don't know what that is, I'll show you that. And then finally we're going to import them into our timeline. Sound good? Alright, so let's hop onto the iPhone screen. Okay, so let's show my iPhone here so you see that. There you go. Okay, so this should kinda look familiar now, you saw it earlier. So what I'm gonna do is create a brand new project for us, and the story I want to put together today is, I went to the beach and I shot some photos using this new vintage lens that I got that I attached to my Sony. And then I wanna tell the story of how I took those photos, and then show the photos afterwards. Like what did those photos look like with a vintage lens? So that's the story we're gonna tell today. So I'm going to create a new project, so I'm gonna hit the plus sign there, and then, so, here this is actually really important, so, let's do that again. This is where you're gonna set the settings for your whole project. So someone had asked me earlier, how do you do vertical video? That's become really important. This is where you select that and, say, your frame aspect. So usually your frame rate, you wanna choose the frame rate that your footage was shot in, and if you are just shooting footage with your iPhone, you're probably shooting at thirty frames per second. And then, the frame aspect 16:9, that's your typical horizontal, if you want to, um, do vertical, it's 9:16. And then there's all sorts of other choices, there's square, and so on. For his particular project, we're gonna do 16:9, and then we can name the project, so we'll call it 'At the Beach'. Okay. Then hit plus, and that should bring up the interface. I'm actually going to turn on the touch points here so you can see, um, where my fingers are touching. Oops, sorry. Hang on. There you go. So the blue dot, that's where my thumb is touching, so you can see what I'm doing. Okay, so here we have completely blank project and we're gonna start bringing in the photos and the videos. Okay, so I am going to tap on albums. So remember I created that iPhone folder? So it's this one, aaa iPhone, so I'm gonna tap on that. And then, so I organized it so everything is in one spot. I don't have to, like, go out of the folder, or go somewhere else. It's all here. So, it makes life a lot easier. So, here are all of the different clips that I think I want to include. And to see any of the clips, you just tap on it, so I know I did a time-lapse, so I'll tap on this, and you see on the right? You're actually previewing that clip. So, um, I'm gonna hit play. So that plays the time-lapse, and I don't know if you can see this number here? It's a twenty second time-lapse. No one's gonna wanna watch twenty seconds of a time-lapse, that's kind of boring. So what I'm gonna do is pre-trim it, and not bring in all twenty seconds, and maybe just pick five seconds of it. So there's two ways to do that, um, see these handles here? So, If I bring it in, it's basically saying wherever, um, my finger is, start from there, and then I can do the same thing on the other side. Tap there and bring it in to about, I don't know, actually I kinda want it to end here at the beach, um, or, if you want to do a shortcut you can, can you see where my finger is? You can scroll through and move the play head to where you want it to begin. So, let's say I want it here, and then rather than dragging, you can hit the bracket, so this kind of is another way to select it. And if you're like, oh my gosh I cannot see what I am doing, that screen is so small! If you double tap, it makes the whole thing bigger, especially if you have the smaller phones, this is a godsend. (presenter laughs) Um, so, you can do that and then now I know exactly what I'm doing here so I'm gonna, uh, select that so it's about four seconds. I'm going to double tap, and then I'm going to bring it down into the timeline. And the way to do that from here is to tap until you see that pop out, and then bring it down and let go. So now that's in my timeline. And then, If I want to see my whole timeline, you can actually zoom in and out, so you see my fingers, I'm pinching out to zoom in. And you can zoom in all the way down to the frame level. So see that white bar? That represents a frame. So you can get really, really precise. But for now we're just creating the rough cut, so I'm not gonna be super precise. You saw me just kind of, like, (mumbles), this looks good here, and then drop it in. And then, um, you should be that casual with it cause in the end you're gonna be going back and doing your fine-tuning. So at this stage, you should just be kinda like, roughly, this is what I want, and then dropping it in. Alright, so I am going to, um, look at another uh, clip here, so I want to show a little bit of the beach, so I know that I shot these kite surfers here. Let me zoom in by double tapping. Um, so I kinda like that visual there, shows how windy it is. So I move the play head here and I'm going to tap on the left bracket, and then I'm gonna bring it in cause I don't want it to be that long, so about two seconds is good. In general, it's good if you change frames every three to four seconds, cause that's how you keep your audience engaged. If there's always something changing, if it's like the same scene for, like, five to seven seconds, you're gonna lose your audience. So typically, I like to change it up every three to four seconds. I double tapped to zoom out, and then I'm gonna do the same thing that I did with the other clip. I'm gonna tap here, and then bring it down. Now I'll try to, if I move it here, you see how that turns pink? So that's actually doing a replace, which we do not want to do cause we want it to come after. So, I'm gonna drag it until I see that insert icon there and then let go.
Class Materials
Free Bonus Material
Ratings and Reviews
Sparkle Queen
really liked the instructor; super clear and went at a good pace that meant you could follow instructions but also not get bored! Have been trying to get my head around video editing for ages but its hard to find clear instruction and guidance; the discovery last month of 'Creative Live' and its classes has totally de mystified the whole process! Feeling excited to try this out myself now - when i feel i have it nailed will try to remember to post some work in here to show my efforts!
Sheila
Excellent class but I wish it was longer. I learned so much! Cielo is a natural when it comes to the great work she creates, as well as teaching others. I couldn't recommend this class more!
Stavroula Fotiou
Great instructor and great class. She really breaks it down so you can grasp the small steps that lead to the end result.