Itajime Overview & Fabric Preparation
Lesson 7 from: Introduction to Shibori Indigo DyeingKaari Meng, French General
Itajime Overview & Fabric Preparation
Lesson 7 from: Introduction to Shibori Indigo DyeingKaari Meng, French General
Lesson Info
7. Itajime Overview & Fabric Preparation
Lessons
Introduction
01:44 2Creating the Dye Vats
03:39 3Kumo Overview & Fabric Preparation
06:06 4Testing the Dye Vats
03:10 5Dipping & Rinsing the Cloth - Kumo
07:36 6Unwrapping the Cloth - Kumo
06:01 7Itajime Overview & Fabric Preparation
08:00 8Dipping & Rinsing the Cloth - Itajime
12:30Lesson Info
Itajime Overview & Fabric Preparation
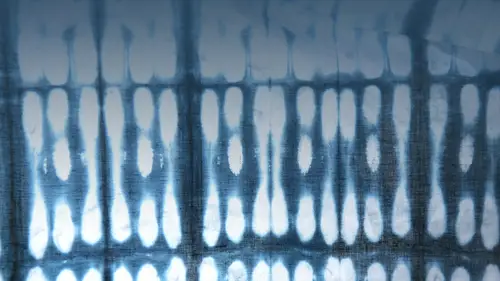
The next to bury technique we're going to learn is the jimmy technique and this is one of my favorites it's a shape resist technique so you can use all different sorts of wood blocks or popsicle sticks or fun little wood wood chips the secret is is that you have to have two similar shapes because this will create the resist. So what I thought we dio is take this set of old linen napkins which was given to me by a great friend, but it just seems to be a little dated for me and I thought, why not add some sort of fun shape, resist and make them a little bit more contemporary and a little more fun? So the secret with eat a genie is it's all in the fold and you have to remember that the accordion fold is what will help us repeat this pattern. So we're going to start with one of the linen napkins and we are going tio fold it and it's a simple accordion back and forth fold and then we'll do the same back and forth lengthwise and kind of even out your spacing so that each fold is somewhat sim...
ilar in size we go so once you've got your piece according unfolded and linen is really nice to work with you to jimmy because just by simply pressing it, you can kind of get it to stay in the shape that you wanted to stay in, we are going to use to shapes, and I chose these kind of oval oval shapes, and I found these at joan's, but you can pick these up in most craft stores, and they're just simple pieces of wood, and they tend to work really well in the dive at, and you can reuse them, which is nice, they don't disintegrate, so you put your two shapes on top of each other, and you really want to make sure that they're right on top of each other, so I kind of test it from the sides from the front, the back and make sure that they're right right on top of each other because that's what's going to give us this really kind of blur, although it's a blurred line it's a real clean shape, once you've got that in place and you're happy with the placement, you're going to need to use a couple of strong clamps, and I'm going to use thes for inge clamps tio hold down this shape, but if it was a smaller shape, you could use smaller clamps and even clothes pins work really well when you have a thinner fabric, so I'm going to go ahead and clamp this piece down, being careful not to include too much fabric in the clamp, because I want that part of the of the fabric to die really well and I'll go ahead and just to make it nice and tight I'm going to put all four clamps on this piece because it really then creates a nice clean resist so this is my seat to jeannie piece that is now completely ready to go and from this point you can go ahead and put this in your water bucket and this will have to now soak and like we did with the silk it will absorb the water and open up the fibers so that it will be ready to go into the indigo fat so it's a genie is one of the oldest japanese techniques and it could be done in so many different ways so I made up a couple of ideas here I mean even if you have no clamps and you've just got a couple of rubber bands and a couple of pieces of wood and this khun b even you know larger pieces of wood you can still make up a great resist. So here is a white cotton t shirt again a natural fiber so this will work really well and what we're going to dio is we're going to accordion full this to the best of our ability and dio a shape resist so I'm going to start on on one side and just fold it back and fold the arms in and then I'll go ahead and accordion folded lengthwise and as you can see, it's not completely straight, it's not, you know, completely tact in there, but we're still going to get a great shape resist on this fabric. So the larger the piece of shape you use, the less indigo that you'll actually absorb, because this will be blocking the indigo. So if you wanted this t shirt with a little more white a little more of the negative, um, then you would go ahead and use a larger bloc peace. Now, once you get into the thicker fabric like this, you might have trouble unless you use a c clamp, but you might have trouble with some of the of the smaller clamps, so you can always use rubber bands, and these make nice attachment as well as give you some really fun little lines on the side of the t shirt because that'll create a resist a swell. So the important part here is just making sure everything is nice and tight, so everywhere you attach your rubber band, you will create a little resist. So what's kind of fun is to use a different size rubber band, and you will get a wider resist, so we're going to go ahead and put this one right in the center actually will put a couple of these in and you create these kind of little I always think of him his little bundles, because by the time you're done, you've really got this this wrapped up little package here that you have no idea how it's going to turn out, but you know, you're going to get some good resist on that. So again, this is all bundled up, and you've got all your rubber bands and your boards on there, and so your e t jimmy resist is ready to go, so I'll go ahead and place this one in the water as well, so this fabric will need to sit in the water for a good twenty to thirty minutes so that the cotton absorbs the water. And here a couple other examples that we did just use seen popsicle sticks. I thought this would be fun to see, because this is taking a piece of printed fabric that we could then do the eat a genie resist and also were over dying the fabric. And this is a little piece of bamboo that I just thought would be fun, tio according fold up and experiment with that as well. So all of these pieces can go into the water, and we'll be ready to die after about twenty or thirty minutes.
Class Materials
Bonus with Purchase
Ratings and Reviews
user-458bc3
Kaari is such a great teacher! She outlines the basic process and steps in the indigo dye process, and encourages experimentation. I enjoyed hearing the traditional terminology, and learning more about how indigo dye interacts with different types of fabrics. Kaari provides lots of tips for adapting your process for different materials, so you always get a deep, rich blue dye. It really got me brainstorming: I started seeing all sorts of things around my house as potential resists for my dye projects! I love that indigo dye projects turn out different every time, and that this should be celebrated! As Kaari mentions, indigo dye projects have a wabi sabi aesthetic, and there really are no mistakes.
Gretchen
I came across this video a couple years ago and have been wanting to try it. The instructions and technique were very clear. We're going to include an eight year old in the project so it will be fun to see how creative she will get!
Annie Milligan
I found this class and this art form on a whim late at night and it has been such a fun project! I got the kit from French General and followed along with the videos and it couldn't have been easier. Everything is explained and demonstrated clearly and I can't wait to start the Intermediate class.