Lessons
Class Introduction
05:10 2What Defines a Dramatic Portrait?
06:07 3Camera Settings
09:24 4Lighting Equipment & Styles
24:24 5Lighting For Dramatic Shots
09:04 6Shoot: With Light On-Axis
14:53 7Shoot: With Butterfly Lighting
06:20 8Shoot: With Beauty Dish
17:31Lesson Info
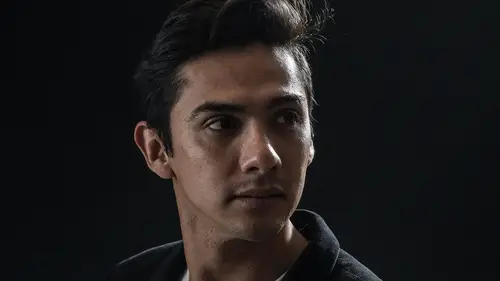
Shoot: With Giant Umbrella
Let's move to the next lighting scenario. And that is using, oh yeah. So we're gonna use the muslin for this one. And, with this, I'm gonna bring in the giant umbrella. So we'll go ahead and pull out our seamless, and then we're gonna use our beautiful muslin for the next shot. Up until now, everything has been just the seamless, the solid black seamless. Which is great, but sometimes we like a little bit of texture in the background, and that's what we're gonna do next. And while they move that, I am gonna position our big umbrella. Let's move you back to about there. Perfect. Perfect, perfect. Now, remember from earlier today, an umbrella casts light a lot more wildly than a soft box does, and so that's one of the things that's going through my mind here as I'm thinking about, well how close do I want everything to be to the background, how much of that backdrop do I want to show, or how much do I want it to fade away? So, never shoot with just randomness in mind, let's shoot with an...
objective. I want the backdrop to be around on my Lightroom brightness scale. Why 20? I don't know, just because. I think that might look pretty good. I like the texture of the backdrop, I think it's a pretty cool background. So, I'm shooting for something around 20, and I'm gonna guess positioning this about there will get me close. Something else to think about when you're using a muslin is how smooth is the muslin? What I mean by that is, have you taken all the wrinkles out? Does it have, is it perfectly flat? Or does it have some warpage in it? Well, we've done a good job of steaming this, it's kind of like an iron that we use to steam out the wrinkles, but as you can see, I can't quite make it over there with my tether, well, yes I can if I take it off, as you can see, there are some actual wrinkles and unevenness in there. You can get over that, there's these little elastic clips that you can get, that you can swing around the post here, and then pull this tight. Those are actually very good for these muslins. But in the absence of that, and we don't have those here today, I need to think about and make sure that my light isn't showing off the wrinkles in the background, okay? To get away from that, I either have to move him farther away, or I have to make the light a little bit more direct on the background so you don't show that side lighting, that profile. We'll see how it turns out. It may be just fine. And I may be talking about something that may not show up in the final photo. (drawn out beep) Oh, sorry. Gonna now use this diffusion dome on the flash, because I'm using a big, huge umbrella, and I want that light to spread all around inside of the umbrella. Kay, throw that in there, lock it down, and I'll go back up to, let's go to quarter power. There we go, we're at a quarter power. And again, dramatic shot. So I've got fairly strong side lighting here and no reflection on this side. In this case, since it's such a gigantic light source, the light should wrap around his face a little bit more than a soft box would. Okay, this is good. I'm gonna have you bring this hand back a little bit, just like that, great. I'm looking at your buttons, making sure all that's good. I'm gonna pull this a little bit tighter. Yeah, perfect. Kay, let's see what it looks like. Here we go. (camera clicks) Going for 20 on the backdrop. And we'll see how those wrinkles come out. (hums) Okay, cool. Overall, overall, it's a little bit too bright. And using your question from earlier, let's go into here with my eyedropper, or with my histogram. And you can see his face on his cheek is in the 70 to 80% for the RGBs. That's too bright overall. So regardless of what the background's doing, I know that his face is too bright, so I need to reduce the overall brightness by, oh, a stop, at least a stop. And we'll shoot that again, I'll bring it back down to a eighth power. And, we're just gonna take a picture. Super. (camera clicks) Good job on the expression. You're very consistent with that. Thank you. Excellent. Yeah, I can already tell this is better. And, we bring the mouse up there and now we're in the 60, eh, 50 to 60% range. And that's all good from an exposure standpoint. Now the question is about that backdrop. And there's my backdrop. Look at that, I'm in the 20. I'm a little bit high. I'm in about 30% overall, and I want it a little bit darker so the solution is, I'm going to move the whole thing away. And now you can see, when you're shooting with one flash, you kind of have to go through these machinations, you know. One flash means you just have to be a little bit more creative with your positioning. Shooting with two flashes or three, well then I can just change the power of the flashes and the background. Kay. That came in a little bit closer, I think. Does that feel about where it was before? Yeah. Okay. Alright, bring your chin down a tiny bit. There we go. (camera clicks) Nice. This should solve our background problem, which was too bright. Nice. Yeah, there we go. I'm at 16, 17 for that background, I love that texture there. I think that looks pretty good. My aperture was f5.6, which means that I maintain a little bit of depth of field, so now you can see some of that mottling, that painted shaping there on the background. If I wanted to get more texture in the background, the solution is to go to f8. The company who made this, and the photographer who painted it put a lot of work and effort into that shape and texture. I think I wanna show a little bit more of it. So I'm gonna give you a little bit of an advanced skill here. I'm gonna change my aperture. I'm gonna add two stops of depth of field. So I'm at f5.6, I'm gonna go f11. Alright, so, f5.6 to f8 is one, and then f8 to f11 is two. So I'll do that on the camera, go to f11. So now I'm at f11. Then, what I need to do is I need to increase the brightness of my flash by two stops as well, right? Kay. So, I'm at eighth power, so now I'm gonna go quarter, and then half. Quarter, and then half. Alright. Should have the same brightness on his face, but now I get more depth of field and I get to show off that backdrop a little bit. (camera clicks) Cool. Hopefully it all came together. Great. Already I can see it. I've got the texture and the detail in the backdrop which I want, because I paid a lot of money for the muslin, actually they donated it to us (laughs) but you get my idea. So I'm using my aperture and my flash power here to vary how much depth of field that I have in the photograph. That's a good skill set to learn and to know.
Class Materials
Bonus Materials with Purchase
Ratings and Reviews
user-182390
Another great course learned a lot about flash and the different modifiers. Very informative and easy to understand looking forward to the next one.