Lesson Info
3. Frequency Separation
Lessons
Lesson Info
Frequency Separation
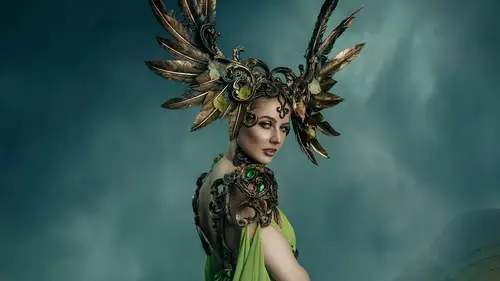
1 Next on our list here we're gonna do frequency separation. 2 And frequency separation gets a hugely bad rap online. 3 There's a whole lot of pro frequency separation, 4 anti frequency separation people. 5 Everyone's super passionate about it 6 and I think the answer is somewhere in the middle. 7 There is no such thing as one tool to rule them all, 8 but you can be really good with one or the other 9 and they can work really well for your workflow. 10 I like to combine a combination of two techniques, 11 which is frequency separation and dodge and burning 12 and smashing them together because I think the sweet spot 13 is somewhere in the middle. 14 So first thing first, 15 my main concern with frequency separation 16 is just her neck hair here. 17 And one thing to keep in mind is 18 when we are doing fantasy retouching, fantasy composites, 19 we are creating something that isn't real. 20 We're working on something that's surreal. 21 We're really building something that exists in our...
mind. 22 So our model and our designer are the basis for that. 23 They're the foundation. 24 And then the digital art pulls all that stuff 25 into a further realm. 26 So I'm going to merge this up. 27 So Alt + Control + Shift + E 28 or Alt + Command + Shift + E if you're a Mac user. 29 And basically what that's going to do is 30 just going to merge all of our work into one 31 and then I'm going to duplicate that. 32 So first one here I'm going to call low frequency. 33 And then this one I'm going to call high frequency. 34 We're gonna learn to spell first. 35 Come on. 36 Thank you. 37 All right, high and low frequency. 38 Now, again, this is another one of those things, 39 like everything on the internet, 40 where there is a debate over 41 what is the right way to do this. 42 I like to use frequency separation, 43 the low frequency by using noise. 44 So there's people who like using blur. 45 There's people who like using noise. 46 And again, these two camps are bitterly divided 47 and I don't care which one you choose. 48 I like to use noise because filter noise median. 49 Now, if we look at this, 50 and I want to sample from a certain area on her skin. 51 Noise, or sorry, median, rather, 52 gives me these beautiful sharp edges. 53 And so if I want to only blur this by five pixels, 54 or maybe let's say seven, 55 if I look at her face 56 where I'm gonna be sampling these colors, 57 particularly around edges, 58 it's going to be more accurate. 59 Now, if I go to blur, filter blur gaussian blur, 60 and let's say we want to do five pixels blur. 61 So see what's happening here around the edges of her face, 62 particularly around her lips. 63 If we were doing really detailed color selection 64 or clone stamping, 65 we have this haloing going on, 66 and I find that it kind of screws things up 67 for me sometimes. 68 So I definitely prefer to use 69 the noise median technique. 70 That works really well for me. 71 If you have another technique that works better for you, 72 by all means, 73 I don't really think there's a right and wrong way for this. 74 There's just a way that works for you 75 and a way that works for me. 76 So I just picked a number that gives me, 77 that gets rid of the texture in the image, 78 but also doesn't make it too, 79 I don't want this to be one homogenous color of skin tone. 80 I'm really looking for these minor details 81 and slight shifts in color. 82 High frequency layer image, apply image. 83 Now, in order to do high frequency this way, 84 you have to be on a 16-bit image. 85 And if it doesn't look, 86 if you don't make your apply image settings exactly this 87 when you're working on a 16-bit image, 88 this is going to screw up on you. 89 It's gonna, typically the default is one and you get this. 90 So you wanna make sure that this is blue, 91 you are sampling not the high frequency layer, 92 but you are sampling the low frequency layer 93 and then you are inverting it. 94 So it's exactly the opposite 95 of what the low frequency layer is. 96 So we've removed all the color, 97 or sorry, removed all the texture so now we only have color. 98 Now we're going to create the high frequency layer, 99 which means we have to sample the low 100 and invert that complete effect 101 so that now we're only getting the texture 102 with some Adobe witchcraft math on the back end, 103 and I don't know how it works, 104 but I just know that it does. 105 Blending mode has to be add, opacity 100% scale to. 106 Make sure it looks exactly like this. 107 Hit OK. 108 Now we're gonna hit this blending mode right here 109 and we are going to go to linear light. 110 And if we turn these two on and off, nothing should change. 111 Now, the first time somebody showed me this, 112 they're like, oh, we've successfully separated the two. 113 I was like, nothing changed, what do you mean? 114 Well, what that means is that if nothing changes, 115 this is exactly perfectly separated. 116 So if we put this onto, let's say, 117 overlay or soft light blending mode 118 or hard light blending mode, 119 see we have these glows, right? 120 So if we try turning these on and off, 121 there's obviously a difference between the two. 122 Linear light, if you turn them on and off, 123 everything should be exactly the same. 124 That means that you have separated your color 125 and texture layers so that we can 126 manipulate them both independently. 127 So first thing we wanna do is we want to work on 128 the texture layer. 129 And I am going to grab my stamp tool, 130 and remember how before we had it set to current and below. 131 So right now if I sample current and below my sample, 132 we're gonna get these really bright colors. 133 So if this happens to you, 134 that means that your current and below is turned on 135 or all layers is turned on. 136 We need to be on current layer only. 137 Current layer only means that we are only 138 going to be moving texture around on this image 139 because we are working only on the texture layer. 140 So just quickly, because it was bugging me, 141 we have these little tiny spots in her eyes, 142 and I will come through again later 143 and clean this up a little bit more. 144 But there was just that little dark spot there. 145 Dodge and burning will definitely help us out 146 a little bit more with that later. 147 But I'm just making a very, very, very small stamp brush 148 and sampling away some of these textures. 149 And there you go. 150 So if we turn this on and off, that was before and after. 151 So I'm only moving the texture around in this image. 152 And there's a little couple guys here. 153 Dodge and burning is mostly gonna handle this in the future, 154 but I do sometimes do just a super quick texture cleanup 155 using frequency separation. 156 I try to be very light-handed with it. 157 There should be websites dedicated 158 to frequency separation fails just like dodge and burn fails 159 'cause there's so many ways to mess up a face, 160 or to be fair, a landscape with frequency separation. 161 Let's get rid of you. 162 But like all things, 163 if you use the tools wisely and carefully, 164 you'll be all right. 165 So I'm just looking for quick little spots here. 166 Really paying attention to the texture of the skin. 167 I really wanna make sure that I'm not stamping anything 168 that you have mismatched textures 169 because of course the texture on the forehead 170 and the texture everywhere else is very, very different. 171 So you really want to be mindful of 172 where you are sampling from. 173 So we'll just lighten these guys up a tiny little bit. 174 I don't wanna get rid of it all. 175 I'm actually, I'm not a big, 176 I don't like retouching skin, to be perfectly honest, 177 so I like to do as little as possible if I can, 178 mostly because I think untouched skin looks, 179 it can look really great. 180 Photoshop should be used just to gently improve faces. 181 I'm not a big fan of removing all the lines in a face 182 or anything like that. 183 Faces have lines and texture and shape 184 and this whole thing with whatever face apps are 185 that are online that basically smear somebody's face 186 into this big blurry awful mess 187 I think is really unfortunate. 188 So I'm just, yeah, 189 I would rather spend my time masking 190 than I would spend my time fixing skin. 191 All right, so let's see here. 192 And I also try to not work too closely all the time. 193 That's not really my thing. 194 I'm not a beauty retoucher. 195 It's not my preference, it's not my world. 196 If you wanna learn beauty retouching, 197 this is not the class for you. 198 This is portrait and fantasy retouching more than anything. 199 So here we are going to fix up this as much as we can. 200 So I know inevitably there is... 201 So neck texture has different texture 202 than the rest of the body, 203 and unfortunately her entire neck, 204 there is no good texture, 205 so this is where it gets a little bit messy, 206 but I am just going to move her shoulder texture 207 over her neck. 208 And this is where every beauty retoucher in the world 209 cringes and freaks out and that's fine. 210 But to be fair, this is a fantasy composite, 211 and all I want is for that hair to not be noticeable, 212 and if I screw up a little bit of the texture on her neck, 213 admittedly 99% of people are not going to be 214 paying attention to her neck in the shot. 215 So I'm just sampling skin texture from somewhere else. 216 Now, if I did this on her face, 217 it would be super, super, super noticeable 218 because we look at faces all day, 219 We look at faces of other people, 220 we stare at them, 221 and we always know when something isn't right, 222 just like in VFX with the uncanny valley 223 and you look at something and you're just like, 224 nope, that doesn't look real at all. 225 That happens all the time with faces. 226 And so I'm really trying to be really careful 227 with the rest of the body, 228 but this little patch on her neck here, 229 I don't think going forward most people will notice. 230 So now I'm doing this super fun part 231 of cleaning up the hair textures here 232 on the rest of the sculpture. 233 And I'm keeping in line with the dark spots 234 and the light spots as best I can. 235 And I'm working with a Wacom Intuos Pro, 236 so I'm not doing this with a mouse. 237 I think that would be very, very challenging. 238 If you are new to using a Wacom 239 or any kind of pen device, 240 I highly recommend taking it easy 241 and using your first six weeks 242 or whatever to do 30 minutes a day of internet browsing. 243 Don't bother trying to build yourself 244 a really great composite with your first time using a Wacom. 245 Doesn't come easily to everybody. 246 It can be very, very frustrating. 247 And if you are one of those people, it's all good. 248 You have good company. 249 There's a lot of people 250 who find these devices to be very challenging 251 and the brain eye coordination 252 is not always immediately felt. 253 So zero pressure. 254 So this little gobbly mess here, 255 I am just going to take texture from here straight up. 256 I'm just gonna completely replace this texture 257 because there is zero good texture there. 258 And we're just gonna pretend that it's fine 259 because at the end of the day, 260 I don't think many people are going to be paying attention 261 to these little super, super, super small details. 262 Same thing here with this little bit. 263 I'm gonna grab some of this green texture here. 264 That's not right, that's too soft. 265 Let's grab a little bit sharper. 266 And this is basically texture digital painting, essentially, 267 'cause if we zoom out 268 and look at this here at this size, 269 it's not super noticeable. 270 So if we turn this off and then on, 271 so off and on. 272 I still have to do the color corrections here. 273 And especially if we go from here to here. 274 All it is is it's not as noticeable anymore. 275 So now I'm gonna work on the color layer. 276 So I'm just gonna grab the letter B for brush. 277 I'm gonna hold Shift all the way through to the mixer brush. 278 So if you click and hold here, 279 you're gonna go to the mixer brush tool. 280 I'm going to run the load at 100%, mix 35, 281 flow 8%, wetness 22. 282 And this here means I'm going to have 283 a clean brush every time. 284 So you can play with these settings, 285 see what works best for you. 286 Typically the thing that I play with the most is flow. 287 I figured out that wet 22, load 100, 288 and mix 35% was a pretty good number for me, 289 but for your own artwork you might find 290 that a different number, 291 a different percentage of each of these numbers 292 works better for you. 293 This here, what this means is if I was sampling this color, 294 see how there's this sample here now, 295 I could paint this color over her entire face if I wanted to 296 and then I could just keep painting. 297 Now, with this on, 298 what this is doing is it's using the colors 299 that are available in that area 300 and it's not copying the color to anywhere else. 301 So I'm not sampling any color. 302 See, this stays clear. 303 So that's a good thing for anything 304 that we want to do on the face. 305 Now, a lot of this is gonna get handled... 306 Whoops, I'm on the texture layer. 307 That happens a lot, by the way. 308 Make sure you're using your mixer brush on the color layer. 309 Dodge and burning is really gonna handle this, 310 so I really try to be careful 311 and really light handed with using 312 the mixer brush tool on the color layer. 313 There's a little bit of makeup there 314 that was a little bit smudged 315 and I'm just ever so delicately... 316 I don't wanna change the shape of her face. 317 That's huge. 318 That's super key. 319 And it's very, very, very easy to do 320 with the mixer brush tool. 321 I see it all the time 322 that people's faces are completely changed. 323 So this is an area here 324 where sampling a color is maybe going to be helpful. 325 So I'm gonna turn this off. 326 I'm gonna sample, let's try somewhere in here. 327 Let's try sampling this color. 328 And this may or may not work. 329 But here what I'm doing is I'm just painting over 330 a little bit of color over her neck 331 just to unify that a tiny little bit. 332 Now I'm going to have to dodge 333 and burn back in the shape of her neck, 334 the folds in her neck. 335 She doesn't have multiple necks. 336 But in her neck just to make sure 337 that it looks like a neck again. 338 Because like I said, 339 I'm not a big fan of really, really, really overprocessed 340 faces and skin. 341 Not really my thing. 342 So here I'm just going back to my texture layer again 343 and cleaning up her neck. 344 A little bit of a bruise there. 345 Tiny little things. 346 Her skin looks good. 347 She doesn't have any major anything going on there. 348 Clean up that a tiny little bit. 349 And again, this goes down to this is fantasy, 350 so sometimes with fantasy work 351 we like to change the features quite a bit 352 and sometimes we don't want to. 353 So it's dealer's choice on the artwork that you're making. 354 I leave that up to you. 355 So I'm just ever so lightly 356 going around this here. 357 And like I said, I'm using a low flow. 358 All right, and let's see here. 359 We have a little scar there on your forehead, tiny one. 360 We'll go to the texture there. 361 Use a stamp tool. 362 Tiny little scar. 363 Okay, so that would be about what I would do 364 for frequency separation. 365 And what does this look like? 366 Well, if we go here, 367 I always like to make sure 368 that I'm making good choices before and after. 369 And again, I really want them to be subtle. 370 I don't want it to be major, major overhauling 371 of her face structure 372 unless we were creating like different beasts, 373 like if we were doing huge animal morphing of her face 374 and we were turning her into 375 a part cat owl person or whatever, 376 well, then do whatever you want. 377 But in this case, I do love her bone structure 378 and I would love to keep that as real as possible. 379 So that is frequency separation. 380 So again, if we hold Alt 381 and click on our original image... 382 Oops, Alt + click, come on. 383 So that's before and after. 384 And like I said, we're gonna fix the neck here in a minute. 385 So yeah, next step is dodge and burning.
Class Materials
Bonus Materials with Purchase
Ratings and Reviews
a Creativelive Student
An excellent workthrough of Renee's compositing process. Thoroughly recommended, with lots of really specific, pragmatic and useful tips, along with pointers on style and considerations for working with artists, models and the whole team - Great!
Alvin Lipscomb
She is awesome, This is a great lesson using Photoshop. Seeing the different brushes she used on her mask was an eye-opener and will definitely use for working on a mask's layer. Right there is a reason to watch this lesson. 🔥 Do yourself a favor and watch this lesson.
pat cash
love her I got all her workshops - she is intense and inspiring