Lesson Info
4. Dodge and Burn, Fabric Clean Up
Lessons
Lesson Info
Dodge and Burn, Fabric Clean Up
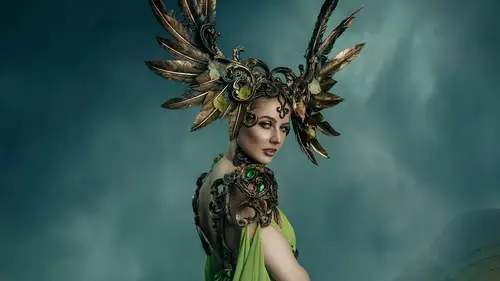
1 Okay, next we have dodge and burning. 2 So there's a whole bunch of different ways to do this. 3 Again, the internet is completely divided, and it's fine. 4 That seems to be the way it is. 5 We are just going to grab a curve, 6 so this little half circle down here at the bottom, curves. 7 We are going to increase this. 8 And I don't wanna overexpose it like this. 9 I don't wanna have it like super, super, super bright, 10 but I just want to increase the midtones. 11 Eh, even that might be a bit much, but that's fine. 12 And then I'm going to invert the mask. 13 So I'm gonna go Ctrl + I 14 or Command + I if you have a Mac. 15 We are going to say dodge. 16 We're gonna make another one, curves. 17 And I'm just looking at the shadows. 18 I wanna make sure that I don't turn it down too far 19 that we start getting all this 20 like really weird chromatic damage 21 and like the pixels start changing a bunch of colors, 22 but super gentle. 23 So curves, invert that. Call this burn. 24 So f...
irst things first, I'm gonna work on the dodge layer. 25 Now one of the things that I like to do 26 with dodge and burning, that's also very common online, 27 is making sure that my image is in black and white. 28 Now the reason for that is 29 because if you're working on an image with color, 30 and you're basically wanting to pay attention to contrast, 31 what's going on in your brain 32 if you're looking at a color image is that, let's say, 33 you're doing the dishes, right? 34 And then you're doing the dishes, 35 and then all of a sudden your spouse starts yelling at you 36 for something, and the kids are playing with the TV, 37 and then the kitten crawls up your leg or something, 38 and (chuckles) then you're not really focused 39 on paying attention to the dishes anymore. 40 That's kind of an exaggerated example 41 of what's happening with dodge and burning in color 42 because there's so much information coming in. 43 We wanna limit that amount of information 44 so that we can have, 45 we can just pay attention to the contrast, 46 'cause that's essentially what dodge and burning is. 47 So we are just going to go here to a half circle. 48 We're gonna hit black and white, 49 and we are gonna put the blending mode onto color. 50 Now the reason why is that there's very, very, 51 very subtle differences, it's super subtle, 52 and typically more subtle than what matters for me, 53 but see how if it's on just normal black and white 54 and then we change the blending mode to color, 55 there are contrast differences, 56 especially in like little bits of the skin. 57 So this is a more accurate version of black and white 58 than what we would see if it was 59 just with the black and white tool 60 or a black and white layer. 61 I'm gonna go to our brush, gonna hold Shift + B 62 and shift to our normal brush, 63 or you can just click here and go to brush. 64 Now flow, 51%, way too high. 65 I'm gonna try about 3%. 66 Some people like to use 1%. Again, totally up to you. 67 And I'm not a micro dodge and burn master 68 by any stretch of the imagination. 69 I'm also painting black on black right now, 70 which is completely useless (chuckling). 71 So we're gonna invert that because we have a black mask. 72 We wanna paint with white. 73 Hit the X on your keyboard and change that over. 74 So I'm just gently going around here. 75 Make sure I have a sort of soft brush. 76 And again, I really wanna make sure 77 that I'm not changing the shape of her face. 78 I'm just accentuating what's already there. 79 I don't want to flatten out her features too much. 80 Here I'm just adding a little bit of shine to her forehead 81 and a little bit of shine to her makeup there 82 and a little bit of work to her eyes. 83 Let's see here. Lips a little bit. 84 Now I could go in with frequency separation 85 and clean up her lips a tiny bit if I wanted to. 86 Have this tiny little line here. 87 Blend that out a tidge. 88 Alrighty, and now on and off. 89 So that's off and on. 90 So we're just kind of making a really pretty glow 91 on her face, before, after. 92 So there's still this tiny little shadow here. 93 I turn on my black and white again. 94 And before, after. There we go. 95 Put this back on here. 96 Just a tiny little highlight on the nose. 97 Teeny tiny bit. 98 Little bit there on the chin. 99 Now let's handle some of this neck here 100 because there is that little bit of highlight here. 101 Add a little bit of shape coming down. 102 And I'm changing the brush size on my keyboard 103 by hitting the brackets on the keyboard, up and down. 104 You can also reprogram your keyboard if you want to 105 in Preferences to find buttons that make more sense 106 to your brain and the way you like to work. 107 So there's no major locked in way 108 for how this should all be. 109 I'm also just quickly gonna add a little bit of dodging 110 to the headdress. 111 Just a teeny bit. 112 Bring out some of those details. 113 Again, some of the dress. 114 Working with a low flow really makes that nice and pretty. 115 So if we do it with too high of a flow, 116 basically what winds up happening, 117 let's say we do this at a 100%, 118 is we just get these like really harsh transitions, 119 and they're really not very pretty 120 even with a soft edge, right? 121 It's too much too quickly, in my opinion. 122 I like to work at a slower rate than that, 123 so I'm gonna knock that down to 5% again. 124 And quickly hang around a little bit of that. 125 That teeny tiny bit of shadow under her lip there, 126 on her jaw, just softening that. 127 Now I am keeping in like a lot of the texture in the face. 128 Like I said, I think faces have textures, 129 so I like to leave in a fair bit. 130 So here I just went to my burn layer, same thing. 131 I'm just cleaning this up a tiny little bit. 132 And let's look at it in color. 133 So I went a little bit too strong on that. 134 Invert that because we're working with layer masking, 135 so we can easily invert our choices. 136 I'm gonna make a little bit 137 of a harder edge there on my brush. 138 Now this little part here is kind of bugging me, 139 so I'm just gonna grab my stamp tool. 140 I'm going back to my high frequency layer. 141 I'm just gonna get rid of that little bit of detail 142 'cause I'm not gonna be able to recreate it. 143 There was no texture there that was good. 144 So just 145 fresh tool (chuckling). 146 Wrong direction. 147 If you do that a lot, that's fine. Me too, all the time. 148 And I'm just alternating back and forth here. 149 So, obviously, that's too strong, 150 but because it's a burn layer, it's its own layer. 151 I can just turn that down a little bit. 152 And I'm just gonna call this neck shadow burn 153 because that really is where I want it to be, 154 and I wanna do more burning on this image, 155 but that is its own battle. 156 So I'm gonna create another burn layer. 157 So curves. 158 Bring that down a tiny bit, invert it, 159 turn on my black and white layer, 160 and we are going to paint white 161 because our layer is black. 162 Our mask is black. 163 And you're gonna do all this to your own taste 164 when you're doing your own work. 165 Some people are more heavy handed than others. 166 There's other digital artists out there who do amazing work 167 who dodge and burn the crap out of their images, 168 and they are amazing. 169 They're so good. 170 For me, I prefer just a lighter hand 171 because I would rather be spending 172 my time masking (chuckling). 173 So it does give my work a little bit of its own look. 174 Let's see here. Let's turn this off. 175 I can do a little bit on her cheek. 176 I think just a teeny tiny bit. 177 Again, I'm not big on the micro dodge and burning. 178 I love looking at it. I think it's amazing. 179 I'm just going here to my high frequency layers. 180 There's a couple textures there that are jumping out at me. 181 Oh, right there. 182 Yeah, some people are amazing 183 at like micro dodge and burning, and it looks so good. 184 I wish I had the patience for it. 185 I am not that person, 186 and it's okay if you are not that person too. 187 And if you are that person, congratulations. 188 You're amazing (chuckling). 189 All right. All right. 190 So let's see what we can do about the lip. 191 Just like a tiny little bit of 192 slightly less. 193 And there are probably some dodge and burn artists out there 194 who would handle this with dodge and burning, 195 and they would do an incredible job, 196 but like I said, my superpowers lie elsewhere (chuckling). 197 So I'm just quickly 198 just breaking up some of those 199 slightly more strong textures. 200 I'm gonna leave this here 201 because I think lips need those textures. 202 Without it, it looks weird. 203 Come on. 204 Every now and then, 205 my device likes to get a little bit funky with me. 206 Well, I think it's the computer (chuckling). 207 There we go. Awesome. 208 So that was done on the texture layer, 209 again, on the high frequency layer. 210 And we can quickly see here, 211 before and after. 212 Before and after. 213 So yeah, that is very quickly 214 how I will do dodge and burning and just like a little bit 215 of additional cleanup with frequency separation, 216 just like hopping back to the previous step, 217 because just because I'm done one thing 218 doesn't mean I'm done, 219 I'm finished with that step altogether. 220 Actually, I just remembered. 221 There's these textures here on the fabric, 222 and frequency separation is awesome for getting rid 223 of little wrinkles in fabric. 224 I find it very, very handy, 225 especially for outfits like this in the fantasy realm, 226 where I don't necessarily want it to be like, 227 "Yeah, this outfit was stuffed in a car, in a suitcase," 228 and bringing people back to reality. 229 Clothing with wrinkles has its place, for sure, 230 but in this case we have this kind 231 of like goddess-type image, 232 and I don't really want it to look like she drove 233 to our location in a car 234 (chuckling) with suitcases. 235 I don't want people to look at this 236 and see things that they're gonna see 237 in their normal everyday life, right? 238 So I want people to look at the images that I make, 239 and I want them to just enjoy looking at them, 240 whatever that is. 241 So I just went back to my low frequency there. 242 Going back to Shift, Brush button, Shift + B, 243 or just clicking here, going back to our mixer tool, 244 and just, just ever so slightly, 245 blending some of those colors in. 246 I don't wanna get rid of them completely. 247 I just want them to be just a teeny tiny bit less. 248 Like I said, when people look at these images, 249 I don't want them to think, "Oh, my God, laundry." 250 (chuckling) So just quick on and off there. 251 That frequency separation is like super fast. 252 That used to take me so long to fix, 253 but, fortunately, this is now a lot easier. 254 So this is, just gonna call it burn. 255 Maybe we can dodge here just a little bit more. 256 Shift + B. keyboard shortcuts are the best. 257 Oh my, God, learn new keyboard shortcuts. 258 It will save you so much time going forward. 259 Now the reason why I'm adding 260 a little bit more dodging down here, 261 and this is like definitely a little bit more illustrative, 262 is simply because I retouched her face 263 quite strongly, in my opinion. 264 That constitutes strong retouching. 265 Ignore (chuckling) the neck. 266 See, actually, burn tool. 267 Let's just knock that down a tiny bit. 268 Oh, my God, that's the eraser tool. 269 Awesome, thanks. Good job, Renee (laughing). 270 Yeah, if stuff is ever not doing 271 what you think it's supposed to be doing, 272 the problem is usually between computer and chair, usually, 273 and that means (chuckling) 274 it's usually the one operating the computer. 275 Okay, so the reason why I dodge 276 and dodged out her hand a little bit there is 277 because when I look at her face, 278 I want the retouching to look kind of balanced all the way 279 through the entire shot, which means dodging areas, 280 the rest of her body at least, into a similar amount. 281 But yeah, all right, so we fixed the hair, 282 we did some frequency separation, 283 and we did some dodge and burning. 284 So I think we're doing pretty good. 285 I think we're doing pretty good. 286 There's one quick step that we can do 287 for doing the eyeballs. 288 And normally I would put this in its own, but it's so quick. 289 I'll just bundle it in here. 290 So we're gonna go here to our hue saturation. 291 And what I wanna do is here we're creating a creature, 292 a character, so I'm gonna change her eye color 293 to maybe this like really strong blue. 294 Let's see. 295 Let's try that anyways. Invert it. 296 Zoom in nice and close. We're using our brush tool. 297 I'm gonna increase my flow on this one. 298 I am just really carefully making sure 299 I'm not going over any of the black 300 because if we go over the black, it changes color. 301 We make sure we don't go over the skin 302 'cause that changes color. 303 So just over so carefully. 304 And I'm also making sure I'm not going over the catch light 305 in the eyes because that changes things too. 306 And I can either increase or decrease the lightness on this. 307 Sometimes it's nice to drop the lightness here. 308 I'm gonna put this underneath all my dodge and burning work 309 because that will bring back some of the luminescence. 310 So the order in which you do things is very, very important. 311 So now we can change the colors at will, if we so choose. 312 So I found that's a really pretty shaded blue. 313 And again, we'll manipulate this further going forward, 314 but that just kinda gives me the baseline. 315 This is kind of where I think things are gonna sit 316 going forward for the compositing and the masking. 317 So yeah, lots of clone stamping, 318 dodge and burning, frequency separation. 319 Hopping back and forth between those three steps gives us 320 a pretty quick before and after 321 and really quick portrait retouching. 322 So, yeah, onwards.
Class Materials
Bonus Materials with Purchase
Ratings and Reviews
a Creativelive Student
An excellent workthrough of Renee's compositing process. Thoroughly recommended, with lots of really specific, pragmatic and useful tips, along with pointers on style and considerations for working with artists, models and the whole team - Great!
Alvin Lipscomb
She is awesome, This is a great lesson using Photoshop. Seeing the different brushes she used on her mask was an eye-opener and will definitely use for working on a mask's layer. Right there is a reason to watch this lesson. 🔥 Do yourself a favor and watch this lesson.
pat cash
love her I got all her workshops - she is intense and inspiring