Aspect Ratio Change and Hair Clean Up
Lesson 2 from: Introduction to Fantasy CompositingRenée Robyn
Aspect Ratio Change and Hair Clean Up
Lesson 2 from: Introduction to Fantasy CompositingRenée Robyn
Lesson Info
2. Aspect Ratio Change and Hair Clean Up
Lessons
Lesson Info
Aspect Ratio Change and Hair Clean Up
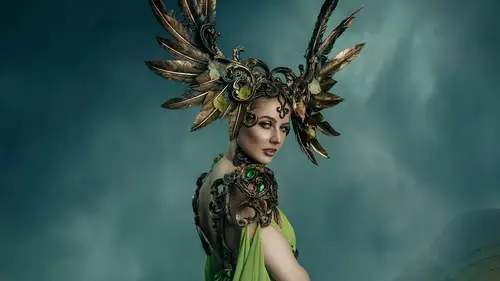
1 All righty, let's get into Photoshop. 2 So, I'm gonna do the rest of this tutorial 3 on a screen recording 4 with a little tiny head in the corner, 5 so I hope you enjoy following along. 6 This is our subject and our model. 7 Her name is Jolene. 8 She is the designer and model, 9 the creative genius behind Fairy Tess. 10 So Fairy Tess is a Dutch designer, 11 and she sculpts all of this stuff by hand 12 and she does all of the sewing and she's incredible. 13 And her work really personifies 14 what really great fantasy design can be. 15 When I first saw her work, it totally blew my mind. 16 And in making this tutorial a fantasy tutorial, I was like, 17 I couldn't think of anybody better to use. 18 So this is our subject, and the first thing I wanna do 19 is I just wanna do a quick crop. 20 I wanna make this image a square crop. 21 So I'm not always a huge fan of square crops, 22 but with this one, I think it'll work really nicely. 23 So I'm just gonna make sure 24 that she's placed i...
n the center ish. 25 Give myself a little bit of bleed room on the top. 26 'Cause I can always crop this down later, so. 27 Cropping is thing number one. 28 I am a little bit off on the bottom there. 29 So click, tap a couple times on the keyboard. 30 There we go. 31 All right. 32 Perfect. 33 Now, first thing I wanna fix on this image 34 that's driving me crazy, 35 I'm not even gonna tackle masking yet. 36 We're gonna get to that in a little bit. 37 But this clump of hair here is kind of making me nuts. 38 So what I'm gonna do is I'm gonna go in 39 and I'm going to fix that first. 40 So this first little bit is going to be all about cleanup. 41 Now I'm gonna create a new blank layer. 42 I'm gonna call this Hair Cleanup. 43 So Control + N, or sorry, Control + Shift + N 44 is to create a new blank layer on your keyboard. 45 The other way you can do it is Layer, New Layer. 46 But like I said, using your shortcuts 47 is definitely the way to go. 48 I apologize ahead of time 49 for the screaming fans on my computer. 50 You're gonna hear them most of this tutorial, 51 'cause I work with a laptop. 52 All right, so I'm gonna grab the stamp tool, 53 and I'm making sure that I'm selecting Current and Below. 54 So current layer, right now I'm on empty layer, 55 so if I tried stamping anything, nothing would work. 56 So I'm gonna go Current and Below, 57 which means my empty layer is going to pick up 58 the information on the bottom. 59 So I'm gonna go Alt + Stamp, and just go in here 60 and quickly clean this up. 61 And I'm gonna clean this up further later on 62 with some more techniques. 63 50%, let's do 100%. 64 And again, I apologize for the screaming fans. 65 Now, this isn't really like a huge deal 66 because we are going to cut this out. 67 You know, I'm just gonna get rid of this. 68 We are going to be cutting this out to all this stuff, 69 but it's just a habit. 70 I like to have this stuff clean 71 'cause we're gonna have to clean her neck up anyways. 72 So it's just, it's a lot easier on the extraction, 73 especially the automated part of the extraction, 74 if we could have this stuff cleaned up 75 a little bit ahead of time. 76 So I'm just using a relatively hard edge brush 77 and just quickly going in here. 78 And I went over a little bit of that feather there. 79 So if I want to, I can mask that back in. 80 Same with a little bit on her neck. 81 Just get rid of that quickly. 82 And it's okay if it's not totally perfect. 83 I'm just gonna create a layer mask here 84 by hitting that little rectangle with the circle in it. 85 Going to my brush tool, making my edge a little bit hard. 86 Obviously painting white on white doesn't work. 87 Masking of course, requires you to paint the opposite color. 88 So we have a white mask, 89 and if I paint white on white, nothing's gonna change. 90 But if I paint black on white, then that'll work. 91 So if we wanna see exactly what this stamp tool has done, 92 it's done this, which looks ridiculous all on its own. 93 But here we have this nice cleaned up area. 94 Now, if I wanted to move this by hitting the Move tool, 95 I could move this independently if I wanted to. 96 But I don't want to. 97 We spent all this time making a nice edge there, 98 so it'll be a lot easier to clean up. 99 So that is really quickly just using the stamp tool there. 100 I'm just gonna quickly scan around 101 and see if there's any other weird things 102 that are sticking out to me. 103 Any other little strays, like these guys here. 104 Now, sometimes stray hair can really, really, really 105 make an image stand out, 106 but her hair is quite clean in this shot, 107 or at least we want it to look like it is. 108 Like it's very slim and, like, tight to her scalp. 109 So I mean, her hair is just like 110 not the main feature in this image at all. 111 So I try to reduce the amount of strays 112 that are popping around. 113 So just quick, and I'm just resampling there. 114 There's this spot in here 115 that I could clean up really quickly, 116 and I'm just stamping way outside. 117 We have a pretty even background going on there, 118 so it's pretty quick. 119 And I went over it again just a little bit there. 120 So I'll just go in with my brush tool on the mask 121 and I'm gonna make sure that I'm painting black 122 and just bring those uneven bumps back. 123 There we go. 124 And stamp out here. 125 And brush. 126 Have a quick look around. 127 All this stuff here, this is gonna be super fun to mask out. 128 (laughs) It's gonna take a little while. 129 But that's okay. 130 Masking is one of those things. 131 I have friends who love doing super detailed 132 dodge and burning and other things. 133 Like all of us have something in our creative lives 134 that we love to do that other people are just like, 135 "Oh my God, why are you doing it that way?" 136 And masking is one of those things for me. 137 I don't mind doing super complicated masks. 138 But yeah, so really quickly, that's using the stamp tool 139 to clean up that little bit of hair there. 140 And like I said, we will work 141 a couple different techniques next here 142 to clean up the hair on the neck. 143 So clone stamping is done.
Class Materials
Bonus Materials with Purchase
Ratings and Reviews
a Creativelive Student
An excellent workthrough of Renee's compositing process. Thoroughly recommended, with lots of really specific, pragmatic and useful tips, along with pointers on style and considerations for working with artists, models and the whole team - Great!
Alvin Lipscomb
She is awesome, This is a great lesson using Photoshop. Seeing the different brushes she used on her mask was an eye-opener and will definitely use for working on a mask's layer. Right there is a reason to watch this lesson. 🔥 Do yourself a favor and watch this lesson.
pat cash
love her I got all her workshops - she is intense and inspiring