Lesson Info
13. Summary
Lessons
Introduction
00:59 2Lighting and Concept
02:07 3Cropping
02:38 4Bringing in the New Background
02:44 5Masking
32:02 6Creating Depth
07:27 7Painting Wet Rain on Costuming
28:45 8Creating Rain Drops
15:06Lesson Info
Summary
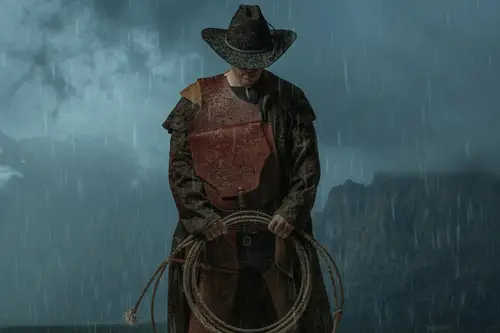
So that's basically how we make this image. I just want to walk you through the steps here really quickly so that we can see where we're going here. So this is what we finished with, and this is where we started. So this is why I love compositing is that we aren't limited by where we are in the world. I mean, you can go online and get stuck of subjects. You can get stock of backgrounds, or you can shoot your own stuff or whatever. I mean, there's, like, literally the world, like it's limitless of what you can make with it. Um, so the first thing that we did was we added in the background here. And remember, we did the subject, the texture and clarity reduction on the background. And then we did a little bit of box blur. Then we went into adding all of the rain drops on the costume. So at first we did the hat and the saddlebags and then the yellow and the jacket and the lawsuit. And then we went in and painted in just a little bit more darkness into the costume itself. Then we added the...
raindrops, which originally were snow, and then I put them into a path blur, and we made sure they change the direction of the rain just a little bit, so that it wasn't just all one big sheet of perfectly vertical rain because no rain falls like that. And then we blended these out into it and kind of like mashed it away where it needed to be, making sure that there was more rain behind the subject than in front of the subject, even though there's still a little bit in front so that we have that appearance of atmospheric depth. Then we went into smart objects. We created a smart object and then did a color grade in adobe camera raw. And then we save that color grade in case we wanted to come back and make any changes or whatever. Then that option is there. Then we went into sharpening where we use the smart sharpen filter. And then there was a little bit of color correction on the neck there that I noticed that I was like, we should probably get that. So yeah, this is the beauty of compositing. Then you can bring the entire world to you from the floor walls inside your house, which I think is pretty awesome. So thanks so much for checking this out.
Class Materials
Bonus Materials with Purchase
Ratings and Reviews
Steve Vick
Great hands-on course. I love Renee's straight forward approach. This is the tool, this is what we are going doing with it and here's how to use it. For me it is the fastest and most practical way to learn. No fluff, no long-winded stories... just doing! In some of the other courses I viewed, I find myself skipping ahead waiting for them to get to the point. But this course has a great pace. I will certainly look for more from this teacher. Thank you.
Lukas Ujma
Greater, nice work! Semply and clever.
a Creativelive Student
I've been compositing for a few years, but masking a subject always presents its challenges. Renée gave a series of tips that were very helpful, including information about how to use the "burn" tool to enhance a mask. That's something I'd never done before. Can't wait to try it! The part of the lesson that explained how to make the subject look as though his clothes had been in the rain was also an eye-opener. The method is simple, but the results are outstanding. I had tried making my subjects look as though they had been rained on, but it never looked real. Now I know how to fix that!