Lesson Info
9. Rain Touch Ups
Lessons
Introduction
00:59 2Lighting and Concept
02:07 3Cropping
02:38 4Bringing in the New Background
02:44 5Masking
32:02 6Creating Depth
07:27 7Painting Wet Rain on Costuming
28:45 8Creating Rain Drops
15:06Lesson Info
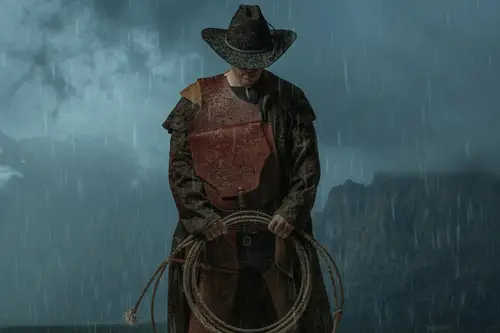
Rain Touch Ups
we're gonna find balance for how much rain we've added into the scene versus how much rain is going to be on the costume. So this is gonna be a little bit of back and forth between these two layers. So we're gonna have some costume. I'm going to go up to the hat. Here we go to my brush, and the first thing I'm gonna try I don't know if it's gonna work, but this is the point of experimenting. I'm gonna grab brush here, and I'm gonna make this capacity super low going to select an inverse, that selection like we've been doing. And I'm just gonna, like, gently darken that hat just like a tiny, tiny, tiny little bit knowing that I'm going to go in, um, and clean up that part of the hat again. The band here. Yeah. So raise a tool because it's gonna like it's gonna stay shiny. Right. So let's make sure that stands out. Yeah, I'm sure we're all good on this guy here. That's looking a little bit better. I like that blending. I think that looks good. That was a good call. Okay, so now we're gon...
na do the same thing onto the jacket as well. It's going to make a selection here. I'm gonna grab my brush, and I'm just super super super gently. I'm gonna make that a little bit darker, especially the areas down here. So here, I'm going to de select make a selection here. Inverted control shift. I just knock that down a little bit more. Go to the yellow sample some of this yellow here and here. I want to make a smaller brush. Make that a little bit more. I like those changes. If I turn on and off now, it's starting to look a little bit more soaked, which I'm kind of digging here. So saddle bag again. I'll just do a tiny little bit, probably less here than anywhere else. But we'll just bring that down just ever so slightly. Now, once I do the color grading, I'm probably gonna have to handle some of this little bit here on the neck. Uh, because it is a little bit bright, but I'm gonna wait until after I've done my color grading to really kind of figure out exactly what that's gonna wind up looking like. Uh, let's look here. See if we missed anything. Um, this is definitely, like my last check. The last check that I do before I go in and do color grading because color grading. Um uh, it's like a full stop point for me. So I like to picture that I'm not missing anything, making sure that there's no super obvious stuff going on that I'm not digging. Let's see here. Where are those books coming from? Jacket, maybe. Yeah, Okay, let's get rid of some of these because it's a bit strong, especially for the area. There wouldn't be quite that much. Yeah, that's looking a lot better. That's looking like it really belongs more. Now let's play with some of these rain layers and figure out the capacity that we want these to be at because this is definitely back and forth thing. This is the part of creating composites where I always tell people like get up, walk away, have a glass of water, do some Burpees or something. Some like physical exercise so that you can look at these images with a fresh pair of eyes because it's definitely really, really easy to miss stuff when you're looking at this. Um, especially when you've been staring at it for a while. Um, it's Yeah, it's just so, so, so easy to just be like, Oh, look, everything's fine. And then you come back to it like the next day. You're like, What have I done? So, um, I just duplicated another one of the layers that goes in front of him, and I am just getting rid of some of these guys here there. I find them to be a little bit distracting at the same time. I wanted a little bit more rain in front of them, so just kind of like balancing it out. I'm basically chasing away like the big blocky ones. So, like this guy here, he's a little bit weird. Let's go here to you race. I could stamp it out. That's another option. This is definitely the destructive way to do it. Um, yeah, so that's looking a little bit better. Whereas before the outfit and everything was looking a little bit too bright, it wasn't looking quite damp enough. So now that we've gone in and added those colors and just, like, sampled and just kind of blend it in, some of those, like the drips and so on and so forth. It's starting to look a little better. The hat could use a little bit more, though. Hmm. Hat Let's go back to our infinite scroll to the bottom of the list. Brush around rough bristle brush settings. So because I'm re selecting it, I have to re select my size and angle jitter. This time they're going to just play with you. So whenever you go back here like, let's say you make a bunch of brush settings changes unless you select them up here again. If you just go back and grab that brush again, you're gonna have to re re connect all of those adjustments that you wanted. So do 6% flow. Not enough. Oh, my God. I'm on the wrong color, Too. Nice. Let's select that hat color. Here we go. It's like, why is it red? Oh, yeah. Okay. So cool team, eraser brush. And again, we're going to go through here and just get rid of these, So yeah, absolutely. You can mask this. It probably would save you a bunch of time, but I'm stubborn in my ways. I just made a little bit of an error there on the racers. So I'm just gonna smudge and pull that in. And I should smudge some of these anyways because they've been sitting there for longer. Okay, Razor tool. Quickly. Make this spot shiny again. And the spot. Cool. Cool. Alright. So if we turn all this off just like that, all this on if I just go to here, I go to here and I go to here, so it's looking pretty good. I'm gonna do a image canvas rotation. I'm going to flip the canvas horizontal. So image, image, rotation, flip, horizontal. And basically what this does is it lets us see it from the other side. So, have you ever looked at your face and been like, Oh, my God, I look really weird from the opposite direction I do. This image is, too. Especially where I have, like, a bunch of crossing patterns here with rain and stuff. I want to try to make sure, but I'm not missing anything too obvious. That's gonna make me crazy later. So all in all this is not too bad. This is looking like a little bit bright compared to the rest of the image, but I'm gonna wait till I handle the color grading for that Cisco Control Z just to go back a step or controls ed, whichever your language preferences are, pulls that off and, oh, let's name this rain drops. Let's head into the next step.
Class Materials
Bonus Materials with Purchase
Ratings and Reviews
Steve Vick
Great hands-on course. I love Renee's straight forward approach. This is the tool, this is what we are going doing with it and here's how to use it. For me it is the fastest and most practical way to learn. No fluff, no long-winded stories... just doing! In some of the other courses I viewed, I find myself skipping ahead waiting for them to get to the point. But this course has a great pace. I will certainly look for more from this teacher. Thank you.
Lukas Ujma
Greater, nice work! Semply and clever.
a Creativelive Student
I've been compositing for a few years, but masking a subject always presents its challenges. Renée gave a series of tips that were very helpful, including information about how to use the "burn" tool to enhance a mask. That's something I'd never done before. Can't wait to try it! The part of the lesson that explained how to make the subject look as though his clothes had been in the rain was also an eye-opener. The method is simple, but the results are outstanding. I had tried making my subjects look as though they had been rained on, but it never looked real. Now I know how to fix that!