Lesson Info
8. Creating Rain Drops
Lessons
Introduction
00:59 2Lighting and Concept
02:07 3Cropping
02:38 4Bringing in the New Background
02:44 5Masking
32:02 6Creating Depth
07:27 7Painting Wet Rain on Costuming
28:45 8Creating Rain Drops
15:06Lesson Info
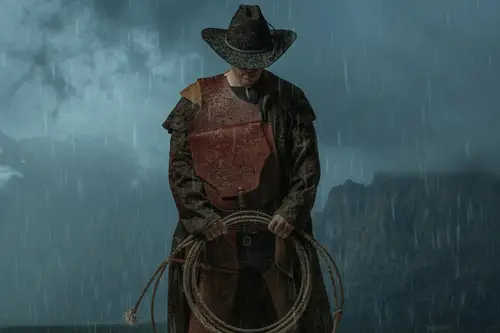
Creating Rain Drops
So now we get to go do some fun stuff. We're gonna make this image like that. It's raining. So yeah, we're the studios. So there are a ton of different ways to create the necessary raindrops in Photoshop. There's literally thousands. Um, but how I like to do it is I like to take the snow layers that I have photographed over the years and turn them into rain. So I'm just going to go control or command a select all control the copy. Bring this on here and make sure I'm on the top group here, which is the raindrops control shift V or command shift V stretch this bad boy out to fit our subject. Okay, Now, one thing going to do is I'm gonna just quickly clean up some of these bigger spots because basically, they're gonna look kind of funny. They're gonna look a little bit too big. Don't want to get rid of all of them, But I definitely want to be mindful. Like, approximately where his faces and so on and so forth. So let's nuke just a few of these players. Pretty good, though, Although we'll...
see once we actually apply the blur. Okay, well, let's take a swing at this. So we're gonna go filter Blur gallery, and then we're gonna go path blur. This is kind of nice. Now, we don't want this going sideways. We want this going down. We don't have to make this like too much. We want to have, like, a little bit of an angle on this. Um, the other thing, um, that we want to have going on here is so we can stretch this out to make these, like, super long, right? Which is kind of cool. Now, Not all rain falls in a straight pattern, so I'm just gonna, like just a tiny little bit at a little bit of a curve to this. Not too much. I don't want it to be, too. Obviously this right up here, we're gonna have to get with that. That's annoying. Um, this one here and that one there. This guy. Well, to clean this up a little bit, but that's fine. Uh, so we're gonna just here the speed of how fast do we want this to be going? Right. Um, we can add a taper, which I like, actually having taper on this maybe not too much and point speed. We can play with this as well. So that's looking not too bad for our first layer of rain. So once we have this year, I'm just gonna hit, okay, All these layers here, all these little dots and stuff, we're gonna basically go away. It takes a little bit of computing powers and times Perfect. There we go. Now, under God, my stamp tool, which is that it s any keyboard. It's also directly under your brush in the panel. So that s make sure my sample my brush is nice and soft. So their hardness all the way down, I'm just gonna go Oh, and get rid of that part there on the edge. Because it was just this big old blog. It didn't look very good. So I'm gonna put this onto the blending mode screen today. We have our first layer of rain okay to a brush. Mhm. So it's gonna be layer number one, and we're going to stack a few of these on here. We're going to make sure that we have a little bit more. So an area here that's a little bit distracting is, uh this area here don't necessarily want to draw a ton of attention there. So I'm gonna stamp from a different area and just get rid of that. Here we go That there is a little stronger, but the hand is a bit weird. Yeah, and I just I'm just running the stamp tool randomly. So, like, sometimes I could totally screw with me. But other times, it doesn't look too bad making sure that I don't have any weird lines going over his face. Sometimes that's super necessary. It looks good, but other times it looks very weird. So that's looking not too bad. There's a blob here, so I'm just gonna stamp from where there's a lighter one and just replace it. There you are. Okay. Rain layer number one. Let's add some more. Let's grab a different one. Control a control. C control shift the stretch this puppy out and we're going to change the direction of this rain a little bit when we do this one. So this big blog here, you see, this is no good. We're going to get rid of that. Can I get rid of you and you and you? So I'm just using the stamp tool stamp tool can give you like repeating patterns, but how much this is going to blur. I don't think it's a big deal, so I'm definitely being mindful of, like, stuff that's, um, on the edge of the layer itself because it kind of looks a little funky. Or at least it can sometimes. And sometimes the blur tool kind of gets a bit weird with it. So I'm just clean up some of those guys and let's just see what happens. We might have to track of things to filter, blur, gallery path blur. And again, we're just going to reset this. So I'm gonna have this rain going a little bit more of the opposite direction. I'm gonna give it a little bit of a twist again, but not too much. Play with the speed a bit Taper for sure. Give me a nice taper. Um and I want to make I'm gonna try to randomize this a little bit because rain doesn't all fall at the same speed, so let's go. Okay. Give our computer, like, 30 minutes to render this out. Put this on the screen. There we go. So now we're getting this really nice crisscross pattern in the rain, which looks great. It looks really, really nice. So the next one, I think I'm not gonna make the raindrops quite as long. Um, so here, this guy is distracting going to get rid of him or her. I don't know why I'm my gen during rain. Seems like a weird flex. Um, get rid of these already. No, if I turn down the opacity of this just a little bit, because again, the other part of rain is that it isn't all the same capacity. But if instead this one get rid of that one and turn up this one that are, like, a little better. So this one can go down a bit more. Thanks. Okay, that's looking good. Let's grab another one. Already grabbed that one. And this one is our next our next victim. Control a copy paste. We've done this a bunch. Now, Now, this one, I'm gonna make it. Not quite so long. Let's put that on top as well. Okay, I'm gonna stamp. And this one I'm going to get rid of a bunch of these really bright guys and Oh, and we're gonna make this less hardcore, so a little bit more subtle. Okay, so now filter, Blur, Gallery path blur. No, Let's see you like that. Let's give it a nice taper. Yeah, I don't want to change every now. I don't want to make the speed too high either. But I also don't want to make. I don't want to make it look like snow. So that's like, That's the hard part with making rain. Sometimes is that if you make it too short, it just looks like it's tricky snow. And obviously, that's not the image that we're making here. So you gotta kind of player that So this looks like snow, for sure. So that's not too bad. It is a little bit shorter from the other ones. Let's get hit. Okay, Screen. Cool. And so yeah. So the last one, I didn't add, like, a ripple or anything into it, And I was like, I don't really I don't think I need to, So that's cool. So this layer here had a little bit of a blue tint to it present in mind, she doesn't look too bad, but what I think I'm going to do with this for sure is I'm going to make sure that this layer is the atmospheric layer. So I don't necessarily want all these rain layers in front of my subject and in front of the background itself, because what does it look like? Well, it looks like, you know, there's just, like, a bunch of layers and atmospheric stuff in front of our guy, and we don't It doesn't Rain doesn't work that way. So the stuff that's further away is going to have, like, stacked atmospheric elements. So I'm gonna grab our mask, which is on the rocks layer Gonna hold Ault. I'm going to click and drag and that basically copies up the mask from the original one that you made, which is super handy. Um, I almost cried the first time I learned that, and I'm going to duplicate this one here. So also, what's happening now is, um and this is what happens in real life is things that are closer are warmer than things that are further away. Things that are further away have less contrast, less saturation. And so, by duplicating this rain layer here, um, it's kind of like creating that depth, and it kind of works out that that one layer has a little bit of color on it, but I might de saturate it a little bit. I'm just gonna do a clipping mask. So just going down here in this little half circle thing go hue saturation going to clip it to here, drop the saturation and a tiny bit. I'm gonna do the same thing on the layer below it the saturation clip it. So clipping mask, you're just holding all it again. And it's just gonna have this little square so you can hover over the 2.5 way between score with an arrow and it covers it basically clips the saturation to that layer. Because if we didn't clip it, then if I unclip this, this is what it does to the entire image. We don't want that. And let's turn that on and off and make sure it was a good choice. And I think it was so that's looking pretty cool. Now, basically, now I'm gonna go around is I'm just gonna start troubleshooting like spots that I think are annoying and so just grabbing my stamp tool. And I'm working on one of the layers that is duplicated, which is fine, because I want some of these layers there. Like, I want some of that texture, but I don't necessarily want all of them to be doubled up in super strong, so I'm just gonna get rid of some of them. Those guys are kind of annoying. This one here, that one super annoying. I don't like that one at all. Where is that one? There we go. I was like, What was the question of like, Where is it? Come on. Yeah. What's this one here? Okay. And so one thing I might try doing here is, um, Now my masks are unlinked, which is a good thing, because if you want to blur anything and your mask is linked, so that little chain in between them, if you blur with that chain attached, you're also going to blur your mask. And I don't want to do that. Oh, this here. These two spots are super annoying. Where is that coming from? There we go. You can go away. And so Okay, Yeah. Better. Yeah. Yeah, I might blur. This guy here is just a tiny bit filter where box blur and probably like one pixel to three might be a little bit much. Basically, I'm just adding just a tiny little bit of depth in between these even though, like, yeah, they're all different lengths and they're all different. Everything else, Um, for this much rain coming down, we might have to add a little bit more dampness to the outfit itself. But let's see here. If we play with the opacity of some of these layers, try to find, like, a sweet balance. So if I put these into a group hold shift, put that into a group and now I can just quickly turn his on and off like am I liking this? This is cool. I think it's not too bad. I think it's not too bad. Um, yeah. Next up, what I'm gonna do is I'm going to play with the raindrops here because I'm just now next step is gonna be balancing out the rain how much rain we've put into the scene versus how much water is interacting with the costume
Class Materials
Bonus Materials with Purchase
Ratings and Reviews
Steve Vick
Great hands-on course. I love Renee's straight forward approach. This is the tool, this is what we are going doing with it and here's how to use it. For me it is the fastest and most practical way to learn. No fluff, no long-winded stories... just doing! In some of the other courses I viewed, I find myself skipping ahead waiting for them to get to the point. But this course has a great pace. I will certainly look for more from this teacher. Thank you.
Lukas Ujma
Greater, nice work! Semply and clever.
a Creativelive Student
I've been compositing for a few years, but masking a subject always presents its challenges. Renée gave a series of tips that were very helpful, including information about how to use the "burn" tool to enhance a mask. That's something I'd never done before. Can't wait to try it! The part of the lesson that explained how to make the subject look as though his clothes had been in the rain was also an eye-opener. The method is simple, but the results are outstanding. I had tried making my subjects look as though they had been rained on, but it never looked real. Now I know how to fix that!