Gather Materials & Setup Worktable
Lesson 3 from: Intro to Screen PrintingErin Dollar
Gather Materials & Setup Worktable
Lesson 3 from: Intro to Screen PrintingErin Dollar
Lessons
Class Introduction
04:27 2Printing Process in Action
04:28 3Gather Materials & Setup Worktable
13:18 4Create Design with a Transparency
10:07 5Set up your darkroom
05:20 6Degrease your screen
07:26 7Coat the Screen with Emulsion
26:43 8Expose the Screen
09:13Lesson Info
Gather Materials & Setup Worktable
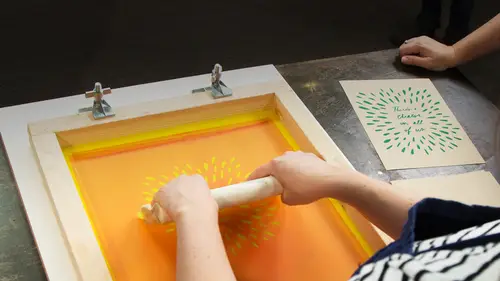
So now I wanted to introduce you guys a little bit into the individual materials that we're gonna be using today. So we've got the screen, this is the most obvious part of the process that we're gonna be doing today, this is called a silk screen. And this is basically the surface that's gonna hold their design. We have this particular design that I've created especially for this, but really this is your canvas, think of this as where you're gonna display your artwork and the stencil, essentially, that you're gonna use to create each print. Silk screen frames can either be wood or the can be aluminum, either one works well. Aluminum tends to be a little bit lighter, wood is a bit heavier. And what we're using here is a piece of particle board which we've attached these clamp hinges which means that our silk screen can be pushed up and put back down in the same place every single time. You saw me using the squeegee, this is a 70 durometer squeegee which is great for all purpose printing.
You can see that it's got that hard edge, it's kind of a block edge and that helps us to get a really crisp impression as we pull the ink and flood the screen. And then when we place it down, we're putting firm pressure and it basically pushes the ink that we've flooded the screen with onto the paper. I'm gonna detail that process a little bit better later. So we also, actually leave this down here so you can see a little bit better. These are some of the other supplies that we're gonna use today. So essentially, we have the chemical supplies that we're gonna use for processing our screen. We have emulsion stripper. The adhesive that you saw me use to create a slightly sticky surface for the paper to stick to. You have degreaser that helps to clean our screen. This is the emulsion that we use to coat the screen which is essentially a photographic process. This is basically how we're going to burn an image into the screen using a transparency, here's the transparency that we used for this image. And you'll see that using the emulsion basically creates a stencil that's suspended in the mesh of the screen. We're using a mesh of 230 on these screens, 230 or 250, which is a great mesh to look for for paper printing. If you're looking to print on textiles, 110 or 100 mesh is really great for that process. And let's move on to some of the other materials that we're using. Transparencies are made either by printing them out on the computer or you can draw directly onto a prepared acetate. But essentially the idea is that it's somewhat transparent so you're gonna be looking for something like this to create your artwork on to make your silk screen. We'll get more into that in the next section. All right, in terms of chemicals we've covered these guys. All of your emulsion is either gonna come premixed with photo-sensitive chemicals or it will include a little bottle like this of Diazo. And this is basically the photo-sensitive chemical that you're gonna mix into your emulsion which will help you to get that prepped for coating on your screen and will make it sensitized. We have a special red scrubber for cleaning up our screens. These clamp hinges come in a little box like this, but you get two per set. What else do we have here? Some rubber gloves for cleaning. When we're considering what we're gonna use to be making direct imagery for creating a silk screenable image, we can use a lot of different things, pretty much the limit is just your imagination. We can also use things like grease pencils, this is called a film opaquer, it's essentially just a really opaque marker. We can use things like Sumi Ink, we can use sort of paper templates like this to make a direct transfer or a stencil. So there's a lot of different options for drawing material. We also have a great, wide selection of inks that we can use, I like to stick with water-based silk screen ink, we've chosen a couple of colors that we're gonna do today, we have both black and green. This comes in a complete rainbow and you can find them pretty much everywhere, they're really widely available. Some of the more specialized tools that we're gonna need today are a UV light, which we'll use to expose our screen. And we're also gonna use these dark room or bug lights which basically are photo-safe lights that we will use so that we don't activate the photo-sensitive chemicals in our screens until we want to. This is called a scoop coater, this is a specialized tool that we use to coat the screen in emulsion and it's similar to the squeegee but it has a very different purpose, you can see that both of them are about the same width as the screen. When you're selecting tools, you really wanna keep your screen size in mind. And you choose a screen size based on the size of the object that you want to print. We're printing on eight and a half by 11, or eight by 10 sheets of paper today so we've chosen a smaller screen. If you wanna print a little bit larger, you'll need to always choose a screen that's at least two inches wider than your imagery on either side. Probably best to go for three or so on each side. And you would, when you're selecting a larger screen, you would get a larger squeegee and a larger scoop coater as well, this would be something that would need to fit the size of the imagery. You can see that the imagery is just a little bit less wide than the squeegee that we're using so we can get an even coat of that ink across the whole image at a time. And the same goes with the scoop coater. The scoop coater is used to push emulsion across the top of the screen when we're preparing it for that photo-sensitive process. So essentially, we want this to be more wide than the imagery that we're making as well by quite a wide margin. Some other materials that we're going to be using today, we'll need a little spray bottle of water for the clean up process. And we, you saw me using the ink and this little spatula just to lay out ink, you could also just use a spoon or a plastic spoon if you didn't wanna use something that you use in your kitchen. And this is just basically to get the ink from the jar onto the screen. This is a pretty think ink and so essentially it kind of won't come out if you just sort of blob it like this, it's a little bit easier to take this spatula here and just smooth it across the top, that's just to make things a little bit easier. May not be totally necessary but, always looking for ways to streamline that process. Okay. What else have we missed? I have a special type of tape that I use to tape off the edges of the silk screen here, this is just to keep the worktable clean and to prevent ink or other things from coming down into the area where there isn't covering from the emulsion. The screen tape that I use is actually like a lower-adhesive tape so it won't leave behind a sticky residue on my screens once we're done. You can use packing tape or something like that if you don't have access to this type of screen tape. Covered the drawing materials. To expose the screen we're gonna use the UV light and we can use either a table lamp or a lamp like this, a little clamp light that's suspended above the screen, we're gonna get much more into the detail of that process later but these clamp lights tend to come in pretty handy for this part of the process. We also have a clean up ink card which is useful when we are cleaning up the screen, I can demo that in just a couple of seconds. And we're using, let's see how clean my hands are, this is the print makers lament is dirty hands with paper. Do as I say not as I do. This is the paper that we were just printing the create to make imagery on. This is just a cotton rag print making paper, it's really beautiful, really rich. You're looking for papers, generally with print making, you're looking for papers that are a little bit heavier duty, card stock or maybe a little bit thicker. Cotton rag paper is great because it's made, instead of with tree pulp, it's made with cotton rag that's been made into a flat surface. And so this is really nice and archival quality, I use, we use BFK, I believe is the name of this paper. We also have some craft-colored card stock. This is just from French Paper Company, they make a lot of really beautiful cover weight and card stock weight papers that you can print on, they're nice and heavy so they can withstand the weight of that water-based ink. There's a couple of other kind of miscellaneous things that you might be needing during this process. Distilled water comes in handy when you're mixing the photo-sensitive chemicals into that emulsion that we talked about earlier. You need distilled water for this process just because it's completely pure and it's not gonna bring any other elements into the photographic emulsion. We also will need a piece of foam, this is gonna be something that we use when we're doing the exposure process, it's gonna help prevent light from reflecting in where we don't want it. We also have a nice, big sheet of plexiglass, you can use real glass or plexi, either way you just wanna make sure it's brand new and doesn't have scratches on the surface. This is gonna be something that we also use during the development process of our screens. We're gonna lay it on top of our screen to keep everything nice and flat. Okay, so why don't I show you how this little clean up card works? Then I'm gonna have a mess taken away and we're gonna start the process from the beginning. I love these little clean up cards, it helps us save this ink. The ink isn't very expensive but I really like to save as much as I can because this makes the process a lot more economical. I know for a lot of at-home printers it can be a little bit of an investment to get started. The individual materials themselves are not too pricey but I think we all wanna have that waste-not want-not mentality and just make sure that we're saving as much of this for another day of printing. There we go. Erin, I want to reiterate for our students at home that are watching this that these are all materials that are easily accessible, when you purchase a class-- Yes, absolutely. You get the materials list but this is all geared towards doing screen printing from home. Yes, absolutely. So Erin's making it possible for you to pull together all these materials and do this in your basement, your kitchen, any place at home. Yeah, your garage. You could do this in your living room if you needed to. This is really, I want you guys to feel empowered that this is absolutely achievable for you, this is gonna be something that's going to be easy and fun and I'm gonna give you the tools to get started on that. I'm gonna send some of these things away to be cleaned while we get started on the rest of the process. So this process is really fun and it's something that I got into more as hobby at first, I studied fine art printmaking and I learned silk screen as something that I wanted to use just as a kind of creative tool for my business as I was developing patterns for my textile company, this was something that I liked to use as a way to experiment, to try out new designs. And it's really easy to go from your image to a finished product very quickly, which is part of the fun of seeing it develop and come together in a really quick way. Move this over here. Okay. Erin, I do have a question that I wanted to pass along. This is from ChortleSnail who is one of our online viewers. Great name. They're wondering, do you have a sense of how much it would cost to get the materials, just to get yourself all up and running in the beginning? Yeah, there's definitely kits available from companies, and I provide some links to those beginner's kits in this bonus material. You can get started for around $150 to $200, maybe even less if you're willing to kind of do the rough and tumble DIY version of this. And I think that what's really great about silk screen printing is that it really lends itself to accessibility. Depending on the quality of the paper, the ink that you want to use, you can get this in around $ if you're really scrimping. Yeah, and part of what I love about this process is that it lends itself both to products as well as fine art. What I really love is that you see people using this same process to create a huge variety of work and it can go in so many different directions, it's connected to the history of sort of poster art and gig posters, things like that as well as sort of fine art practices. I know Andy Warhol was probably the most famous user of this process in his factory. There's definitely a rich history that we're drawing upon, even going back to Japanese silk screen printing, this is something that's been used with artists for hundreds of years and everyone to the most low-brow to the most high-brow of artists has used this technique for their purposes. It's a really fun thing to learn and to adapt to your style of art making.
Class Materials
Bonus Materials with Purchase
Free Downloads
Ratings and Reviews
Ariadny
Wow, that was a great course. Erin is clear, engaging and encouraging. I would loooove to see a follow up course with her that explores some of the more advanced silk screen printing techniques that she mentions in the last segment. Great job!
Marsha Law
Erin is such an outstanding instructor. She's just so confident with her topic and with her ability to communicate. This class helped me realize that I'm not ready yet to start screen printing, which in my opinion is just as important as recognizing when you are ready to try something.
Ana
Recently got my Creative Pass and I decided to explore the Creativelive library out of my usual fields of interest. Saw the title of the course and I said to myself - what is this? I literally had no idea about Screen Printing and that was actually the main reason I took the class. In just two hours I went from not having a clue to understanding the process and imagining me doing it :)) I'm not sure it will ever happen but I really enjoyed the class. Loved the style of teaching, very calm and confident, as well as the moderator's and students' questions which were filling up the gaps.
Student Work
Related Classes
Mixed Media Art