Lessons
Class Introduction to How to Retouch Portraits Using Lightroom CC
01:46 2Getting Started: Setting Up Lightroom
09:31 3Retouching Blemishes
11:49 4Creating & Saving Adjustment Brush
09:56 5Eyes Selection
19:13 6Retouching Skin
12:15 7Teeth Whitening
03:09 8Comparing Texture & Clarity
03:32Lesson Info
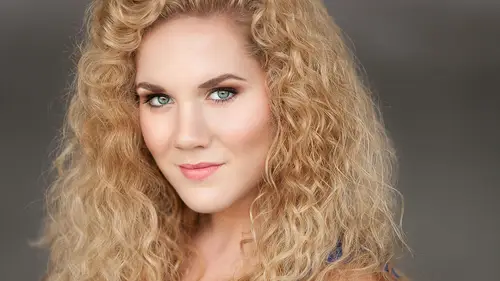
Eyes Selection
I call this the... The Eyes Reloaded section, because it's really going to go a little bit crazy with the eyes. So the first thing that I'm going to do is see if we can get rid of some under-eyes that we've got going on here, okay? So, I have an under-eye brush that I've created. So what it's doing is it's making a bunch of adjustments. So, really quickly, let me just talk about under-eyes in general, and the reason why we need to get rid of them. So, when you are looking at somebody, everybody has a brow bone. And so first off, when you have that brow bone, you're basically casting... There's a shadow underneath it. So the brow bone is casting a shadow underneath, in that area. So that's the first reason why there may be darkness within the orbital eye sockets. The second reason is that the skin underneath the eyes is very, very thin. I was such a geek when it came to biology and stuff like that. I started as a pre-med major, and then I was so dyslexic, I was like, "This is not gonna ...
work out," so I just switched to art. Because I was like, "I can do pictures." But, I'm digressing. So, the skin underneath the eyes is very, very thin. And so what happens is, when blood, I'm not sure if it's oxygenated blood or unoxygenated blood that's blue, but, whenever that blue blood gets underneath that skin, it ends up shining through the skin more in this location, other than the other locations in the body. Because if you look at your veins, you can see the blue of the veins coming through. So, same thing under the eyes. So, what you need to think about is, how do we modify, with a brush, that area, to get rid of those problems? Because, a lot of people think that it's just brightening the area, but there is actually a difference in color in that area as well. That skin, that area is gonna be more blue, and it's gonna be more purple. So those are both tweaks that you also have to make, along with brightening that area as well. So, that's why I've created this brush, is that it's got more modifications than just a brightening brush, for example. We have gone in, we have modified the temp, we've modified the tint. We have increased the exposure and the shadows to brighten those up, but we've also decreased the clarity, if there are any wrinkles, under-eye wrinkles or anything like that. So again, how many modifications are we doing with one brush? One, two, three, four, five. So five different modifications, one brush, and I only have to paint it on once. So this is one of those work-smarter-not-harder situations, right? So let's come on in here and let's look at these under-eyes. I always like to have a little bit of a lower flow, so medium to medium low for my flow. And then I'm just gonna start painting in that brush under the eyes. And that's gonna fix all of the problems. Not just brightening the area. It's gonna fix all of the problems that we just mentioned. Let's look at the difference. We've got our before and our after. Let's make our brush a little bit smaller and get in here and really nitpick. Whoops. And because this flow is, you know, not all the way up, I'm able to build incrementally into the area, and I'm able to build up the brightening so that I do it little by little. Okay, before and after. One brush, okay? That's one of those power-saving tips that I'm trying to talk about, trying to talk about. I don't know how many times I'm gonna say "work smarter, not harder," but that's what I do. So let's move on to our, what did I call this? My Eyes Reloaded. So in this... In this... In this section, what we're gonna do is we're gonna go from this to this, just using our adjustment brushes, okay? What do you guys think? Okay? Cool, so let's start. So the first brush that I kind of want to apply... If for any reason you want to start back at zero, you want to have all of these... You want to have all of these sliders be immediately put at zero, if you double-click the word Effect, it's gonna zero everything out for you, really quickly. So the first thing we're going to do is add sharpness and clarity and de-haze to the eyes. So, let's add some sharpness. Let's add some clarity. And, a little bit of de-haze. Oh, and let's make sure our flow is somewhat high for this first one. So this is kind of like an overall sharpen and pop, okay, so that's our first brush. Simple, but still, looking pretty cool. The next thing we're gonna do is we're gonna add a couple of lashes, and we're gonna fill in a couple of areas where the liner didn't necessarily meet the lash line. So in order to, let's hit H, so we've got an active pin at the moment, but we want to move on and we want to do a new pin with a new adjustment, so let's hit the New button over here. And then I'm going to use my eyeliner dark brush, and I'm gonna make my... My brush size really, really small. Okay, let's increase the feather just a bit. Ooh, that's too big. Let's make our size a little bit smaller. Did you guys think this was possible in Lightroom? When I first did this, when I first did this in Lightroom, I can't remember what version of Lightroom it was, the response time was laughable. It was so slow. I'd paint one lash, and then I'd have to just wait, and wait, and wait for... For the... For Lightroom to catch up to me. Whoops. All right. So the next thing that I'm going to do, that looks good with the lashes. I'm just filling in a couple areas. The next thing I want to do with this same brush is change the settings a little bit. I want to make the brush a little bit bigger, and I want to fill in some of those gaps. Whoa, that's too big. So, but we're gonna bring the flow all the way down so that I build in that effect, slowly. Okay, I'm just darkening some of the areas that are a little bit bright. So right along that lash line, sometimes it's kinda hard to get in there and really get that liner in... Really sneak it in there, right in that line. All right, so let's hide our access points just for a moment so that we can preview the before and the after, okay? Starting to look good. Starting to look good, what do you guys think? Okay. So we added our eye... Our lashes and our liner. We are going to add some shadow. So we're gonna hit New, again, and we're going to choose eye shadow... Eye shadow brown dark. All right, so, let me just zoom in here, you can see what the changes are. And I will talk about this color box in just a moment, but what I'm doing is I'm adding a color to the brush. So I'm modifying the overall temp and tint, I'm darkening it overall, decreasing the clarity, I'm decreasing the native color, and then I'm adding my own color. So that's what this brush is doing. I'm just gonna add this color in here, above the liner. So if you are in a situation where you're like, "Man, this is great, but I don't do makeup every day. "I don't put makeup on myself. "I don't learn about makeup "in any sort of way, day to day," what I would suggest is, next time you hire a makeup artist for a shoot, sit down and ask them to really explain to you why they're doing each specific thing to the model. Because what that's gonna do is it's gonna allow you to kind of see what the makeup artist does, what they're trying to accentuate, what they're trying to mask or pull back, or decrease the appearance of, and all of those things are gonna help you in the long run. Like if she's going to be... If the makeup artist is putting on a certain color of eye shadow onto the model, you could ask them, "Well, why did you choose that color?" And they're gonna tell you why. And so all of that kind of color theory and makeup theory, if you will, is going to be really really helpful with you, especially if you're not somebody who is familiar with putting makeup either on yourself, or on someone else every day. So let's get to the irises now. So that looks good, I'm happy with that eye shadow. Let's get to the irises themselves. So I want to just talk about taking, the importance of taking a reading of your eye, of the eye that you're working on, before you start modifying it or changing it, because I think it's important. If we look at this eye, you can see that there's a hazel ring, or there's a teal ring around the outside, and there's a brown or hazel area on the inside. And there is also a dark rim around the iris as well. So that's three different things going on in this iris. So if you were to take a brush and say, "Oh well she's got green eyes. "Let me just smack green over the entire thing." You're not necessarily going to bring out the true beauty of that iris in all of its uniqueness. So, what I would like to do is apply three different brushes to those three different areas to really, really... That's why I call this the Eyes Reloaded section. We're not just adding one brush to the iris, we're adding three different brushes to the iris, which is really gonna make them pop. So let's go ahead and do that. We'll start in the middle section with my brush light iris teal. No, I'm sorry, light iris hazel. Light iris hazel. And then this brush, I'm going to paint in right here on the inside area. And I'm gonna do the same thing over here. Let me just increase my flow slightly. The next thing I'm going to do, I'm gonna hit New, and now I'm gonna add in that teal area. So light iris teal. Light iris teal. And then the last portion of this section is going to be adding that dark rim. And the adding of the dark rim is really simple. It's just a local adjustment brush with a decreased exposure of point-eight... Of point-eight. So we just zero out our brush by double clicking the word Effect, and then we're gonna pull down to point... To negative zero point-eight five. And then we're going to add that in to just the ring of the eye. Okay. So there is the before and the after of our Eyes Reloaded section, what do you guys think? You think it looks nice? Oh I didn't do her brows. So with the same brush, this darkened exposure, I'm going to lower the flow even more, and I'm just gonna come in here and darken... Yep, I'm on my iris ring. I'm just gonna come in here and darken the brows just a little bit, to give them a little bit of definition. All right, now we can go before and after. So is there anybody in there who was like, "I had no idea that this was all possible in Lightroom. "I thought you'd have to go to Photoshop for all of this." Great, good, because that's what I'm trying to teach you guys. Keep it in Lightroom. Keep in your box, right, what did we say? Keep it in the Lightroom box. (laughs) All right, so, that is the Eyes Reloaded section. I think that this is a good place to maybe ask for some questions, or, you know, any comments if there's anything in the audience. Then, we will move on to our skin section, which is exciting. Could you just describe a little bit more about what the flow actually does right there? I'm pretty new to this, so, I saw you changing it up and down a lot, and I just want to understand what that does. Sure, sure, absolutely. So, talking about what the flow does, it's basically, you've got a hose, right? And the hose has like a gun, nozzle, on it, that allows for different spray types. So, you turn your hose on, and then you have like the mist option. That would be a low flow, because it's not coming out very fast. But, the longer you hold it, the more water is coming out. So the same with the longer you paint, the more that is going to build up in visibility. That's why the lower flow that you use, the more you can build up that effect, and see what looks really nice. If you start everything with a hundred percent flow, then it's gonna very easily have the... Have the option of being way too heavy-handed, way too quickly. So being able to see, as you're working, that effect being built on top of itself, is where the real power of using these tools is. So that's the flow. It's kind of the lower... You know, it's the, it's the fastness in which the effect comes out of the brush. Does that make sense? I wanted to ask about the XMP files. You said that you can save it separately, so I was wondering how you could do it separately if you don't check the automatically saved. Perfect, yeah, so if you don't... If you decide, "Okay, I'm not going to have that checked," what you can do is you can select all of your files that you're working on, then you would go to Metadata, and you would say Save Metadata to Files. Right there, Save Metadata to Files, and that's gonna save them, save all those... That's gonna save out all those XMP files once you're done working, okay? I think this is a custom keyboard shortcut that I've added, command + S, to immediately save all of those things. I don't think by default it's command + S, but there's a way to create custom keyboard shortcuts in Lightroom, and that's what I did to create that keyboard shortcut. But that's where the menu item is. So select all your images, and then Save Metadata to Files is where you would go.
Ratings and Reviews
Laura
Great class, good, clear, easy-to-follow instructions. This is going to have a big impact on my workflow and save me a LOT of time - thank you!
Robin Spencer
Excellent! This program was short and sweet but packed with lots of very useful tips and tricks. I have been using Lightroom for years and still learned so much. All of her time saving tips especially "Sync" were really appreciated. Highly recommend.
JennMercille
As fast as Lightroom is growing and improving, it's a hard to keep up with everything it is capable of. Kristina did a great job of showing how to speed up workflow by retouching in ways that I though you could only do well in Photoshop. This class is super informative and well worth it!