Lesson Info
4. Paper Centerpieces
Lessons
Lesson Info
Paper Centerpieces
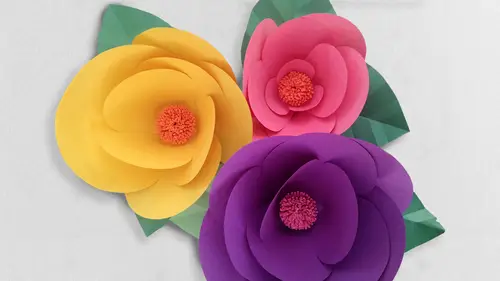
We're going to move on to creating some giant paper floral centerpieces using those beautiful paper flowers that you created in our first session. So in the last session, we'll put together these giant violet colored paper flowers I have brought for everyone a couple of additional flowers to pair with them. So we've got a nice, beautiful sort of peacock colored one and a nice beat purple, and the way that we're going to pull these together is on a round corrugated cardboard base. These are pibe europe I basis cake basis you'll find these used whenever you buy a cake from a bakery, this is usually what is underneath them. You can find them in packs at most any arts and crafts supply store, oftentimes local bakeries will sell them to you ala carte if that's something that you'd like to do, these ones in particular are twelve inches in diameter and they are round you can work with square ones, they also have ones with scalloped edges, but honestly, we're going to be concealing the entire ...
base, so you're really not going to end up seeing any of it. Now. The first thing we're going to do is return to those giant paper leaves that we worked on in our floral making session. Kind of kind of unfold those, and we're going to do a couple of things. The first thing we're going to do is we're going to kind of lay them out and get an idea of how many we might needs to cover up the majority of the base of our plates, and if you can swing it by just doing five that's pretty ideal it's nice to have one extra leaf to add to the center of the center piece, and I'll show you why in just a moment, but when you get an idea of sort of the positioning and placement of how you'd like them splayed around your board, we're going to go ahead and return to our hot glue apply a little bit of hot glue to the end, and I will say this your leaves do not need to go to the very center of your cake plate and completely obscured on ly because your flowers are going to be on top of that, covering a lot of the center. So if you want to position them a little bit further out to the edge of your plates, you're going to get more of them will be visible when the final centerpiece is constructed, so let's, go ahead and just start applying some of those onto our corrugated round cake base. I was sharing with the students a break that I recently put together centerpiece is very similar to this for ah bop mitzvah in los angeles and it was a lot of fun to see dozens of tables with these giant floral centerpieces adorning them and they looked really great and mass so if you are planning an upcoming event party celebration, wedding graduation party these are a fun way to go and the other added thing again like all of our paper flowers, none of them are going to die none of them are gonna wilt and you can send them home with guests as sort of a parting favor a little thank you for attending and you kind of see here how I am spacing out my leaves a little bit I'm not necessarily worried about covering up that entire center portion, but I'm getting them pretty close together rides are we doing everybody good excellence? So now the trick to putting these three flowers together is we really you're sitting at your table you don't necessarily want them all facing up if you're sitting mohr at a regular table height, you want the florals facing out towards you so you get a lovely view of those fluffy pom pom centers so let's start with one and what we're going to do is it's a little bit of trial and error kind of figuring out positioning sometimes the flowers wanna lay in one position a little bit more than they want to lay in another um that you can see how I've positioned it here almost on its side that makes sense all right and what I typically will do as I'll take my hand and I kind of feel under so where it's coming in direct contact with the plates and what that does is that gives me an idea of really where I need to position my hot glue so I'm going to lift it up and I know that this area right here is what was flush with the surface of my stand I'm going to go ahead and apply some hot glue there, apply a generous amount at that contact points and we can always go back in and secure down other portions that might seem like they're a little loose or wobbly go ahead and that guy right down then just hold it in place for a moment while hot glued does dr very quickly because we're doing these at odd angles and there is a little weight at the top of the flower you kind of want to give it a little support for a second while it sets up all right it seems pretty secure at that point, then we want to go in with our second flower and kind of figure out how it might best look leaning up against its friend here so again my little trick but from before once I have in the position I like it I said slipped my hand under to feel where the paper's coming in contact with the cake plate may lift it up and in my case it's right here so I'm going to add a generous amount of glue to that portion and at this point you really can start to see it taking shape on then we have got our third flower contend with and you can see when you're putting these together the benefit of having some of the flowers constructed where they're a little bit tighter together maybe when you created them you you made some of them that they were a little bit more compact these beautiful violent ones that we created in the last session are much more open we're going to cover a lot more space going kind of bus with it here for a moment kind of see what angle I'd like it to be at slipping my hand under to kind of find the contact point all right adds glued to this final fella how are you doing with the angles ladies where you feel like it's coming together enough yeah okay, now there obviously are some gaps and spaces between our flowers and that's where we're going to use some leaves to fill in those spaces I know that we just have that one leaf that we've saved from earlier but if we were doing this at home, obviously you could create a cz many of these as you'd like, you kind of add a little bit of extra dimensions so you can see from the overhead I've got this little hole here. Now, if I'm seated down across, I'm probably my dinner plates, maybe here it's over there, I'm not necessarily getting that bird's eye view that we're getting from our wonderful camera, but if you're standing up and you're walking around the table, you might still see a little bit of that cake plate and that's where you can use some of your leaves to kind of disguise that. And so I think what I'm probably going to do is just take one of my leaves and glue it to one of the back of the flowers at such an angle that it really just kind of covers that up and disguises it, so I had a little bit of hot glue in there and again, the fun thing about these is that no matter the color scheme that you've selected for your particular party or celebration, you can always create paper flowers to correspond with it doesn't matter what the season is, you're always going to be able to make whatever it is you would like all right now. Once you basically have it together, one thing that I would suggest just kind of first sturdiness is go around and find a couple of points where perhaps the pedals of the various flowers come in contact with one another and I had a little bit of glue to secure them together. This is just going to kind of make it a little bit more stationary avoid any potential wobbling back and forth um while it's not going to be handled obviously during the course of your event most likely if your guests are taking it home, you don't want it to fall apart in the car on there ride back to their residents so there I'm going toe secure those couple of believes there and really at this point you're just kind of going around and fussing um making sure everything is secure, I'm going to put a little glue here too would hear the leaf to this adjoining beat purple flower and this is also sort of your time to kind of pick off any of those little hot glue strings that might have spun themselves across your flowers during the course of construction, but you can see how really easily that all came together years you're looking beautiful, I think we could have ah high tea or a little brunch right now and have some very nice decor excellent are they feeling secure to you the way they're coming together, yeah, ok, robert, I found that up. Just a piece of scotch tape, like a cell phone. You just stripped honk, if you I kind of wanted over your words like a magnet to the string. Okay, that's, genius. You're good with the hot glue, their calf. Very nice. That is a wonderful tip, because it is often just unavoidable to get some of those little strings of hot glue and that's, a wonderful trip trip, taking a piece of scotch tape and just sort of swinging it through as a magnet to get all of those so well done. Ladies, I love it.
Class Materials
bonus material with purchase
Ratings and Reviews
user-c468fb
Thank you to Robert for giving me inspiration. The flowers were beautiful and it has motivated me to go out and purchase the supplies to make some of the projects. I feel that his voice was relaxing and he took his time in explaining how to do the projects. I would definitely make these not only for events but for personal use as well. Great job. It's obvious that he has been doing this for some time,
Elle
Excellent class! It was easy to follow along and create the items exactly as demonstrated.
Student Work
Related Classes
Paper Craft Ideas