Shoot: Hibiki Whisky Details
Lesson 11 from: How to Be a Commercial PhotographerRob Grimm, Gary Martin, Aaron Nace
Shoot: Hibiki Whisky Details
Lesson 11 from: How to Be a Commercial PhotographerRob Grimm, Gary Martin, Aaron Nace
Lessons
Day 1
1Photo Shoot for Duratran Backplate
09:13 2Class Introduction
26:47 3Roles in Commercial Photography
33:41 4Breaking into Commercial Photography
23:46 5Establishing Your Brand
16:40 6The Commercial Industry
09:15 7Anatomy of a Photo Shoot
30:08Photo Rep Interview - Lesley Zahara
24:23 9Shoot: Hibiki Whisky Part 1
29:14 10Shoot: Hibiki Whisky Part 2
36:55 11Shoot: Hibiki Whisky Details
23:52 12Shoot: Glass and Fake Ice Part 1
31:25 13Shoot: Glass and Fake Ice Part 2
21:21 14Building your Portfolio
27:39 15Marketing
15:38 16Search Engine Optimization
35:28 17Equipment Overview
37:23 18Working with a Creative Director - w/ Pat Olds
27:26 19Shoot: Beer Bottle Ad
36:27 20Shoot: Beer Bottle Diffusion Trick
27:32 21Shoot: Beer Bottle Star Flare
22:08 22Shoot: Beer Bottle Icy Effect
21:46 23Shoot: Beer Bottle Reflecter Cards
27:06 24Shoot: Beer Glasses
38:01 25Retouching Meeting With Aaron Nace
19:27 26Retouching Hibiki Bottle: Neck
31:42 27Retouching Hibiki Bottle: Label & Sides
30:28 28Retouching Hibiki Bottle: Glass & Bottle
32:28 29Retouching Hibiki Bottle: Label and Adding Back Plate
44:59 30Retouching Beer Ad: Meeting and Set Up
34:41 31Retouching Beer Ad: Adding Glasses
17:39 32Retouching Beer Ad: Beer Body
26:45 33Retouching Beer Ad: Beer Glasses Finishing
38:47 34Retouching Beer Ad: Flares
26:31Day 2
Day 3
Lesson Info
Shoot: Hibiki Whisky Details
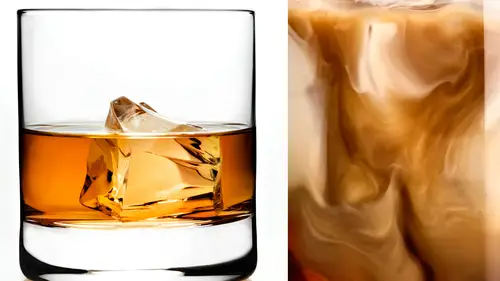
to me, the bottle is looking good. The label, if anything, might be just a skosh hot. But there's full detail in there right now, so I'm gonna maintain it because I can have Aaron push it down in post. One thing you can always do is you can make stuff darker. It's a lot harder to bring detail in something if it's overly dark. So a couple things we've worked on, um, one that neck it's seriously magically disappeared. I wish I had an explanation for you. I can tell you it's the mystery of photography, and that's all there is to it. We've just added this. We find tune this little highlight right there, which I think is really nice. It's giving that facet that really razor sharp thing, which is what I want. So we're gonna go through, we're going to shoot this, and we're gonna then handhold some lights and get some or interest going around in the sides because we need multiple different components to it. So the first thing we're going to do is on the double. Check my focus and make sure I'm...
sharp on that bottle. Then we're going to blow it up 100% and we're gonna look for fingerprints. And this camera shows absolutely everything. If you noticed before, we did have a couple of fingerprints that were showing up on both the bottle and the, uh the glass, you know, we were we wiped it down and we're dealing with with gloves. We still had him. We didn't catch him on. So let's blow this funk her up and take a look at what we got. So this is something I always do. I walk through it and I make sure that I've got fingerprints off Go collect element. I'm sorry. Go up. Go. So you can see you can see all the ripples in the glass If you look at this in this camera is HASA blood is just sick. Um, this is tough on this monitor because it's only 7 20 it rast arises. But you can see the waves that's in the manufacturing of the glass. So retouching with this camera has become a much bigger deal. We've got to make sure that we're dust free. We've got to make sure that we're clean and this camera shows absolutely everything in the world, so we really pay attention to those details? Could be key is really dying right there. I'm gonna want to put a card in there, and we're gonna shoot just for that. I like that. The harsh lights that are coming around the side a little bit we're gonna kind of play with that post. Is that that's a fingerprint, right? Could being Maybe. Okay, it looks like we have a little tiny fingerprint on that edge. And I think you guys Comptel, I'm extremely detail oriented. Um, at the end of the day, like, I think my clients really appreciate that I paid attention to the details. As much as they may feel like it's watching paint dry, they really do appreciate that. We go through everything systematically and make sure it's the best they could be. When I've your home studios, um, we probably would have myself would have Gary. We'd have the client, we'd have a p a. And depending on how many cocktails we have to dio, we might have a drink. Stylist. So, you know, five, maybe six also depends on their budget. How many people? Of course, but probably just find that is really beautiful. down there. Look at that section. I love that glass. What's going on down there right now? It's good. So I think we're good. You look good, Gary. On that. No fingerprints. Yep. Okay, so I'm gonna lock up my mirror because that's super important. I don't want any vibration. You know that the mirror on a two and 1/4 is big, Has a lot of slap. Even though we're locked in on a camera stand, I always lock it up. Just a very important thing for me to do. This is picking up so much. Let's go ahead and pop that, please. And let's mark that as number one would do with silver card. So, Gary, that's gonna be for the entirety of the bottle. That's our main bottle image. Now we're gonna go through we're going to shoot a couple of detail shots. So one of things I'm gonna do right now is I'm gonna get that Beaky Gold toe Pop is right now. It's kind of broken, so that's gonna be just for the neck. I want those golds to pop out on. Didn't quite get it. It's curve this little bit. So what? I did is I cut a card, a white card, sexually silver and one side white on the other. I cut a little semicircle in it so I could get it around that neck so I could get the majority of that gold toe light up pixelated. Yes. At what stage in your evolution did you decide that you needed to go to the medium format camera versus I've always use something really large. I changed from doing four by five cameras with a digital back on it because there are really slow. I was using sliding backs and it just it takes a long time to deal with it. And you have to You can't really look through the camera. You've got a look at a computer to do all you're focusing. If you're not working with the sliding back and it got to the point work, it was just causing me toe lose too much time during the day. I still need a huge back. This is a 40 megapixel. I often shoot with a 16 megapixel back because this stuff we do goes pretty big and we want to be able to shoot billboards. We want to be able to shoot anything that people needs. So I went to the medium format for in a way, for May. It's It's an incredible format. It's also much better because it's closer to the trip. The traditional advertising crop you know, and 1/2 by 11 or 11 by 14 Those air True advertising crops. 35 millimeter. You've got way too much room, top and bottom. It's just 35 millimeters too long of a format, and you wind up losing a lot, and I just don't think well that way. It is probably because I started on for about five and eight by cameras, where you truly have an eight by 10 crop. I mean, that's that's pretty typical for advertising. So to me, the medium format, it offers a much higher resolution. You're talking 60 megapixels. You can even go higher than that. The lenses air crazy. I mean HASA blonde lenses. I joke that you can read your DNA when you leave a fingerprint on there. You can read your day, and I often it's probably not far from the truth. I mean, it's incredible. What the what the glass see? So for me, a medium format and hostile blood in particular was just the answer for me. I Let's mark that for for the Neckar. Gary. Okay. Okay. So I put that card in there just because I wanted to get that gold tone starting to wrap around, actually really pretty coming around that edge. I'm also good now a little bit and go back. One image. Scroll it down. Just a hair in post I might have. That's starting to pick up a little bit of white. The white is obviously reflecting into that gold, and it's changing its tone. Go now, go advanced. One more. You see that gold tone? To me, that's really pretty. I'm have Aaron pick up that tone and convert the other one with the white card into that because it's gonna look a lot nicer unless we dio we've got gold card to Let's actually see what happens if we try it with a gold. Sometimes you can reflect gold into it, and it looks really good, and sometimes it croaks, and then just it goes in the wrong direction. Let's see if this will do it. Who? Oh, that's way prettier, isn't it? So what is this computer. I think that really hot way 10 my God. Night day. All right, there. Little different. You're right. So let me judge it off with this computer. It's a little bit more accurate on texted, confusing. Wow. Who? Okay, that is No overseeing. We're actually good. I don't think gold's changing it that much. You a little bit. Let's put up now. Okay. So in comparing it on the computer, that's a little bit better calibrated. I'm seeing that the color is not as drastic is what I'm seeing up there. But I still want to go after this gold anyway, So I'm gonna cut a little section. I do this all the time in my studio. I just let things fall on the floor. Um, we go back to clean it up later. It's all right now. The gold, the gold cards. A little bit difficult to work with because it doesn't light up the same. It doesn't light up evenly the way a white car does. So I may have to go after this in a couple of different sections. Well, that's pretty again. Am I looking at the right color? I'm not looking at the right color? Not quite. It's a lot more. No, it's totally white. Okay, stop that goal. That's good. That's something. That's what we're going for. Okay, Interesting. So I'm looking at his big monitor, and the color is really kind of. It's off enough where I'm being fooled so and going back and looking at this, the white is actually the best. That's that's a little hard to tell from. So we've gone and we've shot for the base of the bottle we've shot for the Neckar. Um, let's take a look at the base bottle. I wanted to see what 12 looks like on him. Wiki down here. Okay, so that size down a little bit, let's get a little light in there. So again, I want to bring out the golds and make sure that they reflect well on right now. 12 the two is good, but the one is kind of broken. See the difference. Go back one. Gary. Well, I often do this by hand. Like I I don't mount the card and do all that. It takes too long. That's nice. Okay, so that file is for the two to back is for the one Okay, so that's for two years of age one and the other one's for two years, right? So, again, that's an important part of the branding message this age 12 years. This is really important to them. So I want to get that glowing nicer. I really want to be able to bring that out in post. So that's what we're doing right there. Okay, And what I'm doing now is I'm just double checking that this bamboo, whatever this is on this right side is not reflective. It's not. It's just it's printed. It's a lighter tone, but it's not a reflective property. So I'm not gonna hold a card in and the way I am on the 12 it's not gonna glow like that. It's just cause it's a reflect its not a reflective You got a question you're wearing black. Do you have everyone in the studio where black I like Black Black is a really good thing for a photographer to wear, and it really helps diminish reflection. No, I don't force people to wear stuff, but if if I'm seeing them, they got a back off Absolutely valid question with all the mirrored stuff in the reflective stuff we dio that that could be an issue. Okay, so now I'm gonna I'm gonna go a little bit. Uh, handheld. I like what's going on with the bottle, but it's you know, what was going on down here was kind of nice, but I'm missing getting some of the fast it's going on, so I'm actually gonna pull head off and I'm gonna go for specific spots. Try that. That's not what I'm going for. I'm going for this side, right? And that's still a little hot. So they're please there and there. Here's three. Back to back present. Three back was better. Was it? So I didn't come around so that please who That's got some interest to me. It's a little hot down here, but I like the direction that is going, and it feels like it's going to start to fit in that background, getting a little bit of of light. And what I'm doing is I'm just holding in this in there. It's really hard to see what the key knows, but I'm just trying to feather that light and it's a little much, a little hard, so I'm gonna grab some diffusion. One of the great things about having sawhorses as your set. There's always a shelf mind. So is filled with stuff because I want diffusion at the ready. I want a gold card at the ready. It's really using to put it right down there. So I'm always building sets that have a little bit of that. Have a sawhorse with it, and then I can easily grab stuff they're please, better for the most part, Yeah, we're just getting a little bit of a black. I'm in the middle, but in the middle of it is better. It's considered, that is, that's I'm not gonna get rid of this. That's because there is actually and the boss on the back of the bottle where that back label is. So it's not gonna go away completely. I can have that worked on a little bit in retouching. But no matter what I do with light right now, it's not gonna It's not gonna change. That boss question had come up from M. Bo, who is from Germany, who asked, Are the glass ripples going to be retouched and smooth out in the post processing stage up here? Well, I'm thinking just that ambo means the whole bottle in general. Are you going to smooth out those ripples? Are you tryingto accentuate them even more? Because that's what makes the bottle different. Know the facets I want. So all these sides, I definitely want to highlight them. So we're gonna work on that opposed to Actually, we're gonna kind of push the curves a little bit, overlay them a little bit. We're gonna get those those facets to come out the ripples and the defects that we're seeing up in the in the cap that I don't want to see So that stuff will probably smooth out. But these these individual facets are really important. And there's there's a story behind each one of them. I think it's 30 fast. It's on this bottle, and they all have some sort of meaning to the hip Beaky brand. So it's really important that they actually come out, which is why I'm just kind of getting that little bit highlight, which we may pick up that highlight and step and repeat it on the next to fat. We probably will be nice to have it just kind of repeating a little bit So you see those highlights going on and we could sit here and we could move the light and go each time. That's gonna take a good amount of time to do that. It's faster and effectively, more cost effective if we just pick it up and we move it in post. I know that's counterintuitive to what I said. Don't do it. Imposed to it in camera, but does truth and everything, right? All right. So I feel a little bit better about that side. And now we need to go over to the opposite side and do the same thing and see what we get. Get some extra fast. It's coming up. And then I feel like we're in a good place where we can go ahead and we can try to make this glass thing, which we need to do. Is that thing's going to be interesting? Try that, please. Okay, Papa, that are still a little high backs a little whiter than the other one. It's so what I'm doing right now. As I'm sitting here waving this, I'm seeing how it's affecting the glass. What I want to do is find a place. I think it's gonna feather nicely. It's really hard to tell what his facets are gonna dio. Second, I just had it with top. So in here, there's just a highlight at the top right now. Do that. Try there for me. All right. There. Do. That's good, Louis. That's nice to one world. We soften that up. Yeah, it's good. Come in with that. So, one of the other things that I dio, you know, obviously, I'm doing this kind of free, free handed freeform, not putting everything on standing, moving quickly. I'm using the assets of digital photography where I could move quickly and I can, and I could grab things. I work in a systematic way where I'm very conscious of where I'm holding the light right now. So if I like it, I can try to improve on a little bit if it messes up and I go back. So I definitely try to keep in mind where him with stuff as I move through the process. Okay, try that. If we get more more on the side, try without all right, I'm a try. One more spot. Try to get some up in that top edge. We'll see if we give us anything. Try there. Please. Way to try that, Gary. That's got some interest on a couple of those facets. Let's try to feather that a little bit more. Right? So I'm really fighting. The key knows right now I'm really trying to look and see where my model, uh, try that. And for that? No. Okay, I'm not digging or that was going. So I want to stop, take a look at where iwas or have been on and make a decision from there. Another reason why I go slow. You can see how I work myself in these sets. And I got cords around me. If I don't go slow, I'm gonna trip. I'm gonna break something for sure. Who? You know, there's some stuff we could definitely work with. Women, That is That's beautiful. Mark that this one? Yeah, definitely. Did you get that? One of everyone? Well, there we go. That's one that we really liked. OK, And the one before it, which was a little harder. Okay. I like it. All right. Good. I feel comfortable where we are with this bottle. I've got enough components where we can really make a pretty bottle from there. So now we're gonna try to make that glass sing. So acrylic ice. Um, this has this has to go on a drink? There's just no toys around it, Um, realize we can. We do put in there. Sometimes we do work with it. It's a nightmare because things constantly shifting Move. If you look at some of our shots on the Web site, there's like mojitos. And there's, you know, there's spearmint that's down in the drink, and it's perfectly placed in there. If we were really using realize it wouldn't work, it would be constantly moving. The food styles were actually glue. That meant using something called JetBlue, which is a waterproof glue. She'll glue it to the ice or glued to the inside the glass, and then we can put everything in there. We can pour the drink in and it won't go away. Won't flop. It won't float up. So that's one of the tricks that we used or to make it work that's looking pretty bottles looking good, like I'm kind of digging that I'm even digging some of the highlight on the on the right side. Some of that's not bad
Class Materials
Bonus Materials with Purchase
Free Bonus Materials
Ratings and Reviews
Totoo G
I have gratefully been watching this tutorial for free online, and as always CreativeLIVE has done an awesome job in bringing one of the best instructors of the trade and his creative team to help us improve and enjoy a higher level of understanding and performance in the skills we would like to achieve. I am humbled as always and ever so grateful. I would love to purchase the course myself, but since I live abroad, it is practically impossible, I hope those who can, would. I would just like to add one of the most interesting things I have learnt from this course is the careful attention these guys are paying to minute details and the amount of patience it takes to achieve their goals in each project. Stay inspiring, Totoo in China
Ivan
Outstanding course! I'm a former creative director, now photographer full time and have had the unique experience working with studio photographers for commercial products in the past. This course is right on and very close to my experiences, and now that I'm behind the camera, it's nice to see some of those trade secrets revealed. Commercial work is fussy and you often have to sweat the details, but the results can be astonishing and rewarding. Rob and Gary do an excellent job explaining the ins and outs, without any pretention or hold-back on secrets. Something that's always annoyed me in the past, photographers never liked revealing their process. It's great fun watching Rob and Gary work a shoot, and Aaron Nace is beyond amazing in his retouching skills. I don't expect to break into this field, but I wanted to learn how things are done, for my own personal projects. I particularly enjoyed learning how they get the look of ice, ice crystals, and frost on the sides of glass bottles. I purchased several items from Trengrove, as they suggested. Their acrylic products are not cheap, but the quality is amazing and I'm very pleased and looking forward to experimenting. Thanks to all at Creative Live, RGG studios and Aaron Nace for this presentation.
Doors of Imagination Photography
This course is outstanding. I would consider it an advanced level. Having a good understanding of the technical aspects of photography and lighting is recommended. Rob Grimm takes you into two real product shoots. These were not canned demonstrations, but the real thing including working to get the lighting setup just right. The postproduction section with Aaron Nace was enlightening. This does require a good preliminary understanding of Photoshop. It was amazing to watch them build the final images for the client in real time. This is by far my favorite course to date.