Photo Shoot for Duratran Backplate
Lesson 1 from: How to Be a Commercial PhotographerRob Grimm, Gary Martin, Aaron Nace
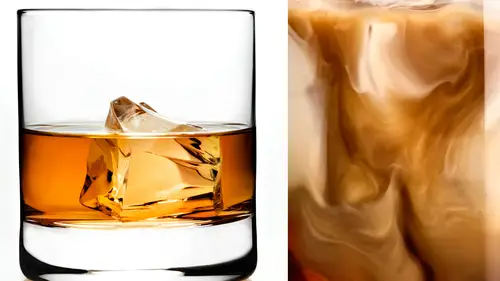
Photo Shoot for Duratran Backplate
Lesson 1 from: How to Be a Commercial PhotographerRob Grimm, Gary Martin, Aaron Nace
Lessons
Day 1
1Photo Shoot for Duratran Backplate
09:13 2Class Introduction
26:47 3Roles in Commercial Photography
33:41 4Breaking into Commercial Photography
23:46 5Establishing Your Brand
16:40 6The Commercial Industry
09:15 7Anatomy of a Photo Shoot
30:08Photo Rep Interview - Lesley Zahara
24:23 9Shoot: Hibiki Whisky Part 1
29:14 10Shoot: Hibiki Whisky Part 2
36:55 11Shoot: Hibiki Whisky Details
23:52 12Shoot: Glass and Fake Ice Part 1
31:25 13Shoot: Glass and Fake Ice Part 2
21:21 14Building your Portfolio
27:39 15Marketing
15:38 16Search Engine Optimization
35:28 17Equipment Overview
37:23 18Working with a Creative Director - w/ Pat Olds
27:26 19Shoot: Beer Bottle Ad
36:27 20Shoot: Beer Bottle Diffusion Trick
27:32 21Shoot: Beer Bottle Star Flare
22:08 22Shoot: Beer Bottle Icy Effect
21:46 23Shoot: Beer Bottle Reflecter Cards
27:06 24Shoot: Beer Glasses
38:01 25Retouching Meeting With Aaron Nace
19:27 26Retouching Hibiki Bottle: Neck
31:42 27Retouching Hibiki Bottle: Label & Sides
30:28 28Retouching Hibiki Bottle: Glass & Bottle
32:28 29Retouching Hibiki Bottle: Label and Adding Back Plate
44:59 30Retouching Beer Ad: Meeting and Set Up
34:41 31Retouching Beer Ad: Adding Glasses
17:39 32Retouching Beer Ad: Beer Body
26:45 33Retouching Beer Ad: Beer Glasses Finishing
38:47 34Retouching Beer Ad: Flares
26:31Day 2
Day 3
Lesson Info
Photo Shoot for Duratran Backplate
Hey guys, my name is gary barton and I am the studio project manager of rg photo could find us online at rg photo dot com you can follow us on twitter at rg photo today I will be going over our new light pad kit that we got from being h photo we recently invested in the canon c one hundred and we're recording to the external recorder out of most ninja progress for two two what we found this camera has a fantastic sensitivity toe low light it does phenomenally well s so what we kind of decided that we needed was a light pad kid that was very broad sourced that we could hide small lights on location that would also leave a very small footprint on any production that we went into because we typically operate pretty small crews so when we heard that roscoe made a light pad kid especially that was daylight balanced were very curious so after a little bit more research we found that the gaffer uh collection of lights that roscoe makes it was gonna be the right for solution for us now in the ...
kit itself there are twelve total lights all from twelve by twelve six bite twelve six by six we have a three by twelve strip light wei have uh one of the small sites the three by six and then the smallest light is this three inch uh daylight balanced circle uh this itself is actually a light pretty cool just plug it in and boom there it is so each of these lights you get two of the lights in the package itself the box that comes in is actually a pelican case there's three levels has all of your grip here needed for every one of these lights has all your electricity has the battery adapter as well you might want to get a couple more of these you can buy these separately at being h photos well, if you plan on going on location it comes with one dimmer switch if you don't want to light all the way up, you could turn it down and monitor it that way you can't monitor sensitivity the brightness of these lights on the lights themselves so you have to work with a dimmer so each one of these size lights comes with eight gels and that is you know everything from your cto to your beauty diffusion to your you know minus greens to just your wife diffusion and they also come with the full spotland sze if you don't want a broad source of light and you wantto magnify it almost and have more of a directional light especially if you want to add a grid to it, all of the lights come with grids and the full spot lends adapter as well so you'll notice I have one light right here it works with your standard knuckle uh, with grip here that you have in your studio, we use a lot of c stands lot of avenger and man photo equipment, so it already pairs well with that don't have to buy additional stuff as well. You can use stuff like velcro if you want to velcro this to the top of a car if you want to do an interview again, these are very low profile lights, so the beauty about these lights too is we're going to be using them both for photo and video. They're going to be good for both when we're on location, doing food gives us a nice, broad source of light. It mimics that sunlight of us operating and shooting right near a sunny window. Um and to you know, this is going to be great for video. We're doing a lot more with video interviews, mohr, editorial based stuff, a lot of commercial stuff on location on dh we have a need for a lighting kit that we could take with us again, leave a small footprint and really play with, you know, put these lights everywhere on kind of hide him as we see fit depending on the job, so tonight I'm gonna take you on location, we are shooting the back plate, it's going to be a dirt trains they were going to use for a japanese whiskey photo shoot so we're going down to blood and sand tonight in st louis I looked them up they're fantastic restaurant on we're gonna be shooting the back plate of um kind of a bar scene of people out of focus a little bit blurred um so we're going to see how that goes so come along with us and I'll pick you up from there okay so here we are it's midnight we're downtown at a restaurant that just closed in st louis called blood and sand we've hired a bunch of models just to kind of come out hang at the bar and just kind of be social and the idea is behind this japanese whiskey shoot is there's a lot of people in the backgrounds dim lit it's a darker bar on we're going to make a back plate and then turn that into dirt trans and then superimpose just photoshopped the hubby key whiskey bottle of japanese whiskey we're going photo shoot that in the studio and then we're gonna put a shop that I have are re toucher put that in the environment this is great because we don't have to bring all of our lights and oliver gear down to this bar this is leaving a smaller footprint on it it's a much easier way to produce something since shooting a bottle you know we'll take ours we're in and out of this bar within one hour, once we started shooting were set up to g o the only thing we used, as you see, here are two two lights led. Plugged into one outlet. He's in a very minimal amount of power. We use one three by six and six by six. And the entire thing took us. You know, not more than an hour. We're in and out. We did everything on thirty five millimeter. Five d mark three way. We shot everything on the fifty millimeter. One point two and our s o wass. I believe at six. Forty the entire time we're half eight and we had a two second exposure. We just wrapped our shoot tonight using the axiom. Lightpath hit from roscoe. Daylight balanced. As you saw in the b roll footage. We only used three by six and the six by six light had that seemed to be enough for everything that we needed to do quite a bit more powerful than we thought actually had used the dimmer switch for most of the shots themselves. So while we had twelve lights while we thought this was a completely dark scenario, a dark setting, we only use two lights, actually, so there are quite a bit more powerful than we thought. So uh if you're thinking about getting a light pad kid you're thinking about investing in a kit for on location or in studio this seems to be a pretty good so let's take it back to the studio to pick it up from there. Okay guys so last night we used the daylight balanced roscoe light pad kit that we got from being h photo overall I thought it was a fantastic kid tohave for this still photo shoot that we did very easy to set up one person could run all the lights the electricity was easy to handle you don't have to worry about having heavy duty electric you have to worry about these lights getting hot whatsoever and that's great because I hate wearing gloves on and I burned myself quite a few times on finals which is a pain in the ass. So er again from what I thought I thought we were gonna need maur light pads in the setting but we actually used to of the smallest light pads that are in the kit themselves so thoroughly impressed we have a ton of lights in this very compact pelican roller case that we could set up just about anywhere for any shoot anytime um impressed with the gels that came with it we did use um the ceo's toe warm up the environment a little bit because it was so dark so that was a big help um so again, we shot the back plate part one of a new image that we're doing for a high end japanese whiskey, and that back plate is going to be printed out into what's called the dirt trans, and we're going to use that door a trans coming up in one of our workshops that we're doing on creative live november seventh, eighth and nine s o if you want to see us, take that door, a trans on dh, create the final image, we're going to be shooting a whiskey bottle and aaron nace from flirting is going to be showing you how to photo shop on object into an environment onto a different table. So if you want teo, join in, uh, roll now, it's, frito watch, november seventh, eighth and ninth we're going to be taking two concepts on bringing those images to life with the korean director from this is fusion marketing so again and roll now you rg photo dot com slash workshops can also go to creative live and enrolled there. Um, and we hope to see they're so november seventh, eighth and ninth. Make sure to follow us at rg photo and don't forget to follow at f stoppers.
Class Materials
Bonus Materials with Purchase
Free Bonus Materials
Ratings and Reviews
Totoo
I have gratefully been watching this tutorial for free online, and as always CreativeLIVE has done an awesome job in bringing one of the best instructors of the trade and his creative team to help us improve and enjoy a higher level of understanding and performance in the skills we would like to achieve. I am humbled as always and ever so grateful. I would love to purchase the course myself, but since I live abroad, it is practically impossible, I hope those who can, would. I would just like to add one of the most interesting things I have learnt from this course is the careful attention these guys are paying to minute details and the amount of patience it takes to achieve their goals in each project. Stay inspiring, Totoo in China
Ivan
Outstanding course! I'm a former creative director, now photographer full time and have had the unique experience working with studio photographers for commercial products in the past. This course is right on and very close to my experiences, and now that I'm behind the camera, it's nice to see some of those trade secrets revealed. Commercial work is fussy and you often have to sweat the details, but the results can be astonishing and rewarding. Rob and Gary do an excellent job explaining the ins and outs, without any pretention or hold-back on secrets. Something that's always annoyed me in the past, photographers never liked revealing their process. It's great fun watching Rob and Gary work a shoot, and Aaron Nace is beyond amazing in his retouching skills. I don't expect to break into this field, but I wanted to learn how things are done, for my own personal projects. I particularly enjoyed learning how they get the look of ice, ice crystals, and frost on the sides of glass bottles. I purchased several items from Trengrove, as they suggested. Their acrylic products are not cheap, but the quality is amazing and I'm very pleased and looking forward to experimenting. Thanks to all at Creative Live, RGG studios and Aaron Nace for this presentation.
Doors of Imagination Photography
This course is outstanding. I would consider it an advanced level. Having a good understanding of the technical aspects of photography and lighting is recommended. Rob Grimm takes you into two real product shoots. These were not canned demonstrations, but the real thing including working to get the lighting setup just right. The postproduction section with Aaron Nace was enlightening. This does require a good preliminary understanding of Photoshop. It was amazing to watch them build the final images for the client in real time. This is by far my favorite course to date.