Lesson Info
7. Extracting The Subject
Lessons
Lesson Info
Extracting The Subject
So they're there, and we'll just bring these into Photoshop. So, I know the last one was good, so I'm just gonna, hopefully, bring it into Photoshop, and I'm also using a Mac today, which I am a PC user, so I'm gonna find my Photoshop. And I'm just gonna pull this off to the side, 'cause I'm used to dragging it in. Maybe, there we go. Can I just drag from here? Yeah. Yep, it worked. So again, the beauty of green screen extraction is the fact that I can quickly press a button, and it'll extract 'em. Typically in Lightroom, I would have cropped in a little bit of this edge here, but it should still find that. So I'm gonna hit, for my action, I have my action program to a quick key. And this is an action I've developed, but it is just a, basically it goes through and finds the green, takes out the cast, highlights different things. There's a whole bunch of different options it goes through. It's probably a 100-step thing that it does. But you can see, look at it. It's just done. I did...
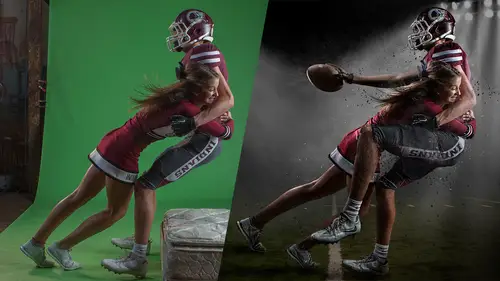
n't have to press any buttons but a single button for an action. So it quickly extracts your subject from the background. And you can see there's no green spill. If I have a couple layers here, you can see what it did. I can shut off my green spill colors, and I didn't have a whole lot of green spill on her in the first place. Let me zoom in. So you can see a little bit of green spill here, now that I've shut that off, but I turn that back on, pretty much goes away, it's not there. So let's put her in that background. So I'm gonna open up that background, find that on my desktop. There we go, all right perfect. And so she is with the tutu, so I'm gonna shut off, this is all a layered template, so I'm gonna shut off the basketballs here and just turn on a ballet bar. That's kind of a bunch of great options with this. But then I am going to drag her into the scene, which for her, I have all three of these layers, so I'm gonna make sure all these layers go with it, 'cause one's a green cast and one's another color option and different things, and drop her into it and then scale her. And if she was just in the foreground there, she's gonna fit very well right away, and I can make her go further in the background if I just scale her a little bit more. So you can see, she fits very well already, right? No? Oops, let's see. I'm working on the commands for a Mac. And hold shift down and move. There we go. Put her a little bit further into the scene. The only thing, when I put her a little bit further in the scene, I have to start thinking about shadows. Shadows are more into the Photoshop stuff, but a quick easy tip for shadows is, I'm gonna make a new layer, put it slightly behind her, and close this out. Maybe not, there we go. And then we hit b for my brush tool. Make it a little bit larger, about the size of her ankle, hit two, it'll go to 20% on opacity. Make sure black's in my foreground, and I can use my Wacom Pen. You can kinda see a little bit of my Wacom Pen. It was working before I started this class. (laughs) We are not using my Wacom Pen. So, Wacom Pens are great in being able to draw, but you can kinda see how I just extended this little shadow out there using about a 20% brush, and it was just about that easy. She fits in the scene, looks like she belongs, either by zooming her in. It's a little bit, on this screen, it's a little bit contrasty compared to the background, but on the computer and when it prints, I'm calibrated here. I'm not calibrated to this screen here, but she fits perfectly as far as lighting-wise and things like that. Let's do another one quick here. So let's do this closeup here just, again, to see how easy it is to put into something here. There we go. And there we got a little bit of highlight, a little bit of shadow, but that could easily be just cropped off a little bit here. And then I'm gonna hit my quick key, or if it's very important to have a perfect extraction, I'm gonna add a couple steps to this. I'm gonna have it paused so that I can perfectly make sure it goes into her hair and stuff like that. So I could run it through automatically and have no stops, or if I hit a slightly different action of mine. Again, these are all actions I've created to help in my assistance of extracting people, make it easy and simple for my life. Oh, I hit too many buttons. One more time I'm gonna do that. This is the quick one. You can see there was absolutely no stops, and gonna zoom in close. It did a really good job without have any stops. If you wanted to have a few more options for doing that, I could just hit function + F12. So it would stop here, and just in case your green screen is a different color, it gives you the option to pick the exact green screen color. 'Cause again, some of you saw the variance in the different green screens. And then it goes into select a mask, which is all hosted through Photoshop, and this allows me to go in and use this, I call it, it's a refine edge tool, and say look a little bit closer here, Photoshop. And I just indicate where it should look a little bit closer at. Maybe down in here or something like that, where there's a couple little tinges of green. And I would just spend a couple seconds running my brush up along those areas, and then once I was done, I would just hit okay. And all of the settings are set already in this action. And you can see a little bit coming up from underneath her arm in this one, but if it goes okay it'll run it through the extraction, and should remove a lot of that, well. Yeah, a lot of that green cast in there, you can see it up there. But it's a little bit brighter, again, on these screens. That one's a little bit better there. Easily able to extract my subject there. Let's put her in one of those other scenes. What do we have left? Not a lot of time, and I wanna get some questions in here, so one more scene here. Let's see, how do I get out of this? There we go. Let's go with that first one. The first one we had was the locker room template. Okay, we haven't done that one yet. Or is it the scoreboard one? Let's do the scoreboard one. Which one you got? Locker room or scoreboard? Scoreboard. Scoreboard? All right, so I'm gonna crop this in just a little bit tighter. I did get some nice shadows on that. I was busy instructing and not paying attention to my background as much as I should've. I should've scooted that main light. Just as he was setting up, I didn't tell him how far back to put it, so it was your fault. (laughs) (audience laughs) I'm gonna hit that function + shift. Let's see, I'm gonna hit function + F12 here, and it's gonna bring up a couple stops, just 'cause I have that in there. And so it gives me the chance to go in and say don't grab this. Maybe if I'm holding the right button down, but it's different buttons on a Mac. I'm gonna scribble that out here quick and then hit continue. So extracts her and then puts her into an awesome background, which would be, let's see, score. So with the score, I'm gonna put her right inside where it says insert subject here and grab all of hers, and drag 'em into the template and position her where it goes. I can shut off those other basketballs if I don't need 'em in there. And then I would just work on either drawing shadows or making her a little bit bigger, and cutting off her, oops. Making her a little bit wider, not that wide. I'm joking. Holding shift down and just bringing into edges here. This is actually not the one. I think I had one where it's a little bit more light in her, but with this, see how she looks there. She looks pretty cool on that background, right, right away? There's also a bunch of add-ons to these templates that help tone your subjects and different things like that, but, again, that's more Photoshop. I just wanna show you how to photograph your subject on green screen so that you can easily extract 'em and slide 'em into different backgrounds and templates and different things like that. If you're looking for ease and if you're just starting off, again, those actions are gonna work really well for ya as far as extracting, and then start off with some templates, some things like that, so you kinda build your vocabulary and your ease of working in Photoshop, your comfortability, or however you say that word. (laughs) All right, so a few other things. I might go back to my PowerPoint real quick and just wrap up here. We went through a couple of backgrounds, show you how easy it is. I wanna give a big thanks go gomolight.com, where I use those lights we used in-studio today. I had a QT600II studio strobes. And we did extracting, and this is my extraction action. It's something I created. It has a bunch of different features as far as for blue screen and green screen and using in Lightroom and all kinds of different tutorials with that and stuff like that, if you want some more help with green screen. However, hopefully I went over enough stuff with you today that you're very comfortable with it and kind of have a great basic understanding of everything. If you're interested, I do have my locker room template. It's on my gamechangers.shirkphotography.com. It's my photographer site. I have lots of different backgrounds and templates there, but I'm giving you guys a gift of $50 off using the code CL50 if you wanna start incorporating these into your own background, or using backgrounds to add subjects to and things like that. This is very cool as far as you can add the subjects' jerseys, even, into the backgrounds and put different words in the backgrounds and all that kinda stuff, too. Change colors. Again, Green Screen Extraction Action, too. I also have a discount for that, CL50, the same thing to get $50 off that Extraction Action and all the things that come with it. So, here is my slide. Obviously didn't have enough room on this thing, but shirkphotography.com is my main website. I also have gamechangers.shirkphotography.com, has a bunch of stuff for photographers. And then Facebook is @ShirkPhotography, and same for Instagram, as @ShirkPhotography. So follow my work on there. See all the composites and cool stuff I'm creating for my seniors and different athletes and subjects. Do a lot of, a big variety as you saw, of different subjects.
Class Materials
Bonus Materials with Purchase
Ratings and Reviews
a Creativelive Student
In this class I teach the first and most important thing when it comes to making good composites - lighting (both subject and green screen). This is not a photoshop class although I do give a quick demo at the end to illustrate my purpose of using green screen and the ease of adding a subject to a scene if they are lit correctly. The main purpose of using a green screen is because there are actions and plug-ins that make extracting super fast and easy. If you enjoy spending time manually extracting your subject then you can ignore the green screen part and shoot on any background as long as you remember the tips I give you for lighting your subject properly. Hope you enjoy!
a Creativelive Student
Ben is an amazing photographer that is highly creative. Not sure this course fully reflects what his images convey to his clients. The course seemed rushed but did get to key basics for green screening. While typically I don't like when instructors promote their products, his extraction action is solid. Definitely worth the discount if you want to be able to systematically process volume. I think if you are beginning in composite photography that Joel Grimes and Ben Shirk can definitely give you the knowledge needed to be successful.
Luc Hourriez
Ben Shirk is for me the best in his field, a source of inspiration for years besides for 2 years I come to the WPPI to see it A mentor for me and these techniques are just magical and bluffing! Many thanks to him and creatrivelive for this course I had already buy his action PS for a few years :) and fully satisfied, this course is perfect to understand and master the technique
Student Work
Related Classes
Studio Lighting